
Hello friends...
It's Monday, which means it's time for the brand new Simon Says Stamp Monday Challenge to begin and this week we want you to join us and create ~ ANYTHING BUT A CARD!
It's entirely up to you what to make, home decor pieces, journal pages, tags or gift bags ~ the list is endless but for one week only, it can't be a card! So get your thinking caps on and we can't wait to see what ideas you come up with and hope you'll play along!
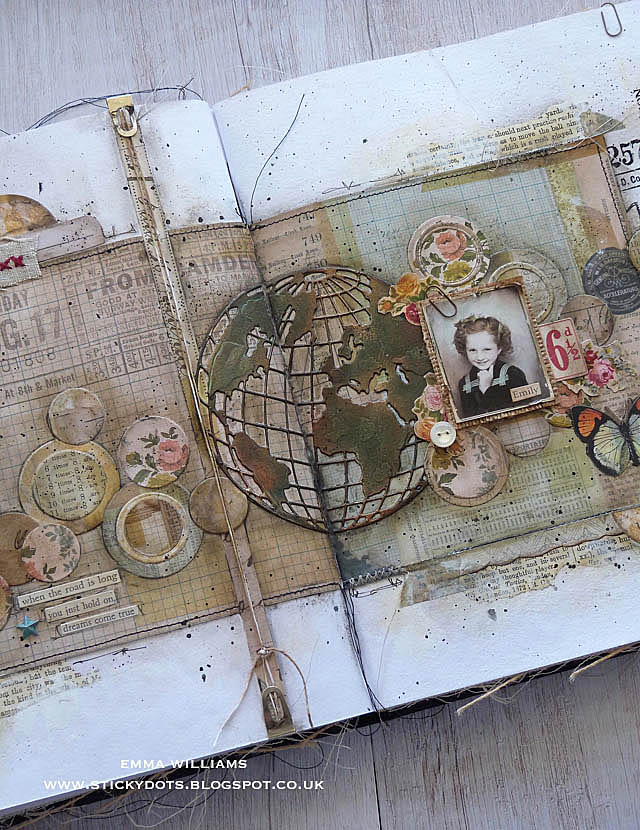
For my project, I chose to created a vintage style journal layout. This project actually inspired by a craft room clear out! I had so many little offcuts of paper from my Tim Holtz paper stashes and it just seemed crazy to throw them away but I couldn't think what to do with them until the lightbulb switched on in my head ~ a collage layout with lots of tiny circles cascading across the page and I had the perfect die in mind to create all these layered pieces, the fabulous Stacked Circles die from the Chapter 2 release!


So, let's get started because it's time to share all the details of how I created my journal layout...


I'm working in the Dina Wakley Media Journal, which is 8" x 10" in size and has a unique variety of surfaces to work on but I chose to create a layout that would go across two of the white cotton pages in the book.
I began by taking two 6" x 6" pieces of paper from the Memoranda paper stash and after machine stitching a border around three of the edges of each piece so that they are mirror images when placed side by side ~ this will then create one continuous page of paper once I adhere it onto my journal. Which is exactly what I did next, using Matte Collage Medium to attach each piece over the top of some Collage Paper that you can just see popping out, down either side of the pages. I then sealed the pages with another layer of medium.
Whilst allowing for the medium to dry, I cut a piece of black card using the large Tim Holtz Globe die from my stash. I think most TH Addicts will have this die in their collection but if not, you can also use the Destination Thinlits die!

To create the metallic patina that you can see on the die cut, I used a selection of Alchemy Gilding Waxes ~ Bronze Age, Vintage Gold, Red Amber and Lucky Emerald and just lightly applied the waxes over the top of the die cut, blending them together to create the look of bronze. Once I was happy with the finish, I then cut my globe, making the cut roughly about 1/3rd of the way from the left to create two separate pieces which I then adhered onto my journal page, placing them across the opening of the book.
Now for those paper circles that cascade across the pages...
 ...obviously for these, I used a selection of Tim Holtz papers, some from the Memoranda stash and some from the Worn Wallpaper set and just cut as many circles as I needed. I also cut some frames by placing one smaller circular die inside a larger die which will give me the frame I need. I then just adhered all these circles to cascade across the project, placing them either side of the globe die cut and just basically layering some over the top of one another to create areas of interest and also using some of the die cut frames to layer over the solid pieces.

Once all my circles were in place, and no matter how many times I thought I had enough ~ I still needed a few more, I then gave everything a coat of Matte Collage Medium and after allowing this to dry, I took my Walnut Stain Distress Crayon and applied the crayon around the outlines of the circles and then blended out the colour with my fingertip. The crayon really just tones down the intensity of the paper and creates more of a vintage feel to the piece.
So, I now have my basic central section of the layout to work with but it all felt a little too square and blocky for my liking, so I took some more of the offcuts from my stash and cut a few more circles but also took some of those offcuts of paper strips that I seem to collect, (and hoard) and using all these pieces together with some torn book pages and strips of Design Tape.
 I just placed these pieces around the edges of that central area, again building up the layers so that it just built up those layers that you can see on the pages.


Then with the remaining die cut Stacked Circles, I placed a few more of these in the top left...

...and bottom right hand corners.

I also added an Ephemera piece and one of the new stitched scraps pieces, which I just love and which worked so well in that corner.

To blend all the hard edges of the paper layers, I used a little gesso which I applied with my fingertip and this just softened the joins of the papers and makes them all sit seamlessly over the top of one another.

To complete the background, I just splattered some Black Soot Distress Paint across the two pages, using the Tim Holtz Splatter Brush and just flicking the paint very lightly.
Now to finish my pages and bring them to life and concentrating on the right hand page, I used one of Tim's Vintage Photobooth images and colour tinted this with Distress Markers. I then aged the edges with a few rips and tears and inked them with Walnut Stain Distress Ink before mounting the photo onto burlap and adding a Mini Paperclip.
Before I attach the photo into place, I added some floral ephemera pieces from the Snippets set, adding it so that it will sit behind the photo and create a gorgeous backdrop behind the image. I also added a 6½d ephemera sticker from the Snippets set. All these pieces are adhered into place with Matte Collage Medium and once again, I added some Walnut Stain Crayon over the top to tone down the colours. I then attached the photo and a button from my stash and then added her name, using one of the Clippings Stickers, Emily.

Finally, I added a butterfly from the Field Notes Ephemera set.

We're nearly there and all that's left are a few details...firstly,
...I wrapped and tied a piece of twine around the page on the left hand side and added some Index Clips to the top and bottom.

...and finally, I used the Clippings Stickers to create a quote ~ 'when the road is long, you just hold on, dreams come true" and placed a Star Adornment next to it, painted with Evergreen Bough Distress Paint.

So, that's my journal layout completed and I hope you love the story of hope that I've told within this piece and enjoyed the creative process behind it and now have some inspiration for all those pieces and offcuts of paper that would normally be thrown away!

As you may know the lovely Heidi, and all the people working behind the scenes at the Simon Says Stamp Store are running on limited operations ~ they are still accepting orders but due to the current Coronavirus (Covid-19) situation, shipping times are going to be slightly longer than usual!
But due to the outbreak we have made the very difficult decision to suspend the $50 vouchers for now but we know that many people are staying safe at home and we would love it if you would continue to enter the challenges and have fun! We are all in this together!


Thank you so much for taking the time to stop by today and see you again soon.
Stay safe everyone and take care of yourselves and your loved ones...
....love, care, believe ~ Emma
xxx
Recipe for project:
Tim Holtz/Sizzix: Stacked Circles, Globe Die from my own stash
Distress Paint: Black Soot
Distress Ink: Walnut Stain
Distress Crayons: Walnut Stain
Distress Marker Set
Distress Paint: Black Soot
Distress Ink: Walnut Stain
Distress Crayons: Walnut Stain
Distress Marker Set
Tim Holtz Idea-ology: Specimen Remnant Rubs, index Clips, Clippings Stickers, Field Notes, Snippets Ephemera, Photobooth, Stitched Scraps, Mini Paper Clips
Mediums: Matte Collage Medium, Gesso
Surfaces: Memoranda Paper Stash, Worn Wallpaper, Dina Wakley Media Journal, Burlap, Black Card
Twine
Prima Alchemy Waxes: Bronze Age, Vintage Gold, Red Amber, Lucky Emerald
Twine
Prima Alchemy Waxes: Bronze Age, Vintage Gold, Red Amber, Lucky Emerald


this is beautiful - seriously, why didn't I get that circle die? I love how you cut the circle in a circle ' great addition to the solid circles!
ReplyDeleteJust stunning Emma! I love all the circles too!
ReplyDeleteA wonderful, nostalgic travel spread - beautiful detailing on the globe, and the stacked circles add gorgeous bubbles of pattern and colour. Love how the 6x6 papers are edges with tissue and tape to soften the borders with the textured cotton paper underneath.
ReplyDeleteAlison x