Showing posts with label Planners. Show all posts

Monday, 3 December 2018

Make It A December To Remember...

Hell friends and welcome to the brand new Simon Says Stamp Monday Challenge! This week our theme is called 'B" is for...and we want you to create something that begins with the letter B! So whether you choose B for ~ blue, birthday, balloons or box, we can't wait to see what you create! The DT are also showcasing Brutus Monroe within their designs but the isn't something that you have to do to play along...

For my project, I chose 'B' for BOOK and altered a book cover, creating a planner journal for the month of December using Brutus Monroe Glass Pebbles as the baubles on my tree! I also designed the planner so that it would be freestanding on my workspace and I can flip the pages to look at the recipes, card list etc that I'll be popping inside.
So, let's begin the brand new challenge and here's how I created my project...
 

To begin with I used a spiral bound notepad with a plain kraft cover, that I bought from a local shop for £1. To prep my cover, I painted it with a coat of gesso and then heat dried it before then applying a coat of Black Soot Distress Paint. I actually painted all the covers, back, front, inside and outside, so that they would be consistent throughout the book and all match perfectly.

Once the paintwork was dry, I then added some dry brushed around the edges with Brushed Pewter Distress Paint to create a more worn, vintage feel to the cover.

Setting the book to one side and moving on, I cut a panel of the gorgeous foliage design paper from Christmas Paper stash, machine stitched a border around the outside before matting it onto red card. To get the perfect match for this project, I actually painted white card with Festive Berries Distress Paint before inking the edges.

I then mounted my layers onto the cover of the painted book.

Taking a Christmas Baseboard, I sanded the edges and then gave it a coat of Vintage Collage Medium before running the Gathered Twigs Crayon around the edge. Blend the crayon out with a semi dry baby wipe.

I then mounted some Christmas Ephemera pieces onto my baseboard, the poinsettia, stamps and Special Delivery label and adhered these into place with Matte Collage Medium. Attach the baseboard onto the cover.
Moving onto the tree, I took the large Woodland tree which I sprayed with Peeled Paint Distress Spray Stain. Once the tree was thoroughly dry, I then used my fingers to dab Matte Collage Medium onto the tips and dusted it in Rock Candy Dry Glitter.

For the baubles, I used Brutus Monroe's Clear Acrylic Bubbles and painted them with a variety of Distress Paints, which take so well on the acrylic surface! I used Festive Berries, Tumbled Glass and Shabby Shutters before adding a touch of shimmer over the top using Unicorn's Hair Sparks Paint from Prima.

When the bubbles were dry, I attached them to my tree with collage medium before popping the tree into a painted thimble.
Once the tree was all stuck together and wasn't about to move, I attached it to the left hand side of the book cover, placing it onto a wood slice. So that the slice would fit against the book cover, I just cut a small amount away to give a straight edge. Allow for the adhesive to dry before touching it again...

The little Paper Doll girl on the right hand side is coloured with Distress Marker pens and then layered over a bed of foliage that I die cut from Classic Kraft Card, using the Mini Holiday Greens dies. I added some Picket Fence Distress Paint to the tips of all the dies cut pieces and then frosted them with some more glitter.
I then arranged all my die cuts behind the paper doll, together with a couple of wood slices which would act as a support for the figure and at the same time creating some dimension to the piece. I then applied some Grit Paste onto the tops of the wood slices to create the look of fallen snow which I glittered with some more of the Rock Candy Dry Distress Glitter.

I added some cheesecloth at her feet so that it would ground her and she wouldn't float and then applied Autumn Red Nuvo Crystal Drops onto the berries of the foliage behind her.
We're nearly there and after placing some frosted baubles around her feet and around the base of the tree, I added the December Quote Chip.
Finally, I hung a story stick from a hinge clip painted with Candied Apple Distress Paint...
...and placed another couple of the painted Brutus Monroe Pebbles in the top left and right hand corners.

So, that completes this week's project which I hope will inspire you with some ideas and of course, you don't have to use these on a book cover, you can create a tag or a festive scene to display in your home!
Don't forget, you can find more inspiration from my talented teamies over on the challenge blog and every week, one lucky random participant has the chance to win a $50 gift voucher from Simon Says StampYou have until Monday 8am Ohio time. 1pm UK time, 2 pm CET to join in and good luck....


See you very soon, love Emma xxx

Recipe for project:
Distress Spray Stain: Antique LinenPeeled Paint

Monday, 3 August 2015

Making A Plan ~ Simon Says Stamp Monday Challenge

Hey everyone!

Hope you all had a great weekend and welcome to a brand new challenge over on the Simon Says Stamp Monday Challenge Blog! This week, we challenge you to "Make A Plan"!

As you all know, planners are all the rage these days and we'd love to see your crafty planner pages! But this challenge can be taken many more ways and you can share a project about plans you've made, you could get a jump on holiday crafting, art journal a dream or hope for the future ~ whatever you decide we hope you'll play along!

For my project this week, I decided it was time that this stationery addict (who owns more Filofaxes, diaries and notebooks than I care to admit) to make my own planner and that's exactly what I did using one of Tim Holtz's worn covers as my base!
To begin with, I took the worn cover and started my decorating the inside ~ it's easier to do this now, before you've added any embellishments to the cover or attached the ring binder in the centre.

I started by applying Broken China Distress Ink through the Honeycomb Layering Stencil and adding it to random areas of my inside covers. I then added some Vintage Photo Distress Ink through the Splatters Layering stencil to give a more worn and vintage appearance. Finally, I watered down some Gesso and flicked this across the cover. Heat dry or let the paint dry naturally before moving onto the next stage.
To decorate the left hand side of the cover, I applied some torn Tissue Tape, an Industrious border and some Remnant Rubs. Finally, I used a Pen Nib and dipped the nib into Black Soot Distress Paint before attaching it to a BBQ skewer which I painted with Distress Paint. I wrapped some twine around the join and then stuck the completed pen onto the cover.
To attach the ring binder into place, I dyed some crinkle ribbon using Stormy Sky and Antique Linen Distress Stain and threaded the ribbon through the holes in the binder, tying it into a tight bow down the spine on the outside and securing the ring binder in place.
Now to decorate the front and for this, I chose some paper from the Correspondence paper stash and cut it to fit the front of my worn cover. I machine stitched the paper, distressed and tore around the outside edge and then inked with Frayed Burlap Distress Ink before attaching my paper centrally onto the cover.
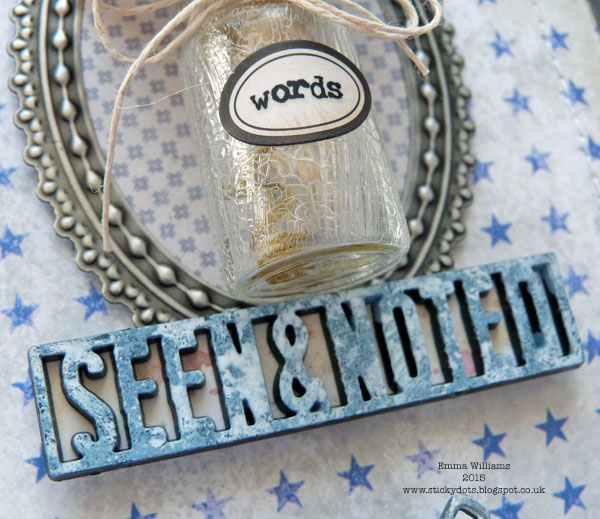
I then took one of the decorative frames from the Industrious Sticker pack and cut an oval of a co-ordinating paper from the stash and cut this slightly larger than the aperture of the frame. I attached the oval of paper to the back of the frame and then using foam pads, mounted the frame onto the cover.

I crackled one of the glass vials using a coat of Glue N' Seal, allowing that to dry and then applying a coat of Rock Candy Crackle Paint. Once the crackles have appeared, I tied some twine around the bottle neck and added a vial label to the bottle and used a Remnant Rub for the wording ~ "words".

I created some handmade paper blooms using the Tiny Tattered Florals die and each flower was coloured with a spritzing of Fossilised Amber Distress Spray Stain. Heat dry the flowers before attaching them to stamens and placing them into the crackled glass bottle, with some dried grass.
Attach the bottle of flowers to the centre of the frame using Glossy Accents which holds it securely into place.
Next, I painted the "Seen & Noted" Alpha Part using Stormy Sky and Picket Fence Distress Paint, allowing the paint to dry between coats and then placed this underneath the bottle.
Finally, I added a Faucet Knob to the cover....
...and used a Philosophy Tag, together with a Tim Holtz word stick from my stash and attached them to the bow using a swivel clasp.
Now all that's left is for me to fill my planner with pages and I started by using some of Tim's Pocket Cards, inserted into page pockets and will gradually add more, including a diary, photos and a note section, building up my custom made planner!

I really hope you've enjoyed this project and love the finished planner!
As always, if you need any further inspiration for this challenge, then you need look no further than our blog to see all the wonderful creations from all the very talented Design Team members and every week, one lucky random participant has the chance to win a $50 gift voucher from Simon Says Stamp. Good luck....


Thank you so much for all your visits today and hope you all have a great week ahead
See you again soon...love Emma xx

Products used:

Sizzix/Tim Holtz Dies: Tiny Tattered Florals
Distress Paint: Picket FenceStormy Sky, Black Soot
Distress Spray Stain: Fossilized Amber
Distress Stain: Stormy Sky, Antique Linen
Tim Holtz Layering Stencil: Honeycomb, Splatters
Powered By Blogger

Total Pageviews