
Hey everyone!
Hope you all had a great weekend and welcome to a brand new challenge over on the Simon Says Stamp Monday Challenge Blog! This week, we challenge you to "Make A Plan"!
As you all know, planners are all the rage these days and we'd love to see your crafty planner pages! But this challenge can be taken many more ways and you can share a project about plans you've made, you could get a jump on holiday crafting, art journal a dream or hope for the future ~ whatever you decide we hope you'll play along!
For my project this week, I decided it was time that this stationery addict (who owns more Filofaxes, diaries and notebooks than I care to admit) to make my own planner and that's exactly what I did using one of Tim Holtz's worn covers as my base!

I started by applying Broken China Distress Ink through the Honeycomb Layering Stencil and adding it to random areas of my inside covers. I then added some Vintage Photo Distress Ink through the Splatters Layering stencil to give a more worn and vintage appearance. Finally, I watered down some Gesso and flicked this across the cover. Heat dry or let the paint dry naturally before moving onto the next stage.


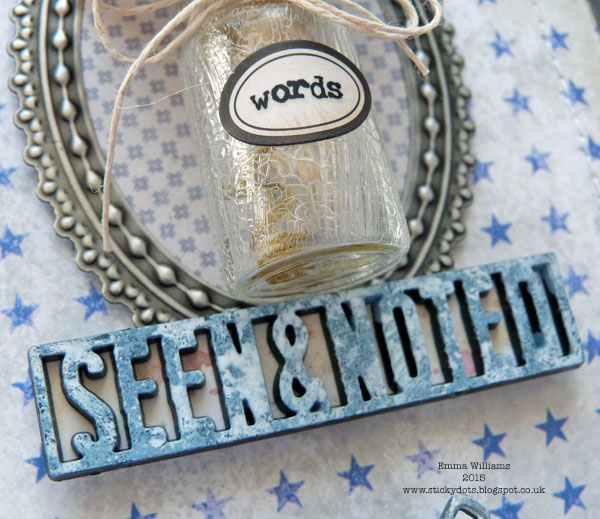
I then took one of the decorative frames from the Industrious Sticker pack and cut an oval of a co-ordinating paper from the stash and cut this slightly larger than the aperture of the frame. I attached the oval of paper to the back of the frame and then using foam pads, mounted the frame onto the cover.
I crackled one of the glass vials using a coat of Glue N' Seal, allowing that to dry and then applying a coat of Rock Candy Crackle Paint. Once the crackles have appeared, I tied some twine around the bottle neck and added a vial label to the bottle and used a Remnant Rub for the wording ~ "words".
I created some handmade paper blooms using the Tiny Tattered Florals die and each flower was coloured with a spritzing of Fossilised Amber Distress Spray Stain. Heat dry the flowers before attaching them to stamens and placing them into the crackled glass bottle, with some dried grass.

Attach the bottle of flowers to the centre of the frame using Glossy Accents which holds it securely into place.

Next, I painted the "Seen & Noted" Alpha Part using Stormy Sky and Picket Fence Distress Paint, allowing the paint to dry between coats and then placed this underneath the bottle.
Finally, I added a Faucet Knob to the cover....

...and used a Philosophy Tag, together with a Tim Holtz word stick from my stash and attached them to the bow using a swivel clasp.

Now all that's left is for me to fill my planner with pages and I started by using some of Tim's Pocket Cards, inserted into page pockets and will gradually add more, including a diary, photos and a note section, building up my custom made planner!


I really hope you've enjoyed this project and love the finished planner!

As always, if you need any further inspiration for this challenge, then you need look no further than our blog to see all the wonderful creations from all the very talented Design Team members and every week, one lucky random participant has the chance to win a $50 gift voucher from Simon Says Stamp. Good luck....

Thank you so much for all your visits today and hope you all have a great week ahead
See you again soon...love Emma xx
Products used:
Sizzix/Tim Holtz Dies: Tiny Tattered Florals
Distress Spray Stain: Fossilized Amber
Distress Stain: Stormy Sky, Antique Linen
Idea-ology: Tissue Tape, Pocket Cards, Industrious Frames and Trims, Ring Binder, Worn Cover, Faucet Knob, Alpha Parts, Corked Vials, Vial Labels, Page Pockets, Philosophy Tag, Pen Nib, Crinkle Ribbon, Swivel Clasps, Remnant Rubs
Surfaces: Correspondence Paper Stash


Your planner is wonderfully shabby chic! I love the flower in the bottle on the front and your pen nib and BBQ skewer is so so clever. I really love the inside covers too, the splashed gesso looks great, I'm going to try gesso for that. Thanks for sharing your beautiful planner.
ReplyDeleteAnother wonderful project xx lovely Emma. xxx
ReplyDeleteLovely Emma, love the flowers in the vase and your design. Tracy x
ReplyDeleteAnother Monday , Another fabulous creation Emma . Absolutely love it . It is always clear to see just how much thought and designing goes into your projects before you even begin to create- a true sign of a real professional ! Your planner is embellished wonderfully - love the pen, the crackle glass bottle and the faucet knob not forgetting all the other bits of ideology and of course the vintage feel you have given to the interior .
ReplyDeleteDo i really have to wait 7 more days to see your next work of art ????
hugs xx
This is the absolute coolest thing I've seen!!! In awe of your creativity with this!!!
ReplyDeleteYour journal is lovely, from the vase of flowers to the pen, nice touches.
ReplyDeleteWhat a great project. I love the pen nib with the attached bbq skewer. :)
ReplyDeleteLove this planner very pretty xxxx
ReplyDeleteanother cracker. i'm at a loss for words. need to buy some phrase book to give me loads of ways of saying stunning, gorgeous without sounding like a broken record, big hugs xxxx
ReplyDeleteoh this is sweet! I love the torn edges and the flower focus.
ReplyDeleteEmma your planner turned out fabulous. I love and adore all your details. Fabulous idea on the front cover with the tiny bottle with grass and flowers. This is such a lovely piece of art !!!
ReplyDeleteThank you for sharing and the tutorial. It is very inspiring.
Hugs from Monica... Spain
Absolutely beautiful! Love how you colored the crinkle ribbon :)
ReplyDeleteStunning color combination! I love the layering too :)
*mwah*
Steph
Simon Says Stamp!
Amazing book cover! Love the crackled vial with gorgeous flower! So pretty! Hugs, Sandra
ReplyDeleteWonderful Emma! Love how you decorated the inside of the worn cover as well and your 'faux' pen is inspired! Thanks so much for sharing it.
ReplyDeleteSuch a gorgeous cover! All the embellishments and details are awesome. :)
ReplyDeleteThe book nerd in me went absolutely giddy when I saw this! Love, love, LOVE how you did the spine and that concept of a jar of words made me sigh happily. You have such a great talent for turning the ordinary extraordinary and showing me things in ways I never would've thought of. I ADORE this piece and have stared at it for a good 15 minutes instead of doing the laundry (no complaints here)!
ReplyDeleteThis is gorgeous Emma! Love the flower in the crackled bottle and the little 'words' label. Wonderful!
ReplyDeleteYou are so clever!
ReplyDeleteA BBQ Skewer? What a brilliant idea!!
There are a lot of unique and beautiful elements in this project. It amazes me....