Hello everyone and welcome to the Inspirations Blog Hop featuring the Simon Says Stamp Exclusive co-ordinating dies that match Tim Holtz stamps.
I'm so excited to be joining this hop, and you might have arrived here via my very talented friend, Stacy Hutchinson's blog, but if not, and you want to catch up with everyone who is participating in this hop, then don't worry because you can head back to the beginning, by clicking HERE. Also, if you would like to see the entire product release , then pop on over to HERE.
So, let's get started and I'll can't wait to share all the details of how I used one of the amazing co-ordinating die and stamps sets to create my mini gift envelopes and gift tag.
To begin with I created my bases and for these I used the Collector (for the gift envelopes) and Specimen (for the tag) die sets and cut my pieces from Mixed Media Heavystock card.
GIFT CARD HOLDERS
Once I'd die cut my card to create two gift card envelopes, I scored along the lines and then added some Distress Spray Stain to create more of a vintage feel to the cardstock. I used a combination of Antique Linen and Pumice Stone sprays, and after misting the surface with water, I applied the sprays and then used a heat tool to dry the card.
I then inked the edges with Walnut Stain Distress ink before I assembled each of the envelopes.
Along the flap of each envelope, I inked one of the Ornate Trims stamps with Frayed Burlap Archival Ink, and then stamped the decorative trim. I repeated this on the second envelope using a different design of trim.

With the envelopes ready, I moved onto the layers.
For these background layers, I applied Distress Crackle Paste, through the Stampers Anonymous Splash Layering Stencil (THS080) onto a piece of Distress Watercolour Card. I set the card to one side to dry and for the crackles to appear and once this happens, I added the colour.
For this I used Distress Spray Stain in Speckled Egg, Antique Linen, Bundled Sage and Uncharted Mariner, together with Speckled Egg and Bundled Sage Oxide Spray.
I spritzed some water over the surface of the crackle pasted card, and then applied each of the colours, one by one. I then gave the card another light misting, you don't want to oversaturated the cardstock, just move the colours around to blend and then I gently heat dried the inks.
Once completely dry, I cut the card into two separate panels to fit the fronts of the envelopes and inked the edges with Frayed Burlap Distress Ink.
I then attached the panels to layers of Silver metallic Kraft stash and mounted these completed panels onto the fronts of my envelopes.
To complete the envelopes, I used the Crop-A-Dile to punch holes into the flaps and set a couple of eyelets into each before threading some seam binding ribbon through each eyelet, which I coloured with Tumbled Glass and Antique Linen Distress Spray Stains.
As the finishing touch, I added some Cello Tape Stickers to the envelopes.
We can now move onto the butterflies....
BUTTERFLIES
This is now where the fun begins and where we get to use the glorious new co-ordinating die sets from SSS, together with the stamps sets from Tim Holtz. For this make, I chose the Flutter stamp set, and I began by inking each butterfly with Black Soot Archival Ink, (I used three, 1 for each make) and stamping them onto watercolour card stock. I always use the smooth side of the cardstock when I stamp.


I then coloured my butterflies with Distress Watercolour Pencils and once I was happy and the watercoloring was completely dry, I used the co-ordinating Flutter die set to die cut the butterflies.
I then inked the edges of each one with Frayed Burlap Distress Ink, and shaped the wings.
BUILDING UP THE LAYERS
We can now start to build the layers and complete the envelopes.
I began by using mica sheets that I have in my stash and I used two pieces and layered these over the top of one another, fixing them to the envelope with foam pads to add dimension.
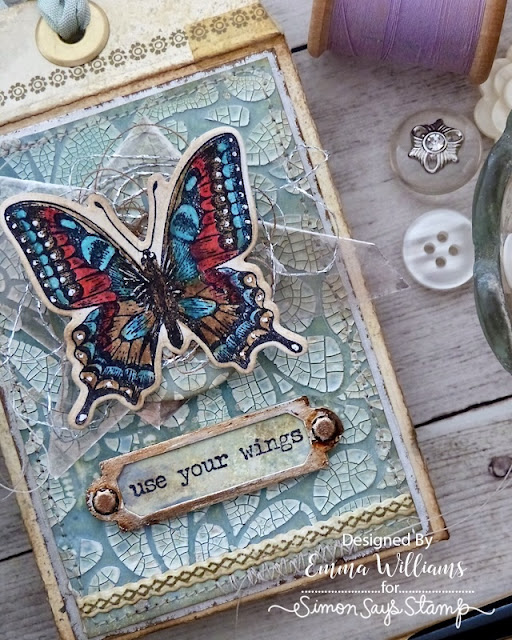
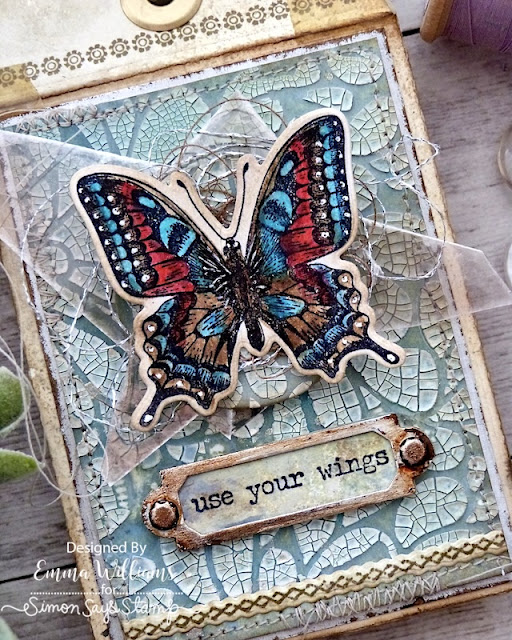
I then cut two circles from the remaining crackled cardstock that I used for the background, and used these as my base for the butterfly.
I mounted my butterflies over some loose threads from my haberdashery box which I glued directly onto the circle, and then attached the butterfly over the top, leaving the wings free from adhesive, as I want these to rise up, as if the butterflies are in flight.
We're nearly there and all that's left is the sentiments that sit underneath the butterflies...
SENTIMENTS
For each envelope, I used a frame and sentiment. The frame is die cut from silver Metallic Kraft card using the dies in the Specimen die set. I cut three layers to build up the frame and and then added the sentiment to a piece of mixed media cardstock, that I placed inside the frame.
I completed each frame with Hardware Heads on either side.
The "see the world" sentiment is from the Tiny Text Remnant Rub set by Tim Holtz...
...and the "use your wings is from the Tiny Text Stampers Anonymous stamp set.
I completed the envelope with an Ornate Trim, die cut with the co-ordinating die set, and attached this along the bottom of each of the envelopes.
To create more of a rusty finish to the silver metal, I used a paintbrush to apply Crackling Campfire, Black Soot and Antiqued Bronze Distress Paints to the metallic surface. I wiped away any excess paint, so that it pools and sits in the recesses, especially where I've added the hardware heads.
FILM SLIDE TAG
As a little extra make, I thought it would be fun to make a gift tag and as I mentioned at the beginning, I used the Film Slide die in the Sizzix Specimen Thinlits Die Set by Tim.
Once my film slide was folded and inked, I used all the same elements as I used on the envelopes and layered the mica sheets, threads and butterfly as my focal point. I then added the ornate trim across the bottom section. To complete the make, I added a "no.48' remnant rub, some tiny nailheads and an eyelet in the top, complete with twine from my stash.
So, that's my makes complete and I hope you've enjoyed this process and it's inspired you with ideas of how to use some of the amazing dies and stamps from this release.....
Thank you so much for stopping by today and before I go, don't forget to join Tim and his star student, Heidi for Create Together, live on the Simon Says Stamp YouTube channel, tomorrow at 12 noon ET.
See you soon, love Emma x


These are truly works of art!
ReplyDeleteReally Beautiful!!! Love the colors on your butterflies!!!
ReplyDeleteWOW, these look incredible. I love the way you colored the butterflies, and all of the natural colors are amazing. LOVE them!
ReplyDeleteIt didn't print my name, SHARON GULLIKSON
DeleteThese butterflys really are beautiful! your color choices and technique make them 'pop' on the tags. Thank you for the inspiration!
ReplyDeleteThese are so beautiful! I’m not sure that I would be capable of recreating something like this but it would be fun to try!
ReplyDeleteI love how intricately the butterflies are colored. Lovely!
ReplyDeleteSo beautiful
ReplyDeleteBeautiful job! Love your tags! Love Tim Holtz & Simon says stamp.
ReplyDeleteAMAZING products and inspiration. Don't know how SSS produces these great products and will never figure out how Tim Holtz comes up with such great inspiration! Karen Thorne
ReplyDeleteThese tags are so beautiful, thank you for the inspiration!
ReplyDeleteAnother set of beautiful butterfly tags, lovely!
ReplyDeleteI DO LOVE all of these! I am so sad however...It is just my situation...I need videos. Is this on a video and I just missed it? (hoping). I just wanted to ask just in case...so that I could see what is done. So Beautiful.
ReplyDeleteWow Emma, I can recognize your art work right away because of the blending of blues, my favorite color, and all the exquisite details you put into your artwork. The water coloring of the butterflies is absolutely beautiful. I love these GC so much.
ReplyDeleteBeautiful art work.
ReplyDeleteHi, Emma - I'm at a loss...I'm going to reach for adjectives like "exquisite" and "exceedingly gorgeous" (well, I threw in an adverb there, too) because I just have to pick my jaw up off the floor now. THESE ARE ASTONISHINGLY PRETTY!
ReplyDeleteLori S in PA
These are just fabulous!!
ReplyDeleteLove all the great colors!
ReplyDeleteWOW! These are fabulous Tags! Love all of the details and those beautiful butterflies!
ReplyDeleteGorgeous tags. Love the vintage look.
ReplyDelete