
Happy Monday everyone, and welcome to the final Simon Says Stamp Monday Challenge of 2023!! Don't worry, we will be back in the new year but this challenge will run for 2 weeks because the DT are all having a little break for Christmas!
This week our theme is all about Let It Snow, and as always there is so many different interpretations of this challenge with all the wintery themed products that are available. For my make I chose to create a piece using the gorgeous Santa Greetings Die from Tim Holtz and Sizzix and surround him by falling snowflakes as he get's ready for the big day.


To begin with I used the larger size Rectangular Etcetera Panel, Pinked Etcetera Trims, Mosaic Tiles and backing paper from the Christmas Backdrops pack to create the base of my make.
ETCETERA PANEL
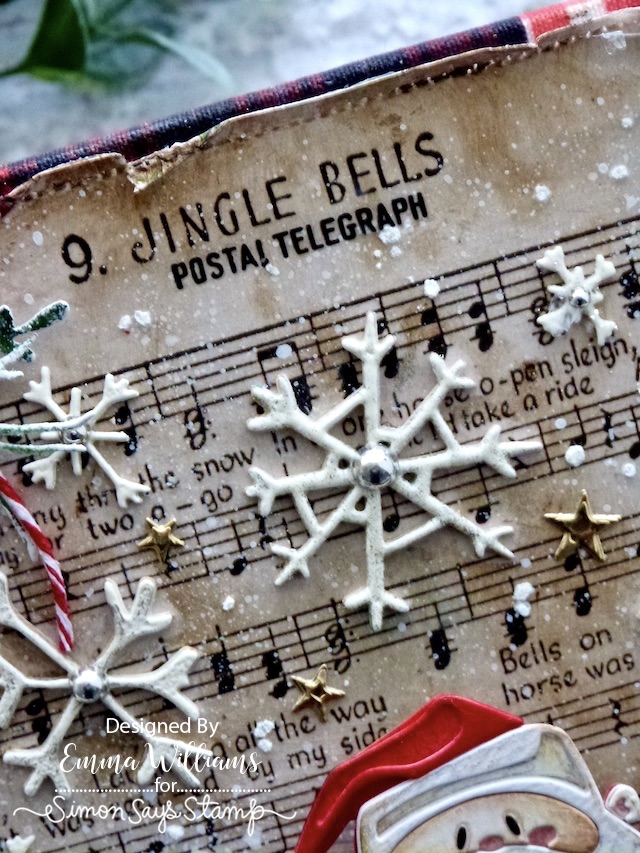
I covered the edges of the panel with Christmas Linen Patchwork tape. I then cut a panel of the Jingle Bells Backdrop paper from the Christmas pack to fit the front of the panel. After adding a few rips and tears around the edges, I machine stitched a border and then mounted the paper onto my panel, adhering it with Matte Collage Medium, curling back the top left and right hand corners.
I dipped my splatter brush into a Picket Fence Distress Paint and then lightly splattered the background to create the snowy effect.
To give more texture to these corners, I added some Mica Flakes which I sprinkled over the top of Glossy Accents, that I just dribbled over the curled paper. Tap away the excess flakes and leave this to dry.

A few final details were added to my paper using Remnant Rubs ~ the Postal Telegraph wording underneath Jingle Bells...

....and the Number 25 in the right hand corner.

Along the bottom of the panel, I placed three Mosaic Tiles, which I covered with some of the brickwork paper from the same Christmas Backdrops pack. I sanded the edges of each tile before attaching them to the panel, leaving a gap between each tile.

After I applied a layer of Matte Collage Medium over the surface of the panel, I left it to dry and then ran Gathered Twigs Distress Crayon around the edges of the panel, and also around the edges of each of the Mosaic Tiles.
Along the top edge of the tiles, I placed a Pinked Etcetera Trim that I painted with Black Soot Distress Paint which I allowed to dry before sanding back some of the paint.

I then attached this to the panel and allowed to dry.
To complete the tile section, I added hardware Heads to either side of the tiles and then placed the "A Visit From Santa" Clippings sticker in the centre.

The panel is now ready for me to add the snowflakes.
SNOWFLAKES
Using Tim's Scribbly Snowflakes and Cozy Winter die sets from Sizzix, I began by cutting a selection of snowflakes from Mixed Media Heavystock card. To create the depth of the snowflakes, I cut each one several times and then layered them over the top of one another to make one singular flake.

For this make, I used 10 single snowflakes of various sizes and shapes, in total.
Once I had my snowflakes, I dabbed the embossing dabber over the top and then heat embossed each of them with cream embossing powder, melting the powder until it was molten.

I then attached the snowflakes to the background Matte Collage Medium and added silver metallic droplets in the centres of each.
In amongst the snowflakes, I added tiny die cut gold stars that I cut from Metallic Kraft stock card, using the Falling Stars Die.
Finally, I added some Grit Paste through the Speckles Layering Stencil and left it to one side to dry.
SANTA GREETINGS
Now for the star of Christmas...say hello to Santa!

I cut all my pieces from Distress Watercolour card and Black Kraft Cardstock, which has double sided adhesive sheets attached to the back.
The white sections and Santa's face, are all coloured with Polychromos pencils. The belt, eyes, gloves and boots are all from the black card and the belt buckle from silver metallic card.
For the red suit, I spritzed the watercolour card with the following Distress Spray Stains:
LUMBERJACK PLAID, BARN DOOR AND CANDIED APPLE
Once I had the right blend, I dried the card and cut my pieces for his suit and then assembled Santa.

I attached Santa to the panel using foam pads to add height and dimension to the piece and placing him so he stands on the ledge.

To create the "Let It Snow" bunting, I cut the letters from gold metallic kraft card, cutting each letter four times and then layering them to create the thickness of chipboard.

I then cut the banner itself and attached each letter to the die cut using Glossy Accents. I set this aside to dry completely before then attaching it to my Santa.
On the top edges of each letter, I applied a tiny amount of Snowfall grit paste.
LEDGE
Santa is now ready for the decorative elements around him and I began by die cutting my foliage. I used the Holiday Brushstrokes 3 die set to cut all my pieces from watercolour card that I coloured with Rustic Wilderness and Iced Spruce Distress Spray Stains.
To create the snowy effect on each piece, I lightly dabbed the edges of the die cuts with the Embossing Dabber and then sprinkled white embossing powder over the wet ink. Tap away the excess, and heat emboss. Once the powder is cool, rub Matte Collage Medium over the pieces, and sprinkle with Rock Candy Distress Glitter. Repeat with all the other pieces and then set them to one side to dry.
I arranged the greenery onto the ledge, placing it around his feet.

In amongst the greenery, I added some of the crystal clear bubbles from the Halloween release. I used a selection of sizes and then smeared Glossy Accents over each bubble before dunking them into the pot of Rock Candy Glitter. Once they were dry, I attached them onto the ledge.

Finally, I added some Jingle Holiday Bells. Each bell is painted with Lumberjack Plaid Distress Paint in a very rough fashion ~ for more of a vintage feel, you don't want to completely cover the bell with paint and leave some areas of the original metal showing. This way it will look old, with chippy paint.
I attached the bells to the ledge and then added some Snowfall Grit Paste around all my elements.

Allow for this to dry, before drizzling glossy Accents over the top and sprinkling Mica Flakes onto the medium. Tap away the excess flakes.
At this point, I also drizzled some more Glossy Accents underneath the ledge, and added more Mica Flakes.
We're nearly there and all that's left is to add the Candy Twine bow in the top left hand corner.
CORNER EMBELLISHMENT
I cut a piece of the twine, enough to form a triple looped bow and then dipped the twine into some Gathered Twigs Distress Ink, that I smooshed onto my glass mat, watered down with a mist of water.

I heat dried the twine, then tied the bow which I attached with some of the leftover greenery and a final Holiday Bell.

So, that's my final project of this year finished and I hope you love what I've made and will be inspired by the ideas in the piece.

Don't forget that every week, one lucky random participant has the chance to win a $25 gift voucher from Simon Says Stamp and you can join in up to 5 times, which means you could have 5 chances to win. You have until next Monday at 8am Ohio time. 1pm UK time, 2 pm CET to join in and good luck....


Recipe for project:


Such beautiful detailed work! Thank you so much for the detailed tutorial.
ReplyDeleteMerry Christmas to you and your family and I wish for you to have a wonderful new year. I love this Santa and all the "snow" that is scattered around project and in all the forms. Love!!!
ReplyDeleteStunning creation Emma. I love reading your process and trying to understand all the magic you pour into your creations. It's next level genius and I'm always in awe! Wishing you a fabby Christmas and happy holibobs. Hugs, Wends xoxo
ReplyDeleteWow! Emma, you never cease to amaze me with your amazing creativity. Every little detail that you add comes together to make an incredible work of art - every time! Thank you for sharing your talent, and for providing the wonderfully detailed account of how you did it.
ReplyDeleteMerry Christmas!
Linda
oh my heart!!! I think it stopped beating for 5 or 6 beats. This is the best I have ever seen! Honestly!
ReplyDelete