
Hello friends and welcome to the brand new Simon Says Stamp Monday Challenge which this week is all about ADDING TEXTURE. The DT are also showcasing the products of Tonic within their makes, something that you don't have to do if you would like to join us.
This week, as we get nearer to Easter and a visit from the Easter Bunny, my thoughts turned to my Mum who can't eat chocolate, (don't worry, I always make up for her as I'm a chocoholic). I didn't want her to feel left out, so thought it would be nice to treat her to a gift card but because the card on it's own is pretty boring, I decided to make a little gift pocket envelope and used dies from Tim Holtz and Sizzix, which I layered over a textured background coloured with Tonic Shimmer Powders.

So let's get started and here's how I made this gift card envelope...


Now to start adding those layers...
BACKGROUND LAYERS
I began by making that textured background and applied Grit Paste through the Roses Layering Stencil onto a panel of cardstock. After allowing the paste to dry, I then added the colour using the Tonic Shimmer Powder. I chose Atlantis which I will admit was slightly brighter in colour than I expected ~ I thought it might be more of a Duck Egg blue, but no problem ~ I just adapted and this was perfect for this make.
I shook a tiny amount of the powder onto my stenciled card and then misted water over the top. If you've used PaperArtsy Infusions, then these powders work in exactly the same way but have a slight shimmer effect to them once dry.
You can either leave the card to dry, or if you're like me and can't wait ~ then use a heat gun, being very careful not to overheat the paste or bubble it.

Once it was dry, I then used my new Rotary Trimmer to cut through that pasted background, with very little effort and not one raggedy edge in sight. I cut panels to fit the front and the flap and inked the edges of each piece before I machine stitched a border around the front panel. I attached each inked panel to my pocket envelope.

FEATHERED FRIEND
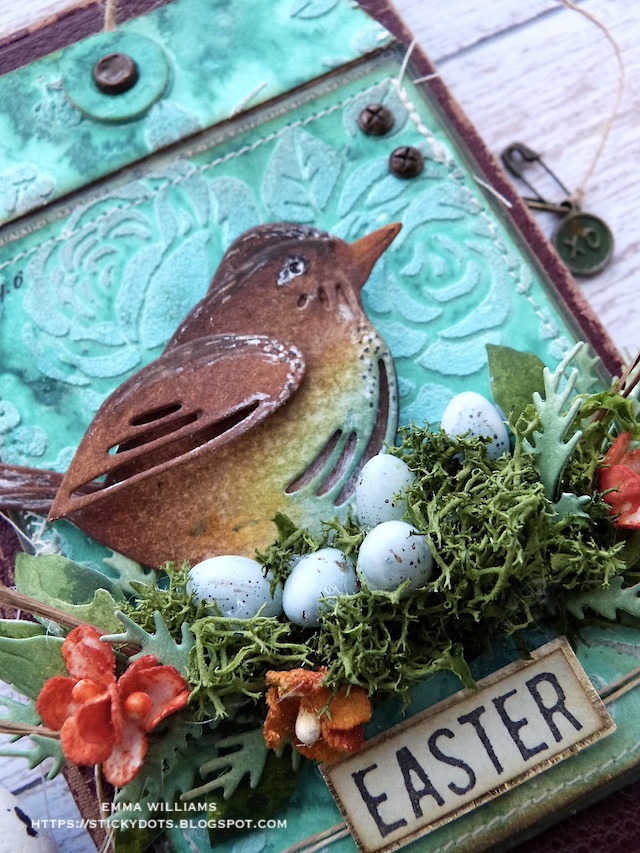
Now to make that little birdie. I actually had one of these leftover sitting in my stash that I didn't use on a previous project, and to create the bird, I used the smaller size from the Feathered Friends Die Set which I cut watercolour card, before I inked and coloured the individual pieces of the die cut bird with Distress Inks, blending the ink over the surface.
INKS; Tumbled Glass, Rusty Hinge, Vintage Photo, Gathered Twigs, Broken China, Old Paper
I assembled the bird and added white pen highlights before moving onto the nest.

NEST
To create the nest, I coloured some more of the Mixed Media Heavystock card using Rustic Wilderness and Peeled Paint spray stains and then cut the foliage using dies from the Festive Bouquet Thinlits Die Set. Once I'd cut enough pieces, I started to assemble the nest, arranging the foliage with moss to build it up. I then placed my little feathered friend in the nest.

Now for the tiny speckled eggs and for this I used some of Tim's Tiny Eggs and painted them with Speckled Egg Distress Paint. Once dry, I loaded up the Splatter Brush and splattered Ground Espresso Distress Paint across the surface of each egg before drying them again and then adding them to the nest.

Finally, I added some tiny little flowers and for these I used the Bouquet Findings which I coloured with Crackling Campfire Distress Spray Stain and added to the nest.

SENTIMENT
We're nearly there and all that's left is the finishing details and the sentiment. I stamped the Easter message in Black Archival Ink using the stamp from the Spring Shadows set. I cut away the Happy part of the message and then layered the "Easter" sentiment onto some gold metallic kraft card.
I then wrapped twine around the bottom section of my envelope, securing it with a knot before attaching the wording using foam pads.

FINAL DETAILS
For the final details, I added some Hardware Heads to the top right hand corner of the envelope....

...and a tiny remnant rub in the corner.

To complete the envelope, I tied a piece of twine around the washer that I attached with a Large Fastener which has a slightly battered and worn look thanks to the Texture Hammer.
On the end of the twine, I attached a Word Tag, that I painted with Rustic Wilderness Paint. Once the paint was dry, I then applied a light coverage of Statue Foundry Wax over the raised areas and heat embossed the wax to set it.

So that's my make finished and I hope you love what I've created and it will inspire you with some Easter gift ideas.

As always, if you make anything, or if you've been inspired by anything that you've seen here on my blog ~ then please, let me know by tagging me on social media or leaving a comment here and I will be right over to take a look!
Don't forget that every week, one lucky random participant has the chance to win a $25 gift voucher from Simon Says Stamp and you can join in up to 5 times, which means you could have 5 chances to win. You have until next Monday at 8am Ohio time. 1pm UK time, 2 pm CET to join in and good luck....


Recipe for project:


Wow! This is so lovely! Thanks for sharing step by step I think I might have a try with what I have on hand.
ReplyDelete