
Hello friends...
Can you believe we're nearly in October?!? It's definitely been a busy year of making and time has flown but as always, I'm having so much fun creating new and exciting projects and can't wait to share what is coming soon!
In the meantime, it's Monday and that means it's time for the brand new Simon Says Stamp Monday Challenge and this week our theme is all about EMBOSSING! We want you to create projects and emboss it, anyway you choose ~ whether that be with powders and folders, as I've done with my project, or anything else you choose, the choice is entirely up to you and we can't wait to see how you interpret the challenge.
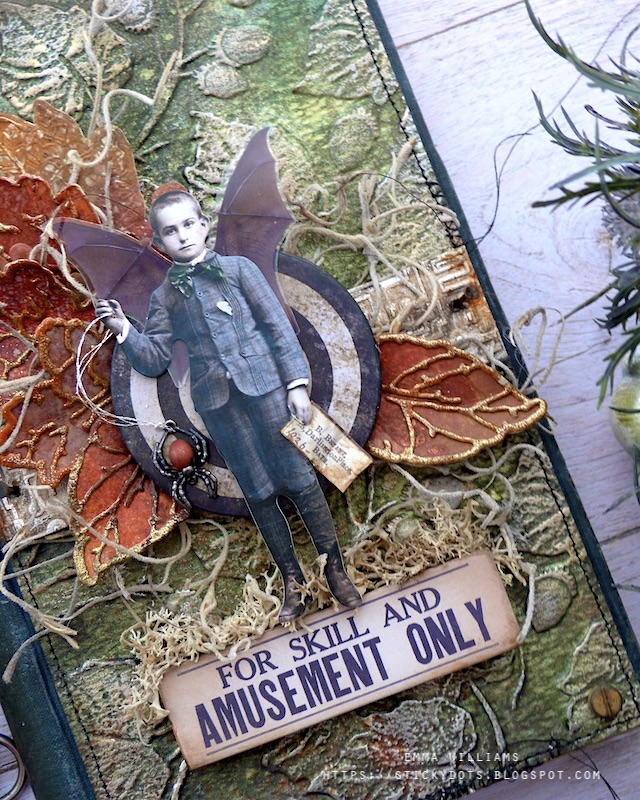
For my make, I created a spooky little tag and combined the folder to create a background with powders that bring a shimmer and shine to the autumn leaves.


TAG BACKGROUND
I cut a panel of mixed media heavy stock card, that was the same size as my tag and spritzed it with a combination of Black Soot Distress Spray Stain and Wicked Elixir Mica Stain, I don't usually got for green but I love this colour so much and it works so well for Halloween projects, and I'm really embracing it this year! "Green is my new blue in this craft room"...
After misting the sprays with a little water to get a good blend, I then splattered some Burning Ember Mica Stain over the top before drying it thoroughly.
The card is slightly larger in size than the folder I'm using, so you will need to emboss this in two passes and to begin, I placed the top section of the card inside the Sizzix Acorns 3D Texture Fade Embossing folder from Tim Holtz. Run it through your die cutting machine, I did this a couple of times for a deep impression and then remove the card, and place the bottom section of the card in the folder to emboss this.

You will get a line across the middle of the card, but don't worry as this will be hidden.
To complete the background and add some definition to the embossing, I rubbed a small amount of Foundry Wax over the top. I used a blend of all four colours which gave me the effect I wanted but you can use any colour you choose.

After heat setting the wax, I added a machine stitched border around the outside of the background before adhering it to the tag using Matte Collage Medium.

Across the centre of the tag, where you have that straight line I mentioned earlier, I hid this with a strip fo metallic kraft card that I embossed using the Circuit 3D Texture Fade. I cut the strip to approx, 3cm in width and one by one, I applied a combination of Black Soot, Ground Espresso and Antiqued Bronze Distress Paints over the top. I wipe away the excess paint each time and then always dry between each paint application as you don't want the colour to become muddy in appearance.
I attached the strip across the tag using foam pads and then on either side of the strip, I hammered in a Tack Nail that I altered with Distress Paint for the rusty finish.
LEAVES
Now to create those leaves and once again, I used Mixed Media Heavystock Card and spritzed the card with the following stains and a mist of water:
Once I'd achieved the colour I wanted, I then cut my leaves using Tim's Leaf Print Thinlits Die Set from Sizzix and cut the leaves. This die cuts the leaves in two sections, so they can be layered over the top of one another ~ you get the solid leaf shape and the skeleton leaf that layers over the top.
With all my pieces cut, I took the skeleton part of the leaf and embossed them with a combination of Distress Glazes and a hint of gold embossing powder.
Distress Glaze in order of application: Crackling Campfire, Vintage Photo, Candied Apple, Walnut Stain
Apply the embossing dabber to the skeleton left and sprinkle with the powder, using one powder at a time and heating in between each application. I always add less of each colour as I go along, so it gives a variation of colour to the embossed areas. Layer the finished embossed leaves over the top of the solid leaf and ink the edges with Walnut Stain Distress Ink.

Because I had a few extra leaves already cut and sitting on my desk, I used a combination of these leaves with some of the previously cut leaves that I had leftover and cut using the Oak Leaf Impresslit Die.

PAPER DOLL AND TARGET
For the main focal point of this tag, I used a Halloween Paper Doll, which I layered over the top of a Bat Wing Transparency to add a little extra spookiness!
I colour tinted the paper doll using Distress Watercolour Pencils. Picking up the pigment direct from the pencil using a water brush and applying it to the surface.
Once dry, I then threaded some silver metallic thread through a needle and popped the thread through the hand of the paper doll before I tied a spider from the Halloween adornments pack, to the end of the thread.
The spider is painted with Black Soot Distress Paint and Candied Apple in the centre of it's body.
In his other hand, I placed a snippet piece. I inked the little Curator Snippets ephemera piece and crumpled it up slightly before I cut a small incision into the hand of the paper doll, and placed the letter underneath it, so he appears to be holding it.
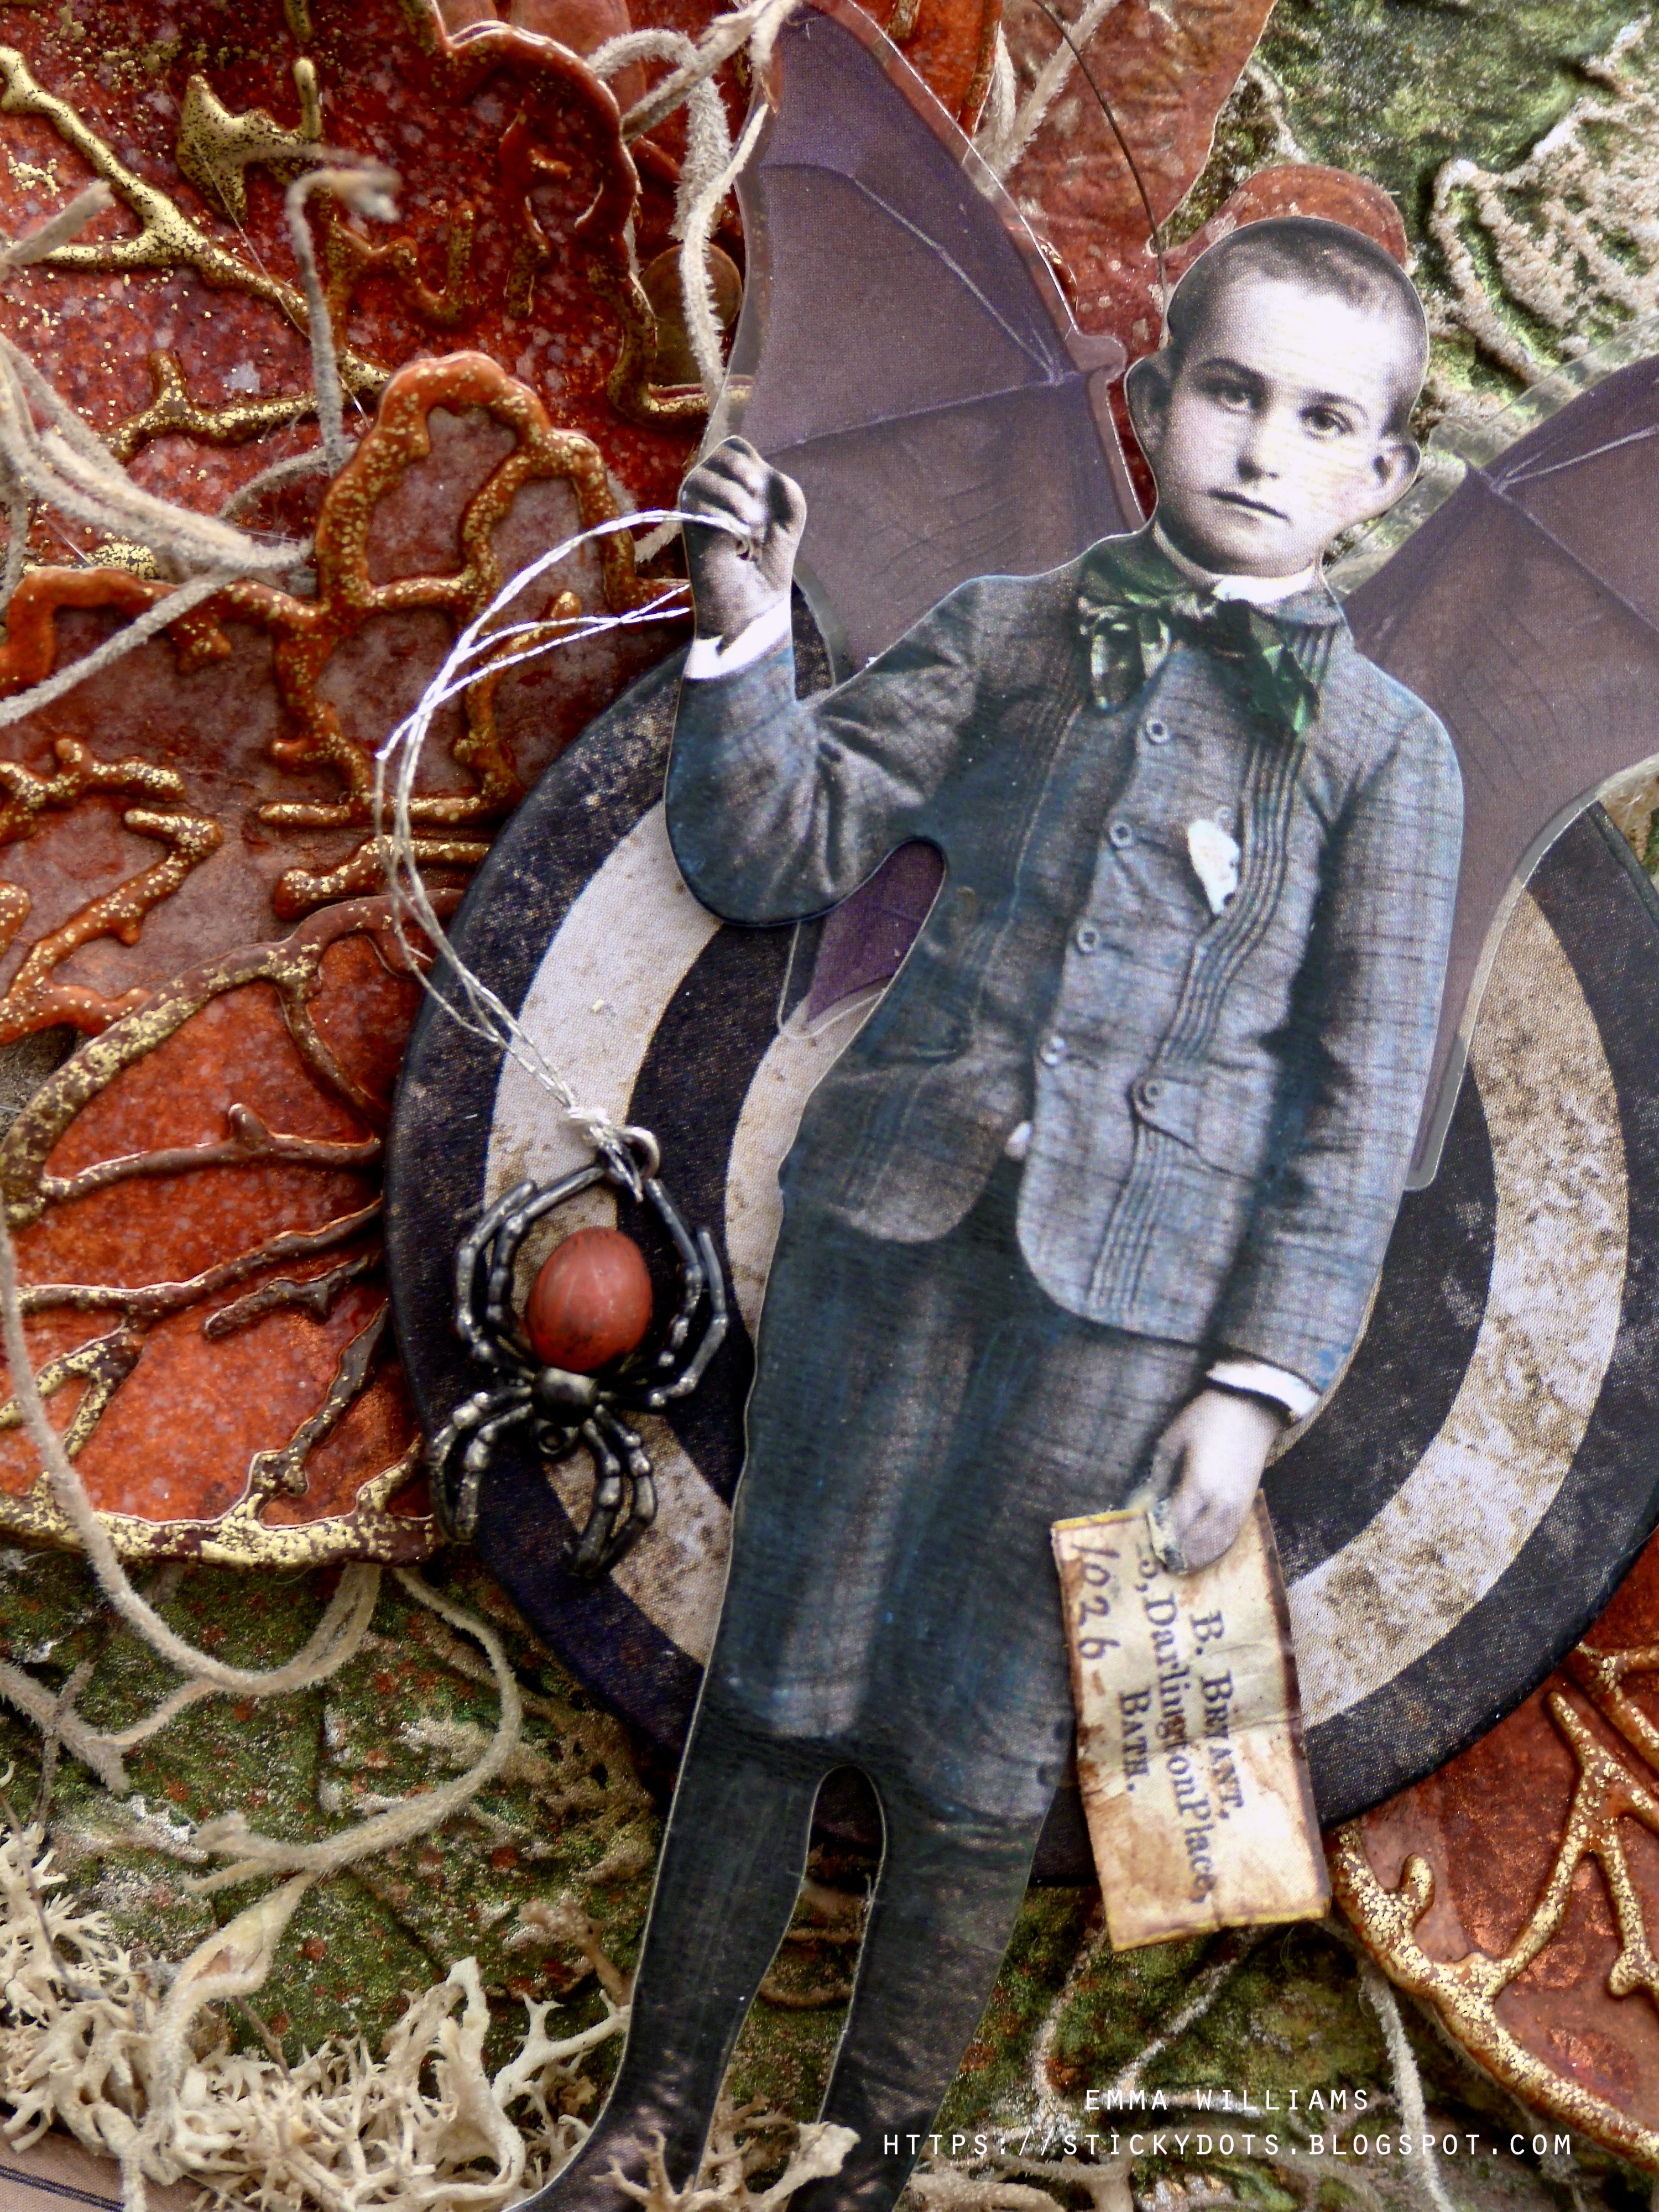
I mounted the paper doll onto the target, which is from the Halloween Baseboards Pack and then used foam pads to add dimension on the back of the target before I arranged it in the centre of the die cut leaves, which I attached around the circle.
I added some Spanish Moss in and around the leaves to add some more texture before moving onto the next step.
FOR SKILL AND AMUSEMENT ONLY
This was the perfect caption for this piece and once again, it's from the halloween Baseboards pack. I sanded the edges and then inked them before I mounted them onto my tag using foam pads to add some height.
I attached some moss along the top of the baseboard piece to complete this section....

...and made sure it looked as if the little boy was standing on the moss and quote.

We're nearly there and all that's left is to add the hardware...
...a few bolts on each of the four corners and finally a hinge clip to the top of the tag. I altered the metal with a little Black Soot and Crackling Campfire Distress Paint to create a more rusty finish.


So that's my project ready and finished...

As always, if you make anything, or if you've been inspired by anything that you've seen here on my blog ~ then please, let me know by tagging me on social media or leaving a comment here and I will be right over to take a look and if sometimes I miss it ~ just keep nudging me!
Don't forget that every week, one lucky random participant has the chance to win a $25 gift voucher from Simon Says Stamp and you can join in up to 5 times, which means you could have 5 chances to win. You have until next Monday at 8am Ohio time. 1pm UK time, 2 pm CET to join in and good luck....


Recipe for project:


Just another fabulous project Emma, I LOVE it!!! :) x Corinne
ReplyDelete