
Hello everyone and Happy 4th July to all my friends in the USA!
So here we are in a new month ~ I can't quite believe that we're over halfway through the year, where has 2022 gone?!?!? But as always, as we start a new week, it's also time for a brand new Simon Says Stamp Monday Challenge and this week, the DT are showcasing PAPER ROSE products and combining them with our RED, WHITE &/or BLUE theme and if you'd love to join us and play along, then all you need to do is create something using either all of the colours, or some of the colours!
For my make, I wanted to create a piece to celebrate American Independence Day and I chose to use Paper Rose backing papers, combined with Tim Holtz products to make a vintage style tag.

It's time to get creative...


TAG
To begin with I used a Small Stampers Anonymous Etcetera Tag that I painted with Black Soot Distress Paint. Once dry, I sanded back the edges, removing some of the black paint and revealing the core.
Down the centre of the tag, I adhered a panel of the double sided paper, choosing the brick wall design, from the Paper Rose Textures 1.0 12" x12" paper pack. I cut the paper to size, slightly smaller in width than the tag itself so that it will leave a black border showing either side, ripped and tore around the edges of the panel and then machine stitched a border.
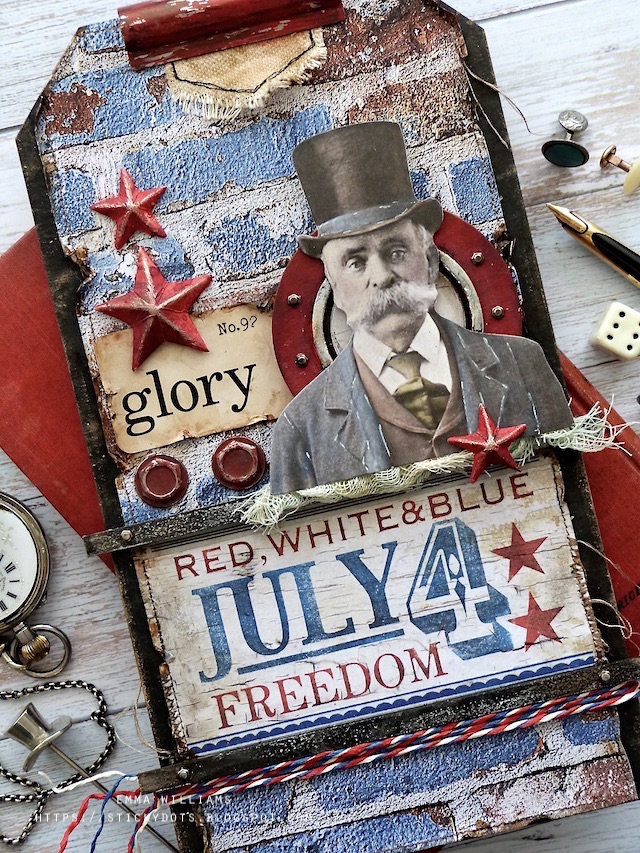
With my tag surface prepped and ready to go, I moved onto the next stage ~ the JULY 4th banner.
STAMPED July 4th BANNER
For this I cut a panel of the same paper, but used the reverse side, which is a white wooden plank design.
I placed the paper into my stamp platform, and then using the background stamp from the Americana Silhouettes Stamp Set by Tim Holtz, I used masking tape to mask off the areas I didn't want to stamp.
I then preceded to ink up the various sections of the stamp using Fired Brick and Prize Ribbon Archival Ink. I will admit that this technique is so much easier to do with the stamp platform but it can be done without but you might need to use ink with a slower drying time.
I machine stitched the banner around the edge and then attached it to my covered tag.

To frame the banner, I attached two of the straight edge trims from the Bat Web Trims pack. I chose them to be slightly longer in length as I liked them hanging over the edge, and after painting them with Black Soot Distress Paint, I placed them above and below the banner before I attached Hardware Heads onto each of the ends of the trims.

To complete this section, I wrapped some red, white and blue paper string that I had in my stash. This is by Tim Holtz, but is quite old ~ so if you're lucky enough to own it, then now is your chance to use it.

STEAMPUNK PART DIE CUT
We can now move onto all those layers, and let's start with the circle that sits behind the old gentleman.
I used the Steampunk Parts die and using only the circle on this die, I cut multiple layers of card that I built up to create a thick and very substantial die cut. This die cut has two separate pieces, so at this stage, I didn't attach the smaller ring that sits on the top of the circle.
I then painted this with a combination of Candied Apple and Black Soot Distress Paint, applying the red paint first, allowing it to dry and then dry brushing the black paint over the top. In the centre of the steampunk part, I attached a circle of the paper that I used on the banner.
Taking the smaller ring die cut, I applied Sterling Foundry Wax over the surface, heat set the wax and then attached it to my steampunk part.
I layered the circle onto my tag, using foam pads and placing it on the right hand side, attaching a Flash Card to the left, ripping and tearing the edges and using Matte Collage Medium to adhere it.
I then ran my Gathered Twigs Crayon over the top and around the torn edges, before adding a Specimen Remnant Rub number, "no. 92" onto the card.

PAPER DOLL PORTRAIT
Now for the Paper Doll Portrait, and for this I primed the surface with clear gesso and once it was dry, I added colour using Distress Crayons and a water brush.
I then used a white gel pen to apply some detail before I attached the portrait over the steampunk part using foam pads.

To the left of the portrait, I attached two Machinery Heads that I painted with Candied Apple Distress Paint. Once the paint was dry, I then scratched the surface to reveal the metal underneath, which creates more of worn effect to the pieces.

On either side of the portrait, I used Hex Fasteners. These come in two different sizes and I used the small ones and cut the wings off the back before attaching them to my steampunk part.
To finish the bottom line of the portrait, so it appears more grounded and doesn't float, I used some Mummy Cloth that I had on my desk and just tucked this underneath to from the base.

STARS
For the three stars on this project, I used Mixed Media Heavystock card inked with Candied Apple, Aged Mahogany and Barn Door.
I cut the stars, two small and one larger size, using the two dies in the Holiday Vault 2021 die set and folded along the scorelines to create my dimensional stars.

Along each of the folded edges, I applied some Sterling Foundry wax which I then heat set before I attached them to my tag ~ two on the left hand side...

...and a third star on the portrait.

We're almost there...
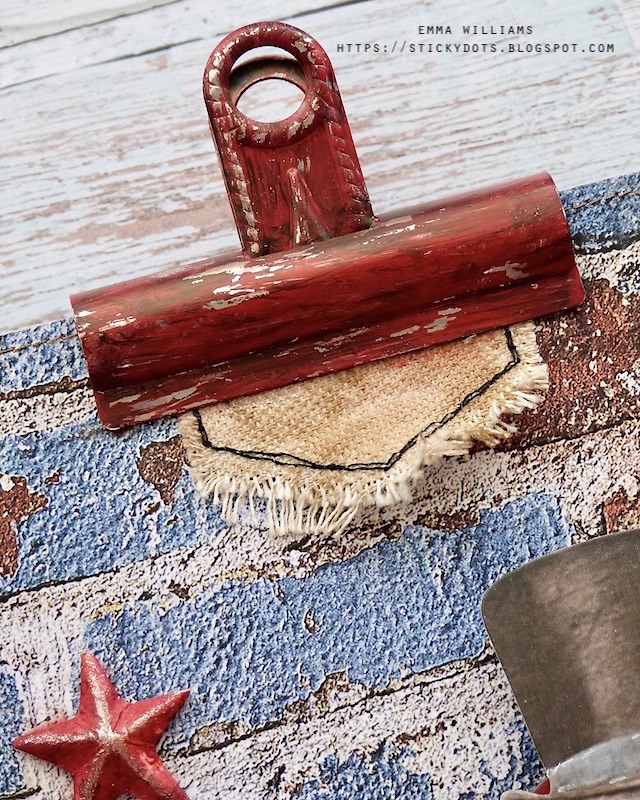
CLIP
...and all that's left is to paint the Vintage Clip with Candied Apple Distress Paint. Once again, once the paint was dry, I then scratched the surface to reveal the metal and then clipped it to the top of my tag, together with a Stitched Scrap that I dyed using Frayed Burlap Distress Spray Stain.
So that's my project finished for this week and I hope you love this piece...it's definitely been a lot of fun to make.

As always, if you make anything, or if you've been inspired by anything that you've seen here on my blog ~ then please, let me know by tagging me on social media or leaving a comment here and I will be right over to take a look and if sometimes I miss it ~ just keep nudging me!
Don't forget that every week, one lucky random participant has the chance to win a $25 gift voucher from Simon Says Stamp and you can join in up to 5 times, which means you could have 5 chances to win. You have until next Monday at 8am Ohio time. 1pm UK time, 2 pm CET to join in and good luck....


Recipe for project:


I love all the lovely layers and textures! There is truly something to see that is thoughtfully added in every nook and cranny of this tag! Thank you so much for sharing!
ReplyDeleteWow!! Just absolutely gobsmacking stunning!! Every little detail
ReplyDeleteThis is awesome- you do great written tutorials and I appreciate all the time this takes. Crafty hugs
ReplyDelete