Hello friends...
How is everyone doing? It's been a week of sunshine here in London and as we turn the clocks forward and head towards summer, it's time for lighter nights and fingers crossed more sunny days and of course, that means more daylight time for crafting! Which leads me nicely into a brand new Simon Says Stamp Monday Challenge which starts today, and this week our theme is all about RECYCLING. So whether you choose to recycle some of those cardboard boxes or old packaging that we all seem to keep for those "just in case" moments, or if you want to recycle some old projects inspiration and update it with a new idea, then we hope you'll join us and can't wait to see what you make!
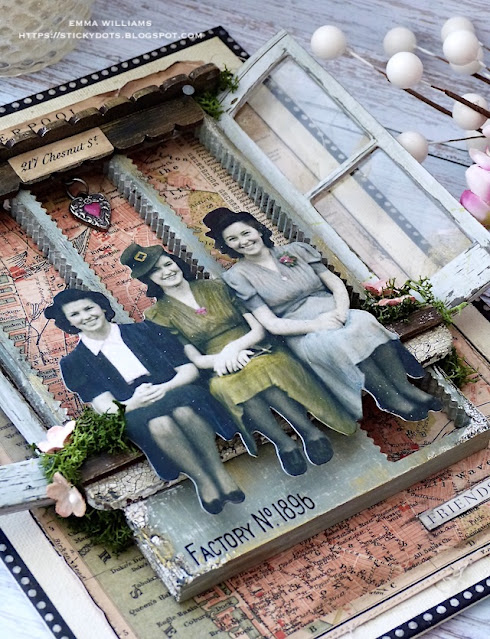
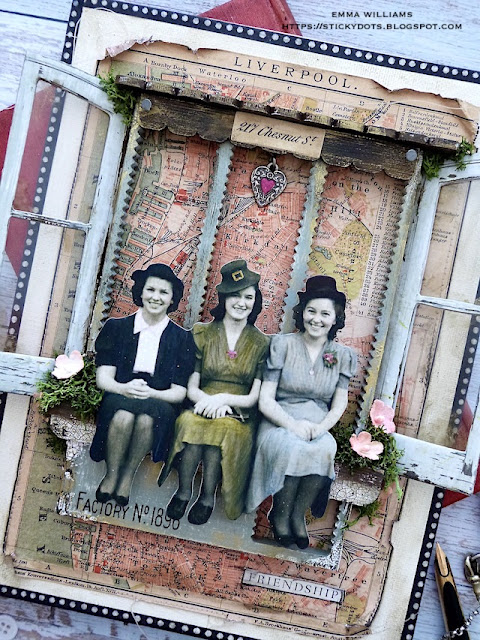
For my make, I chose to recycle some acetate packaging but also something that I seem to have plenty of and that's the waste from the packs of Stampers Anonymous/Tim Holtz Etcetera Trims! I use plenty of these trims on my projects and I've always kept those boards that I pop them out from ~ in my mind, one day they WILL have a use! So, as I hunted around to see what I could use, I suddenly cast my eye on these and thought they would look so cool as a window frame, and that's exactly what they became...a window of opportunity!
CANVAS BOARD
To begin with I started with my base and this is a Dina Wakley canvas board that I cut to measure 24 x 18cm. I applied a layer of Antique Linen and Picket Fence Distress Paint over the surface, and then cut a panel of the Liverpool map paper from Backdrops Volume 2. I love this map, and have been waiting for the right opportunity to use it and now was that time because I thought it worked perfectly as the backdrop for this piece.
After distressing and adding small tears around the edges of the paper, I machine stitched a border and then attached the panel to my painted canvas board using Matte Collage Medium.
I applied a coat of the medium over the entire board and paper, before adding some of the black and white dot Design Tape Trim around the edges. I honestly could do with a whole pack of that design, I absolutely LOVE it!
With the board ready, it's now time to recycle those waste products....
FRAME
I used three of the waste pieces from the Pinked Etcetera Trim pack and layered them over the top of one another to form one thick frame. You can see the depth of the frame I created, in the photo below....
After I applied a coat of gesso to the surface, I allowed it to dry before painting it with Sage Acrylic Paint from Dina Wakley. I used this colour, because I always associate it with the era of the photo ~ from kitchen accessories, to clothes and cars, it just seemed to be a colour that was everywhere at the time and I remember it so well from my grandparents and parents photos!
Once the painted surface was dry, I added crackle paste to random areas of the painted frame, allowed this to dry and do its thing before running the Walnut Stain Distress crayon over the top, blending out any harsh lines of colour with my fingertip.
Finally, I applied some of Tim's brand new Foundry Wax around the edges. I applied Gilded using my finger but you are advised to use a brush, just in case of a possible allergic reaction since this is a solvent based product.
I heat set the wax before I attached the finished frame to my board using Matte Collage Medium.
In the bottom left hand corner, I used a Eccentric Remnant Rub, "Factory No. 1896" and just applied it directly to the frame.
At this point, I also attached a Heart Adornment charm which hangs from the centre window. I fixed this to the top frame, using a screw eye fastener and then after painting the centre of the heart with a little Picked Raspberry Distress Paint, I attached the charm to my screw eye fixing.
WINDOWS
With the frame in place, I attached the windows on either side of the main frame.
This window is just one of the new Window Baseboard pieces and because I wanted to create the look of an open window, I cut it in half using a craft knife. Please be careful when doing this...
I attached some acetate, which I took from some recycled packaging and placed this behind each window frame. To create a more vintage feel to the glass, I applied a small amount of Mushroom alcohol Ink, dabbing it onto random areas of the acetate. This is so difficult to show in the photos but it makes so much difference to the project in real life. To attach the acetate, I used adhesive tape before I adhered the completed window frames at an angle onto each side of my main frame, using Matte Collage Medium down the side of each window frame.
Whilst the medium was drying, I just propped the frames up and this seemed to do the trick, and the frames are set into place and don't move.
TRIMS
Now for the trims and I added Scalloped Etcetera trims to the top, and used one of the Bracket Trims as a ledge for my friends to sit on ~ don't forget to keep that waste!!!!
At the top of the frame, I used two different lengths of the scalloped trims and painted these with a combination of Black Soot and Ground Espresso Distress paint which gave me a rich wood tone to the surface. I also added some more of that Gilded Foundry Wax to the surface, just to add some more depth of colour.
I then attached each trim into place ~ the smaller trim across the top, and the larger trim at a 90˚ angle to form a 'L' shape.
In the centre of the smaller trim, I attached an idea-ology Snippets Number Strip, 217 Chesnut St and aged it with a smear of Walnut Stain Crayon over the top.
To complete the frame and trims, I hammered a Nail Tack onto either side of the smaller trim.
The ledge that I used for the paper dolls is one of the Bracket Etcetera Trims and I added Crackle Paste directly onto the surface. I allowed the paste to dry, before attaching it across the lower section of my frame.
I then added a straight edge strip that I cut away from some more of the waste and painted this with the same combination as before ~ Black Soot and Ground Espresso. I attached this over the top of the crackle trim, just to create a little more height for the ladies to sit on.
PAPER DOLLS
I used a Group Paper Doll for this project and added colour using Distress Crayons and a waterbrush. I also added some white dots to the blouse on the left.
I then attached my paper doll to the ledge, before adding clumps of moss.
To complete this ledge, I added some Bouquet Findings, that I coloured with Antique Linen Distress Spray Stain and Saltwater Taffy Oxide Sprays.
Finally, I added the word "Friendship" in the bottom right hand corner, which is from the Clippings Sticker Book.
So that complete's my project for this week, and I hope you've loved what I've made...
As always, if you make anything, or if you've been inspired by anything that you've seen here on my blog ~ then please, let me know by tagging me on social media or leaving a comment here and I will be right over to take a look!
Don't forget that every week, one lucky random participant has the chance to win a $25 gift voucher from Simon Says Stamp and you can join in up to 5 times, which means you could have 5 chances to win. You have until next Monday at 8am Ohio time. 1pm UK time, 2 pm CET to join in and good luck....
Recipe for project:


love how you made the window back from the scraps! Such a great idea!
ReplyDelete