
Hello friends...
Hope you've all had a great week and ready for the weekend!
Today, I'm sharing another project that I made using some of the new Christmas dies from Tim Holtz and Sizzix ~ my Festive Bouquet embroidery hoop! If you want to see the entire release, which is available now from SSS, then don't forget you can catch up with Tim's YouTube live, where you'll also be able see all the amazing projects from the makers... just click HERE!


HOOP
For this project you will need an 7" Embroidery Hoop and I applied some Crackle Paste around the edges of the hoop which will help to create a more rustic appearance to the wood.

After allowing the crackle paste to dry and do it's thing, I then stained the wood with Gathered Twigs Distress Spray Stain which I painted directly onto the hoop with a brush. I allowed the stain to dry before I then sealed it with a coat of Matte Collage Medium.

Whilst the medium is drying, I cut a circle of Simon Says Stamp Midnight green card, slightly smaller than the inside of the hoop and a circle of gold metallic kraft card which is the same size as the hoop.
To create the stamping around the edge of the green circle, I used the speckle stamp from The Poinsettia stamp set and inked it with clear embossing ink before stamping randomly around the edge. I sprinkled gold embossing powder over the top, tapped away the excess and heat embossed until molten.

Matt the green circle onto the gold circle and then attach the matted layers to the back of the hoop.

To make sure the hoop is more substantial, I cut a piece of mount board that I attached to the back and this creates support.
Now to start designing the interior of the hoop...
LANTERN
To begin with I cut the Lantern from the Candlelight Colorize Die Set using Silver Metallic Kraft card and assembled the pieces to form the lantern. To create more of a rusty, pewter finish to the surface, I used Alchemy Waxes and applied these with my fingertip ~ Rusty Red, Charcoal, Bronze Age and White Pearl.
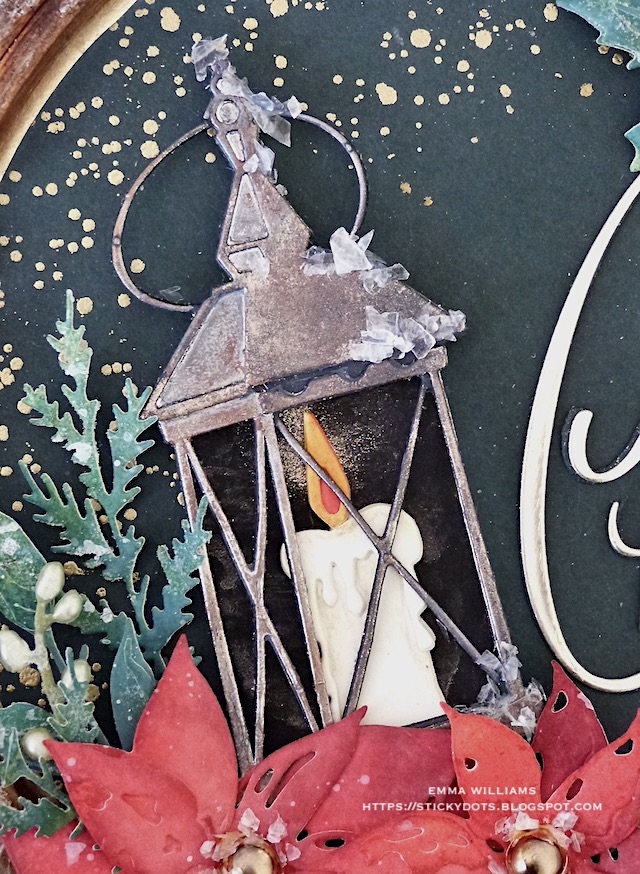
I cut the candle from Mixed Media Heavystock and coloured it with Polychromos Pencils.
I also cut a back section for this lantern, just cutting it from plain black card, but using a touch of wax to add a glow where the candle flame will hit. Place the candle onto the black card and the die cut lantern over the top.

FLOWERS AND GREENERY
Now for the flowers, I coloured Mixed Media Heavystock card with Candied Apple, Barn Door and a touch of Aged Mahogany Distress Spray Stains and combined it with Candied Apple Oxide Spray.
I heat dried the card and cut the flowers from it. I cut two large and one small, and used a double layer of die cuts to create my poinsettias.
For the foliage and greenery, I coloured more card using Distress Spray Stains ~ Evergreen Bough, Peeled Paint and Bundled Sage and as a variation of colour for the foliage, I coloured a second panel with Peeled Paint, Rustic Wilderness and Shabby Shutters.
Once I'd cut and assembled all the foliage, I inked the edges with Walnut Stain Distress Ink and then smeared a light coverage of Matte Collage Medium over the leaves before I sprinkled Rock Candy Dry Glitter over the top. Set aside to dry.
...and whilst that's happening, I layered the die cut flowers to create the poinsettias. I slightly offset each of the die cuts to form one poinsettia flower.

I then added a Metallic Droplet in the centre of each before sprinkling Mica Flakes over the top of Glossy Accents.

Attach the lantern inside the hoop and surround it with the two sizes of Poinsettia. Arrange the foliage by tucking the pieces behind the poinsettias.

DIE CUT WORD
For the Christmas wording, I used the die from the Vault Series 2021 and cut this from metallic kraft stash, three times before layering each piece over the top of one another to form a die cut that resembles the thickness of chipboard.
I attached the wording next to the lantern using Matte Collage Medium.

Take the final poinsettia and place this on the right hand side of the wording, again arranging the foliage around the flower.

For the finishing touches, I added Mica Flakes around the outside of the hoop and then added little white berries to the foliage using Tonic Nuvo Drops, sprinkling Rock Candy glitter over them whilst they were wet.

Finally, I tied a loop of Velvet Ribbon to the top.

And that completes my Festive Bouquet Hoop which I hope you love and I can't wait to see if you're inspired by it! If you are, then don't forget to tag me on social media or leave me a comment here and I'll be right over to take a look!

Thank you so much for taking the time to stop by today ~ stay safe and keep well.
Love Emma xxx
Recipe for project:
Stampers Anonymous: The Poinsettia
Distress Ink: Walnut Stain
Distress Spray Stain: Candied Apple, Barn Door, Aged Mahogany, Gathered Twigs, Bundled Sage, Evergreen Bough, Peeled Paint, Rustic Wilderness and Shabby Shutters
Oxide Spray: Candied Apple
Tim Holtz Idea-ology: Velvet Ribbon Cool Trims, Metallic Droplets
Mediums: Matte Collage Medium, Crackle Paste, Rock Candy Dry Glitter, Mica Flakes, Glossy Accents, SSS Gold Embossing Powder, Clear Embossing Ink, Simply White Tonic Nuvo Drops
Alchemy Wax: Rusty Red, Charcoal, Bronze Age and White Pearl


I absolutely love everything you make!! So inspirational and this make is incredible!! Thank you so much for sharing your wonderful talents ❤️
ReplyDeleteBeautiful...love it!!! Thank you for sharing your art and your time...
ReplyDeleteBeautiful! What size diameter is the embroidery hoop?
ReplyDeleteIt’s a 7” hoop…hope that helps! 🙂
Deleteyes !
DeleteYour creative well has no depths & lucky for us! Love this classy, festive and absolutely breathtaking piece! Whilst I do not have these exact does, I’m going to use this as a template for some of my holiday cheer! Thanks, Emma!
ReplyDeletestupendo bravissima
ReplyDeleteoh wow that is amazing, love the using of the hoop for the base and Lovely design!
ReplyDeleteAbsolutely stunning piece! Wow!!
ReplyDeleteIt would take weeks to gather all the pieces, parts and products and recreate this masterpiece. But worth the wait! You need to do a class on something like this!
OHH !!! I have been waiting for this one Emma !! Thankyou so much for sharing your gorgeous hoop make in a tutorial ! I am making two !
ReplyDeleteHeather , New Brunswick, Canada