
Hello friends and Happy Monday!
It's time for the brand new Simon Says Stamp Monday Challenge and this week our theme is all about having FUN WITH STENCILS! There are so many stencils available that you can choose from, so we hope that you will come and join us and play along!
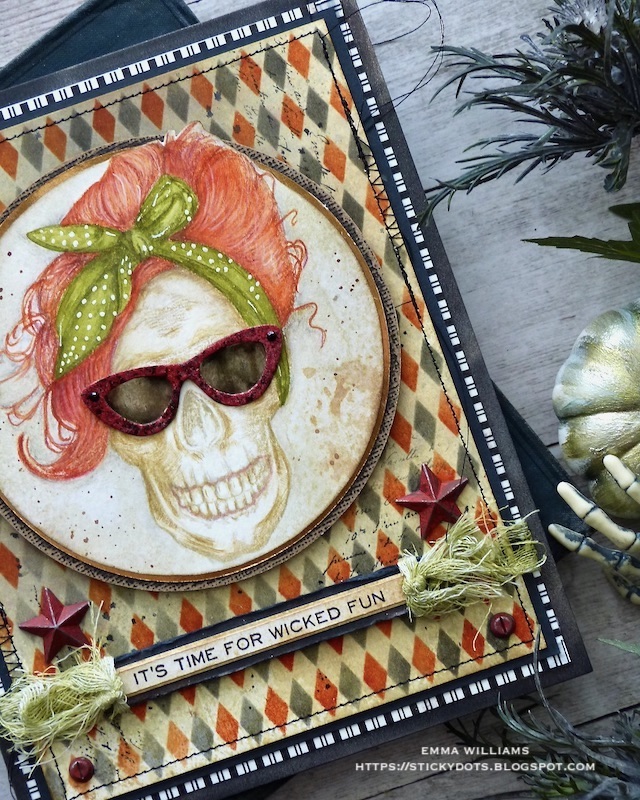
For my make, I'm sharing a card that I created for the recent Tim Holtz Stampers Anonymous Halloween 2021 release and this one is definitely all about having fun with stencils ~ because I chose to use the Multi Harlequin Shifter Layering Stencil to create a repeat pattern background for this wicked hipster, complete with flame red hair, who is all about having some spooktacular fun come the 31st October!
So, let's get started and here's how I created this card...


To begin with I'll start with the background panel and how I created the repeat harlequin pattern. Using a panel of Mixed Media Heavystock card, 13 x 17cm and inked with Old Paper Distress Ink, I started from the left hand side, (you will need to do this in two passes as the card panel is slightly wider than the stencil), I placed the Harlequin Shifter Stencil directly onto the card. I usually just hold the stencil in place but if you're not too confident, then you could try low tack masking tape and Sticky Grid.
I then started applying ink through the stencil using a blending brush. I started with Crackling Campfire and picked up the ink directly from the pad with the brush before gently building up the colour on the intensity of colour on my card panel. Once I had the first section of card inked, I then placed the stencil on the remaining right hand side of the card and repeated the inking with the blending brush, adding Crackling Campfire directly onto the card, through the stencil.

Once I was happy, remove the stencil and at this point I cleaned any remaining ink from the stencil as I didn't want cross contamination of colour.
Now for the clever part of a shifter stencil and that second repeat pattern layer of colour. Place the stencil back down over the top of the inked panel, shifting and matching up the pattern that you can see as an etched line on the stencil, and lining it up and placing it over the top of the Crackling Campfire ink. Hope that makes sense but I promise you it is really easy and if you go wrong, it's only a piece of card, just keep going!
I then applied my second layer of colour, Hickory Smoke. Again I used a Blending Brush and applied the Distress Ink through the stencil, building up the intensity as I go.
Once again, you will need to do this in two passes to cover the entire card panel.

With the repeat pattern complete, I then added some more stamped layers, and for this I used the script stamp from the Tiny Toadstools stamp set and stamped random areas of the background with Black Soot Archival Ink before adding tiny splatters of Black Soot Distress Paint. I finished the panel with a tiny stamp in the top left hand corner that is a stamp from the Moth Study stamp set.

I machine stitched a border around the outside and then matted the panel onto black card, followed by that striped piece of card which is actually plain card, but I added a layer of an older Tim Holtz Halloween design tape that I have in my stash, and placed this around the edge to create the look of patterned paper.
Now for the main feature of the card, the Wicked Hipster which I coloured using the no-lines watercolour technique which creates such a cool effect to the skull and especially her flame red hair!

To begin with I stamped the image of the lady hipster onto a piece of Distress Watercolor card with Antique Linen Distress Ink.
I then added the colours and I used a combination of Distress Re-Inkers and Polychromos Pencils and starting with the Re-Inkers and a waterbrush, I laid down a solid coverage of Ripe Persimmon for her hair colour.
I heat dried the ink and then add some shading using Crackling Campfire, again heat drying the ink between layers.
With my base layer down on paper, I added shading and detail using Polychromos Pencils.
I repeated this to colour the face, using Antique Linen and Frayed Burlap Re-Inkers as the base layer, before adding detail with the pencils.
For the bow, I used Peeled Paint and Forest Moss Re-Inkers and a final layer of pencil highlights. To complete the bow, I used a white pen to add the polka dots.
Finally, I added some lipstick to my skull...using a touch of Kitsch Flamingo Re-Inker.
I then cut a circle using a circle cutter from my stash and because I wanted her hair to slightly overlap the top edge of the circle, I carefully cut the circle, cutting it up to the point where the circle meets the stamp, then leaving the hair uncut before starting the cut again. The circle is slightly smaller in size than will fit the head, and this means that I need to cut around the top outline of her hair to complete the circular focal point.
I inked around the edge of the circle with Walnut Stain Distress Ink and added some splatters before matting it onto Neutral Kraft stash, a rust layer, followed by a black layer both of which I sanded around the edge for a more worn, distressed look. I attached the image to the background with foam pads.
Now for the glossy sunglasses, and I stamped these directly onto Mixed Media Heavystock using Black Soot Archival Ink and then fussy cut around the outline. I then applied a layer of Embossing Dabber over the top and sprinkled with Cranberry Metallic Embossing Powder. Tap away the excess and heat emboss before repeating this process, but this time sprinkling a small amount of black embossing powder over the top. You don't want a solid layer of black, you want that red to be the overall colour, so it really is only a sprinkle, so brush away any excess powder and once again heat emboss.
To create the sunglasses, I inked a small piece of acetate with Pitch Black Alcohol Ink, and then attached it behind the sunglasses. I then fitted the sunglasses onto my wicked hipster, using small piece of foam to create dimension.

We're nearly there and all that's left is to stamp the sentiment onto a strip of card inked with Old Paper Distress Ink and layer this onto black card.

I dyed a strip of Mummy Cloth with Peeled Paint Distress Spray Stain and once this was dry, I wrapped it around each end of the layered sentiment before attaching it to my card blank with foam pads, placing it below the image and securing the ends of the cloth around teh back of the card panels. Mount the panels onto a black card blank with foam pads.

To compare the card, I painted a Star Adornment with Candied Apple Distress Paint to either side of the circular panel and finished with Hardware Heads, again painted with the red paint.

So that's my card finished and I hope you've enjoyed the process and it's encouraged you to have a play with Shifter Stencils or no-line watercolouring ~ both of which are such fun techniques.

...as always, if you make anything, or been inspired by anything that you've seen here on my blog ~ then please, let me know by tagging me on social media or leaving a comment here and I will be right over to take a look!
Don't forget that every week, one lucky random participant has the chance to win a $25 gift voucher from Simon Says Stamp and you can join in up to 5 times, which means you could have 5 chances to win. You have until Monday 8am Ohio time. 1pm UK time, 2 pm CET to join in and good luck....


Recipe for project:


This is so fun Emma! I love the harlequin background and the red hair is so cool!
ReplyDelete