Showing posts with label no line watercoloring. Show all posts

Monday, 13 September 2021

It's Time For Some Wicked Fun....

Hello friends and Happy Monday!

It's time for the brand new Simon Says Stamp Monday Challenge and this week our theme is all about having FUN WITH STENCILS! There are so many stencils available that you can choose from, so we hope that you will come and join us and play along!

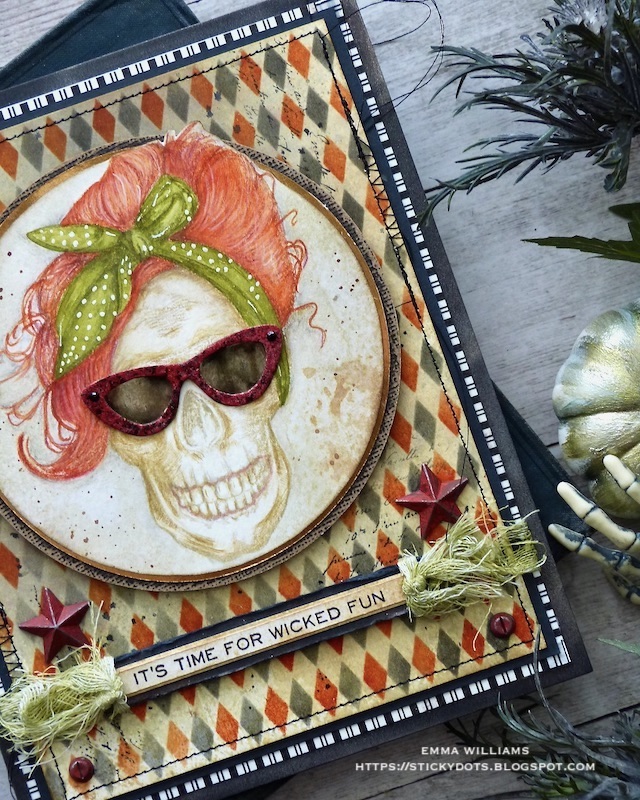
For my make, I'm sharing a card that I created for the recent Tim Holtz Stampers Anonymous Halloween 2021 release and this one is definitely all about having fun with stencils ~ because I chose to use the Multi Harlequin Shifter Layering Stencil to create a repeat pattern background for this wicked hipster, complete with flame red hair, who is all about having some spooktacular fun come the 31st October!

So, let's get started and here's how I created this card...


To begin with I'll start with the background panel and how I created the repeat harlequin pattern. Using a panel of Mixed Media Heavystock card, 13 x 17cm and inked with Old Paper Distress Ink, I started from the left hand side, (you will need to do this in two passes as the card panel is slightly wider than the stencil), I placed the Harlequin Shifter Stencil directly onto the card. I usually just hold the stencil in place but if you're not too confident, then you could try low tack masking tape and Sticky Grid.

I then started applying ink through the stencil using a blending brush. I started with Crackling Campfire and picked up the ink directly from the pad with the brush before gently building up the colour on the intensity of colour on my card panel. Once I had the first section of card inked, I then placed the stencil on the remaining right hand side of the card and repeated the inking with the blending brush, adding Crackling Campfire directly onto the card, through the stencil.

Once I was happy, remove the stencil and at this point I cleaned any remaining ink from the stencil as I didn't want cross contamination of colour.

Now for the clever part of a shifter stencil and that second repeat pattern layer of colour. Place the stencil back down over the top of the inked panel, shifting and matching up the pattern that you can see as an etched line on the stencil, and lining it up and placing it over the top of the Crackling Campfire ink. Hope that makes sense but I promise you it is really easy and if you go wrong, it's only a piece of card, just keep going!

I then applied my second layer of colour, Hickory Smoke. Again I used a Blending Brush and applied the Distress Ink through the stencil, building up the intensity as I go.

Once again, you will need to do this in two passes to cover the entire card panel.

With the repeat pattern complete, I then added some more stamped layers, and for this I used the script stamp from the Tiny Toadstools stamp set and stamped random areas of the background with Black Soot Archival Ink before adding tiny splatters of Black Soot Distress Paint. I finished the panel with a tiny stamp in the top left hand corner that is a stamp from the Moth Study stamp set.

I machine stitched a border around the outside and then matted the panel onto black card, followed by that striped piece of card which is actually plain card, but I added a layer of an older Tim Holtz Halloween design tape that I have in my stash, and placed this around the edge to create the look of patterned paper.

Now for the main feature of the card, the Wicked Hipster which I coloured using the no-lines watercolour technique which creates such a cool effect to the skull and especially her flame red hair!

To begin with I stamped the image of the lady hipster onto a piece of Distress Watercolor card with Antique Linen Distress Ink.

I then added the colours and I used a combination of Distress Re-Inkers and Polychromos Pencils and starting with the Re-Inkers and a waterbrush, I laid down a solid coverage of Ripe Persimmon for her hair colour.

I heat dried the ink and then add some shading using Crackling Campfire, again heat drying the ink between layers.

With my base layer down on paper, I added shading and detail using Polychromos Pencils.

I repeated this to colour the face, using Antique Linen and Frayed Burlap Re-Inkers as the base layer, before adding detail with the pencils.

For the bow, I used Peeled Paint and Forest Moss Re-Inkers and a final layer of pencil highlights. To complete the bow, I used a white pen to add the polka dots.

Finally, I added some lipstick to my skull...using a touch of Kitsch Flamingo Re-Inker.

I then cut a circle using a circle cutter from my stash and because I wanted her hair to slightly overlap the top edge of the circle, I carefully cut the circle, cutting it up to the point where the circle meets the stamp, then leaving the hair uncut before starting the cut again. The circle is slightly smaller in size than will fit the head, and this means that I need to cut around the top outline of her hair to complete the circular focal point.

I inked around the edge of the circle with Walnut Stain Distress Ink and added some splatters before matting it onto Neutral Kraft stash, a rust layer, followed by a black layer both of which I sanded around the edge for a more worn, distressed look. I attached the image to the background with foam pads.

Now for the glossy sunglasses, and I stamped these directly onto Mixed Media Heavystock using Black Soot Archival Ink and then fussy cut around the outline. I then applied a layer of Embossing Dabber over the top and sprinkled with Cranberry Metallic Embossing Powder. Tap away the excess and heat emboss before repeating this process, but this time sprinkling a small amount of black embossing powder over the top. You don't want a solid layer of black, you want that red to be the overall colour, so it really is only a sprinkle, so brush away any excess powder and once again heat emboss.

To create the sunglasses, I inked a small piece of acetate with Pitch Black Alcohol Ink, and then attached it behind the sunglasses. I then fitted the sunglasses onto my wicked hipster, using small piece of foam to create dimension.

We're nearly there and all that's left is to stamp the sentiment onto a strip of card inked with Old Paper Distress Ink and layer this onto black card.

I dyed a strip of Mummy Cloth with Peeled Paint Distress Spray Stain and once this was dry, I wrapped it around each end of the layered sentiment before attaching it to my card blank with foam pads, placing it below the image and securing the ends of the cloth around teh back of the card panels. Mount the panels onto a black card blank with foam pads.

To compare the card, I painted a Star Adornment with Candied Apple Distress Paint to either side of the circular panel and finished with Hardware Heads, again painted with the red paint.

So that's my card finished and I hope you've enjoyed the process and it's encouraged you to have a play with Shifter Stencils or no-line watercolouring ~ both of which are such fun techniques.

...as always, if you make anything, or been inspired by anything that you've seen here on my blog ~ then please, let me know by tagging me on social media or leaving a comment here and I will be right over to take a look!

Don't forget that every week, one lucky random participant has the chance to win a $25 gift voucher from Simon Says Stamp and you can join in up to 5 times, which means you could have 5 chances to win. You have until Monday 8am Ohio time. 1pm UK time, 2 pm CET to join in and good luck....


Thank you so much for taking the time to stop by today ~ stay safe and keep well.
Love Emma xxx

Monday, 14 June 2021

Love Is The Flower...

Happy Monday everyone...

Hope you've all had a wonderful weekend and as we start a brand new week, we have a brand new Simon Says Stamp Monday Challenge, and this week our theme is called BEAUTIFUL BLOOMS and whatever you choose to use and make, the SSS DT can't wait to see your projects and hope you'll join us and play along.

For my project, I made a card and I chose to use one of the most beautiful floral stamps that I could think of ~ the gorgeous floral spray from the Stampers Anonymous Dearly Departed by Tim Holtz. This is definitely a favourite of mine and I decided to use the no lines watercolour technique to add the colour using Distress Re-Inkers as my chosen medium.

So let's get started and here's how I created this card...


To begin with I cut a panel of Distress Watercolor Cardstock, 11.5 x 15.5cm and using Tim's Stamp Platform, I stamped the image of the floral spray directly onto the right hand side of the card using Antique Linen Distress Ink. I also stamped a second image of just the flowers, onto a separate piece of card.

After removing the card, I leave the stamp in position, as I will be returning to this once the images are coloured.

I then started my watercoloring using Tim's waterbrush and Distress Re-Inkers and apply small dots of the ink into a paint palette.

COLOURS USED:

Flowers: Picked Raspberry, Kitsch Flamingo, Spun Sugar for flowers on the main panel. Crackling Campfire, Mustard Seed for the second stamped image.

Leaves: Peeled Paint, Forest Moss, Bundled Sage

Once I was happy with the effect, I placed the watercolored image back into the Stamp Platform and then inked the centres of the flower image only with a very light inking of Gathered Twigs Distress Ink before stamping directly over the coloured image to bring back some of the detail in the centres of the flowers.

I repeated this process with the second stamped image before cutting around the outlines of the coloured flowers.

Now to add that vintage touch and I started by inking the background with a blending tool using Antique Linen Distress Ink. I carefully apply the ink around the outline of the stamped flowers.

I then inked through the stencil using Frayed Burlap Distress Ink, adding a second layer of imagery onto the background, again avoiding the painted flowers. I splashed a small amount of water onto the background and then heat dried it. If you want to avoid any mishaps, then you can always cover the flowers with a mask of paper, this will protect them whilst you add ink to the background but I just covered them with some paper towel.

For the next layer of inking, I added some script from the Dearly Departed set in Black Soot Archival Ink, together with the Music Score taken from The Poinsettia stamp set, and stamped in Hickory Smoke Archival Ink.

To complete the background, I stamped a postmark and numbers from the Field Notes set and then I machine stitched a border around the outside edge of the card.

I now have the background ready to mount onto card layers, starting with black kraft card from Tim's Neutral set, which I lightly sanded, followed by a layer of ivory card, inked around the edges with Walnut Stain Distress Ink and finally a floral layer. This is actually plain white card, that I edge with Design Tape to create a border. As I mentioned in the past, I've no idea which tape comes from which set, lol ~ they are all in a huge box, all mixed up!

With my layers complete, I dyed some Mummy Cloth using Spun Sugar, Kitsch Flamingo and Antique Linen Distress Spray Stains. I dried the cloth with my heat gun and then wrapped it around the bottom section of my card layers, securing it with a knot on the right.

I then mounted the layers onto a kraft card blank and attached the orange flowers to my stamped arrangement, using foam pads to add some height.

Now to add the finishing touches and I began by stamping the 'Wholesale Florists' stamp onto card coloured with the same inks as I used on the background. After stamping, I cut around the outline and mounted it onto gold metallic kraft card, followed by felt which I cut using my very precious, and well loved pinking shears that my Nan handed down to me.

I mounted the logo onto my card panel using foam pads, placing it over the top of the Mummy Cloth.

I pinned an Antiqued Gem to the middle of the knot, and then added a button.

Finally, I added the 'Love You' label down the side. I stamped the label which I took from the Field Notes stamp set onto some scrap card, inked with the same colours as before and then I stamped the wording which I took from the Tiny Text stamp set.

I cut around the label, added some zig zag machine stitching down the edge and attached this to my card, placing it next to the flower arrangement on the left hand side.

So that completes my card project and I hope you'll see why I love this stamp set as much as I do, it really is a stunner and even though it is a Halloween stamp set, you can use this image for anytime of the year. 

As always, if you make anything, or been inspired by anything that you've seen here on my blog ~ then please, let me know by tagging me on social media or leaving a comment here and I will be right over to take a look!

Don't forget that every week, one lucky random participant has the chance to win a $25 gift voucher from Simon Says Stamp and you can join in up to 5 times, which means you could have 5 chances to win. You have until Monday 8am Ohio time. 1pm UK time, 2 pm CET to join in and good luck....


Thank you so much for taking the time to stop by today ~ stay safe and keep well.
Love Emma xxx


Recipe for project:

Distress Paint: Black Soot
Distress Re-Inkers: Picked Raspberry, Kitsch Flamingo, Spun Sugar, Crackling Campfire, Mustard Seed, Peeled Paint, Forest Moss, Bundled Sage
Distress Inks: Antique Linen, Frayed Burlap, Walnut Stain, Gathered Twigs
Distress Spray Stains: Kitsch Flamingo, Spun Sugar, Antique Linen

Sunday, 28 June 2020

Send Happiness ~ Simon Says Stamp Blog Hop Day 2

Hello friends and Happy Saturday!

Today, is the second day of the Simon Says Stamp Send Happiness 🌈 Blog Hop and I'm really excited to be joining so many talented designers as one of the stops on this exciting hop! You can see the fabulous new release in full by just popping over to Simon Says Stamp and if you've been hopping along, you'll have arrived here from the talented Vicky's blog but if you've just popped by and want to join us from the very beginning, just hop over on the Simon Says Stamp's Blog.

For my card, I got to chill out with the gnomes and created a little woodland magic for my gnome to escape to and this is how I created this piece, using the no line watercoloring technique to add colour to the cutest little gnome I know!
To begin with I created the inky background layer for the 12.5 x 15.5cm kraft card blank. Cut a panel of heavy stock card, 10.5 x 13.5cm and lightly mist the card with water. Spritz the damp card with Speckled Egg and Pumice Stone Distress Spray Stains. Mist again with water and allow the stains to blend but not become muddy in appearance. Once happy, heat dry the inked card and if you want to add more stain, just repeat the process ~ you can always add but you can't take it away!

On the inked card panel, I wanted to create a very subtle pattern and for this I used a flower stamp from the Luck & Hugs Stamp set, inked with Speckled Egg Oxide Ink and stamped the image randomly over the inked background to create a pattern.
After inking the edges of the completed card panel with Walnut Stain Distress Ink, I machine stitched a wonky border around the edge.
I matted the inked card panel onto a piece of burlap, followed by a further panel of mixed media heavy stock card, which is lightly inked around the edge and finally a layer of gold metallic kraft card which I've sanded very lightly to take some of the shine away. I then placed foam pads onto the back of the layers and mounted it onto my card blank.

For the next layer, I used the Filigree Message Rounded Rectangle Die to die cut some of the Heavystock card and then cut around the die to create a 8 x 9cm panel. Using the Tumbled Glass Distress Ink pad, I applied the ink pad directly to the die cut, to ink the surface of the card but I didn't go for a complete coverage, I left some of the card untouched by ink.

Working quickly, I sprinkled some Speckled Egg Distress Embossing Glaze over the top, tapped away the excess and then using a heat gun, gently heated the glaze until it melted. Ink over the top of the glazed panel with Walnut Stain Distress Ink and then matt onto white card, so that it allows a pop of white to show through the die cut, followed by a panel of gold metallic card, leaving a border of gold showing around the outside.
Now to bring the chillin gnome to life and for this I used the no line watercoloring method and stamped the image of the gnome and his toadstools onto watercolour card using Antique Linen Distress Ink. I then watercolored the image with a selection of Distress Marker Pens:
Skin: Antique Linen, Spun Sugar
Beard: Pumice Stone
Hat: Peeled Paint, Candied Apple for the band
Clothes: Candied Apple, Brushed Corduroy, Antique Linen
Toadstools: Candied Apple, Frayed Burlap, Old Paper
Once I had laid down the first wash of colour on all my stamped images, I then built up some shadows and highlights before using Polychromos Pencils to add even more shading which completes the gorgeous little gnome. On the toadstools, I added small white spots using a white fine line pen.

After fussy cutting around the outline of each image, I attached the pieces with foam to my glazed die cut filigree rectangle. Underneath his feet, so that he looked more grounded, I dyed a piece of Mummy Cloth with Peeled Paint Distress Stain and once the cloth was dry, placed it beneath him attaching it with Matte Collage Medium. I then attached the finished panel to my card using foam pads and added small gold Metallic Droplets to each of the top corners of the die cut.
We're nearly there...

...and all that's left is a couple of details, starting with the Summertime label that sits in the top left corner and for this I used a label stamp from Tim Holtz's Field Notes Stamp set and stamped this onto a piece of card, using Barn Door Archival Ink. I then stamped the Summertime wording onto the label, cut the label in half and added some machine stitching before attaching it to my glazed panel and adding a Tiny Clip to clip it in place.
Finally, I used a sentiment strip from the Fresh Blooms set, cut the message "May The days ahead be filled with sunshine & love" and after inking with Antique Linen Distress Ink, I attached this across the bottom of my card, adding a couple of Hardware Heads either side to complete it.
I hope you love the card and made and enjoyed the creative process behind this card. If you haven't tried the no line watercoloring technique, then I hope this inspires you and encourages you to have a go ~ it's really not as hard as you might think but if at first you don't succeed, practice will make perfect!


HOP ORDER:


ALL THE HOP DETAILS:

Simon Says Stamp is giving away a $25 coupon to every stop on the blog hop! This means you can leave a comment here and on every stop along the way to increase your chances. Winners will be posted on the Simon Says Stamp blog on Wednesday, 1st July and all winners will need to contact/email Simon Says Stamp to claim their prize. Also, last but by no means least ~ we are also running a special surprise promotion in conjunction with this hop and you can claim one free gift of your choice! The offer is valid until 29TH JUNE at 11:59 EDT, or while supplies last and there are one of four codes for you to choose from to claim your ONE gift!

Thanks so much for hopping by today, hope to see you again soon!
Emma xx


RECIPE FOR CARD:
Simon Says Stamp Send Happiness Release: Chillin Gnomes, Filigree Message Rounded Rectangle Die
Simon Says Stamp products: Luck and Hugs Stamp Set, Fresh Bloom Sentiment Strips
Tim Holtz Stamps: Field Notes
Powered By Blogger

Total Pageviews