
Hello friends and Happy Monday...
As another week flies by, it's time for the brand new Simon Says Stamp Monday Challenge and this week we'd love for you to join us and play along with our fun theme which is all about embracing our FEMININE side, and with Mother's Day just around the corner in so many countries, this is just perfect timing to start making those cards for all those special Moms. The DT are also showcasing our very own Simon Says Stamp products within our projects!
I chose to make a tag and this was actually inspired by the Art Deco period and from the clothes to the architecture, I just love everything about it and for me this era was one of the most feminine of all time and in turn, this style was ideal to replicate for this challenge. So, with all my bits and pieces in front of me, a combination of Simon Says Stamp and various Tim Holtz products, the tag started to come to life and I started with the background which is actually a Simon Says Stamp die that I cut to create a stencil.

So, let's get started and here's what I did...


I cut a panel of acetate, 12 x 17cm but you can also use scrap card, as long as it's it's fairly thick and will stand up to being used as a template.
Taking the SSS Spring Blooms Corner die, I placed the die in the bottom left hand corner and ran it through my machine. To cut through acetate, you might need to do this two or three times, dependent on pressure of your machine. I then placed the die in the opposite corner and once again, ran it through the machine. I now have a stencil to be used for the background and placed this over the top of my tag.
I spritzed through the stencil design with Tim Holtz Resist Spray, and then carefully lifted the stencil and removed it from the tag.
Allowing for the resist spray to dry, I then spritzed colour over the top of the tag, which I had already misted with a little water and the colours I used were a combination of Distress Spray Stains; Speckled Egg, Stormy Sky, Salvaged Patina, Frayed Burlap and Crackling Campfire. I also used Speckled Egg Oxide Spray.

After gradually building up the colour using the various sprays, which I dried in between layers, I had my background which has shown up the beautiful pattern of the die, which I'd used as a stencil.
I machine stitched a border around the outside of the tag and then adhered it to a size 8 Etcetera Tag using Matte Collage Medium before inking the edge of the tag with Walnut Stain Distress Ink.
Moving onto the die cut leaves that surround the photo. For these I used the Sizzix Skeleton Leaves Die set by Tim Holtz and cut three sets of leaves from Mixed Media Heavystock card.

With the leaves on my glass mat, I added colour using Speckled Egg and Bundled Sage Distress Spray Stains. I throughly dried the leaves before the next step of adding the gold flakes.
I used Prima Marketing Vintage Metallic Flakes and applied the flakes to approx half of the leaves using Prima's Gilding Glue. I applied the glue to the surface of each leaf, and once the glue is ready, I applied the beautiful flakes over the top. At this stage, it might look a mess but don't worry all you do is use a brush to brush away the excess flakes, which can be popped back into the tub and you are left with the most gorgeous gilded leaves.

Cut the stems into pieces, and set them to one side.
Now for the framed image, which is the perfect Deco shape. I used one of the dies in the Sizzix Geo Frame Dies by Tim Holtz. I cut the frame three times from Mixed Media Heavystock card, keeping the inner piece because I will place that back inside once I've finished. I layered each die cut over one another to create one thick frame. Once the adhesive was dry, I then inked the frame with Salvaged Patina Distress Ink before applying the Embossing Dabber over the surface. After sprinkling Salvaged Patina Embossing Glaze over the top, I heat embossed the frame until the glaze was molten. I then applied another layer of Embossing Dabber before applying a very light sprinkling of Walnut Stain Embossing Glaze over the frame. You don't want a solid covering, so it really is as if you're sprinkling sugar over the top of a doughnut, that's all you need. Heat emboss and then place the inner section, which I covered with linen from my stash, back inside the frame.

For the next layer, I added some Mica from my stash before attaching the Photo Booth image over the top. I colour tinted the image with Distress Crayons and a waterbrush, and then machine stitched a border around the outside before using Matte Collage Medium to attach the image over the top of the frame layers.

I placed a Mini Paper Clip in the top right hand corner of the photo.
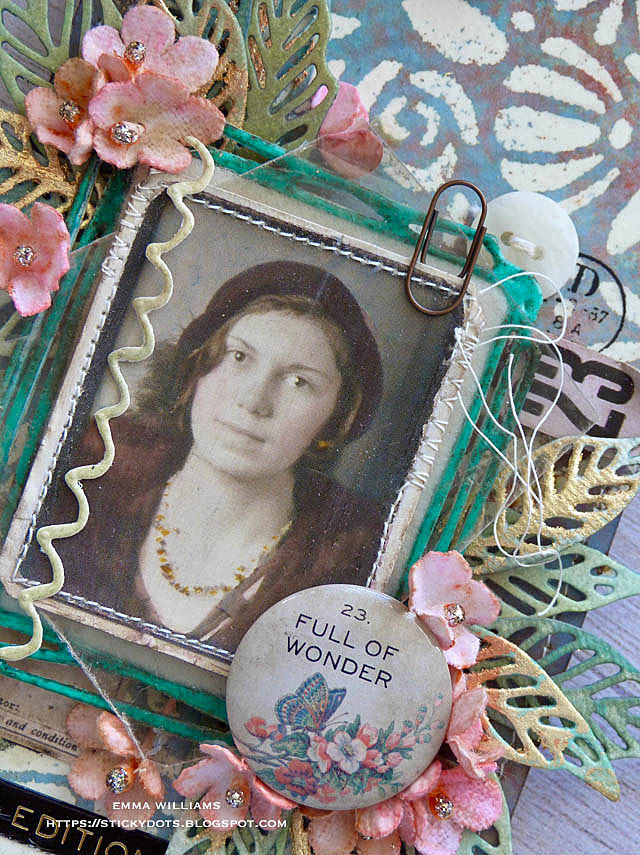
I attached my completed frame onto the tag, attaching the leaves to cascade around it. I also added some ephemera snippets, a button from my stash and a Remnant Rub around the arrangement of the frame and leaves.

Now for the finishing details and to add that touch of femininity, I added the tiny pink Bouquet flowers. I coloured the flowers with Kitsch Flamingo and Antique Linen Distress Spray Stains and once they were dry, I cut each individual flower from the stem and placed them in, and around the photo. In the centres of the flowers, I added Platinum Stickles Glitter Glue to each of the stamens and allowed for these to dry.

To complete the photo, I added the 'squiggle' that runs down the left hand side. For this I used the Sizzix Media Marks Die by Tim Holtz and cut the piece from a scrap of previously inked card. I think it was inked with Antique Linen, Speckled Egg and Old Paper. I then attached the die cut mark directly onto the photo.

I also added one of the new Flair Quotes "Full of Wonder" in the bottom right hand corner.

Underneath the frame, I placed a Metallic Quote Sticker ~ Limited Edition and also attached a Stitched Scrap, which I coiled around and stitched to form a loop, placing this on the left hand side of the frame.

Finally, at the top of the tag, I attached the hole reinforcer piece, which also have a touch of Vintage Metallic Flakes added to the surface.

All that's needed now is the Mummy Cloth, (from the halloween trimmings set) tie that I coloured with Speckled Egg and Antique Linen Distress Spray Stains and once it was dry, I looped it through the hole reinforcer and placed a Heart Charm on the end of the cloth, just painting the tiny heart in the centre with a little Kitsch Flamingo Distress paint.

So that completes my project for this week's challenge and I hope you've been inspired by the ideas I've used.

As always, if you make anything, or been inspired by anything that you've seen here on my blog ~ then please, let me know by tagging me on social media or leaving a comment here and I will be right over to take a look!
Don't forget that every week, one lucky random participant has the chance to win a $25 gift voucher from Simon Says Stamp and you can join in up to 5 times, which means you could have 5 chances to win. You have until Monday 8am Ohio time. 1pm UK time, 2 pm CET to join in and good luck....


Oh my goodness Emma! How GORGEOUS is this!! The whole design is stunning!! I wish I had your talent and could do something like this!! ;-)
ReplyDeleteHope you have a great week!
luv
Lols x x
As usual I need to pick my jaw from the floor...sublime, full of details! Love to bits...
ReplyDeleteHugs xxx
So beautiful Emma! The muted colors with pink flowers is beautiful!!
ReplyDeleteBreathtaking is what it is!
ReplyDelete