
Hello there...
Today, I'm sharing my second idea-ology project that I created for the recent Tim Holtz idea-ology launch, which if you missed, don't worry because you can catch up with it HERE on Tim's blog! When these products arrive and they are all spread out on my desk, I always try to find that lightbulb moment from something and as soon as I saw these three boys, my mind went to one of my favourite films, Stand By Me and instantly, the story unfolded and the products just came together seamlessly to create my Divided Vignette Box...
There is quite a lot of detail to this piece but I've added a list of all the idea-ology products, together with the rest of the products that I used, at the end of the post.
So gather your stash and let's start creating...

FIRST STEP ~ THE BOX
I then painted the outside of the box with a solid cover of Rustic Wilderness Distress Paint and once this was dry, I used the dry brushing technique to create a little vintage distress using a combination of Gathered Twigs and Walnut Stain Distress Paints. To do this, take a dry paint brush and dip into the paint, remove the excess onto a dry paper towel and then apply to the box, letting the brush just kiss the surface and add hints of paint over the Rustic Wilderness!


 With the box ready, I moved onto adding an extension to the base of the box, which you can see is attached along the bottom edge.


I placed all my corked vials into both sections of the divided tray, arranging some to lie on their sides and some to stand.


Once dry, I then applied Humidor Design Tape around the raw edges. Attach the tape so that if folds back to give a really nice finish on the outside of the box and place the tape to cover each of the four sides and the edges of all the divided sections on the inside of the box.

On the top of the box, I attached the larger Vignette Finial from the set of four pieces. I painted the finial using exactly the same method and colours that I used on the box and adhered it into place with Matte Collage Medium. For a little extra ageing, I used Treasure Gold Gilding Wax, which I just applied lightly onto the finial, to accentuate the contours. I then wound some twine around it and secured it with a knot.

To add even more vintage appeal, I applied crackle paste to the edges and once it had worked it's magic, I applied Walnut Stain Distress Crayon over the top, blended with a semi dry baby wipe to ensure the colour seeped into the cracks.

For a final detail, I adhered a piece of Field Notes Ephemera to the right hand side, bottom corner of the box.


For this I used a piece of wood, cut to fit the width of the box. If you aren't able to get any wood, you could use MDF, or you could make a base by layering mount board. I would suggest about 5 layers of mount board to create a substantial base and then apply a coat of gesso over the top before moving onto painting it.

I painted the base extension with the same colours as I used on the box and applied the same dry brushing technique to create the distressed effect before applying some more of the Humidor Design Tape around the edges and then attaching it to my box. For this I used Matte Collage Medium which I applied along the back edge of the base ledge. Once this is in place, I allowed for the medium to dry, ensuring the base was attached and wouldn't move, or even worse, fall off!
Now for the inside of the box and this was all covered with papers from the Backdrops paper sets. Each piece of paper is cut to fit the divided sections and the walls and adhered using Matte Collage Medium but to add some more of that vintage appeal and create some atmosphere, I ripped and tore section of the paper, and also added some more Crackle Paste. Again applying Walnut Stain Distress Crayon over the top to accentuate the crackles once dry.

So the box is ready to fill and let's start with the top section and the volt box, complete with tiny light.
This is the second smallest sized vignette box in the set of four which I flipped over to work on the solid side.
On what has not become the front of the box, I used one of the wonderfully detailed Gauge Frames which I painted using Black Soot, Ground Espresso, Vintage Photo and a touch of Rusty Hinge Distress Paint. I brushed the paint onto the surface of the metal and once it had become slightly tacky, I wiped away the excess before allowing it to dry and placing an Urban Layer piece, the volts/amps gauge, behind the window, so that it showed through the aperture. I then attached the gauge piece to the bottom section on the front of the box.

I then covered the entire vignette box, using gold Metallic Kraft Paper, embossed using Tim's Foundry 3D Embossing Texture Fade from Sizzix. I cut the panels of embossed card to fit the box and adhered each piece into place with Matte Collage Medium.
After applying Translucent Grit Paste around the edges, and allowing for it to dry, I painted the box with Black Soot, Vintage Photo and Ground Espresso Distress Paints. Once the paints were dry, I used Antiqued Bronze, Rusty Hinge and Black Soot Distress Crayons to give more depth of colour to the metal and the paste that forms the rusty appearance around the edges.
With the volt box ready, I drilled a hole through the wood where I would be fitting my light.
For this I used a Tiny Corked Vial, the one with the rounded bottom and after applying a layer of Matte Collage Medium to the glass, I allowed it to dry before creating the crackled effect using a layer of Rock Candy Distress Crackle Paint, just painted over the surface. Allow for this to dry and crackle before attaching the glass vial over the top of the drilled hole.
Once the glass vial was solid and securely glued into place, I drilled a second hole through the back of my Divided Vignette Box, making sure that this hole will line up with where you need to thread the lights through to the volt box, and add them to the glass vial.
I then threaded my Tiny Lights through the hole in the back of the divided vignette box and then through the hole in the tiny volt box so that they fit securely inside the glass vial ~ you won't need all the lights on the wire, only about three ~ so it's perfectly safe to cut the excess wire leaving those three lights remaining on the strand attached to the battery box, which is essential ~ DO NOT CUT THE BATTERY BOX FROM THE WIRE! With the lights inside the tiny vial/light bulb, secure the box into place on the right hand side of the top section.
Next to the volt box, I added the ruler which I took from Tim's Junk Drawer Baseboard set. I wrapped some red cotton thread around one end and then attached it to the back wall.

Underneath the volt box, I attached a ledge for the boys to sit on and used Etcetera Trims to build it. I used two trims, placing them at a right angle to one another to form the ledge. With the 'L' shaped ledge in front of me, I then placed a third trim, along the front so that this will fit behind the boys to support them and allow me something to attach them to. I once again added some Translucent Grit Paste to the edges for more texture before painting the ledge with Distress Paints and then attaching it with Matte Collage Medium, placing it directly underneath the volt box.

The image of the brothers is from the new Group Paper Dolls set and I water coloured them with Distress Crayons before attaching the image to appear as though they are sitting on the ledge. I used acetate strips to add some cleverly hidden support behind the dolls, so that they are solid and will not bend or move.

Underneath the ledge, I added a wheel. This is a piece from the Odds and Ends Embellishments and to add the patina look to the metal, I altered it with Evergreen Bough, Vintage Photo, Picket Fence, Antiqued Bronze and Black Soot Distress Paints applied directly to the metal in individual layers and drying each layer between applications.

I attached the wheel to a Finial base which was painted with Distress Paints to give the effect of wood and then attached this inside the box.

To complete this section, I added some moss along the floor of the section, together with Mummy Cloth dyed with Frayed Burlap and Pumice Stone Spray Stains.
Bottom left hand section:
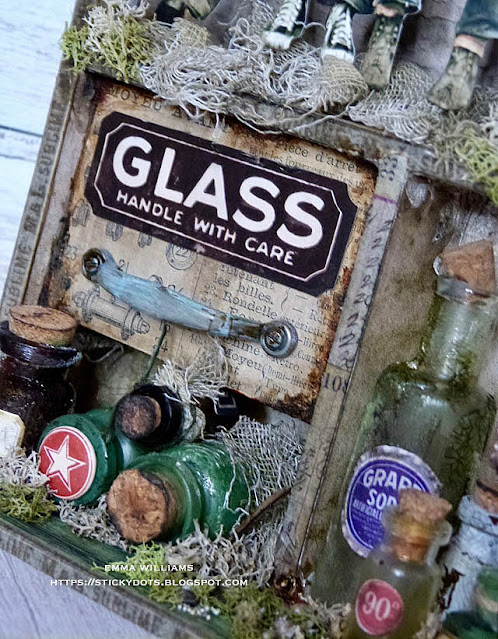
To create the faux drawer, I used the smallest sized Vignette Box and once again, I covered it with papers from the Backdrop set. I then attached the covered box inside my divided section, using Matte Collage Medium.
I added the Glass Handle With Care label to the front of the box, together with the handle which I once again altered using the same coloured Distress paints as I used on the wheel in the above section.

Underneath the faux drawer, I created a collection of bottles/corked vials, all different sizes and shapes, and these will sit in each of the bottom sections. I primed all the bottles with a layer of Matte Collage Medium before adding various finishes. I painted some bottles with Rustic Wilderness Distress paint and some bottles have a crackled glaze finish created using Rock Candy Distress Crackle Paint. I sealed the corks inside the bottle necks with more of the Matte Collage and then I lit a match and being very careful at this stage and blowing them out almost immediately, I set fire to the corks to create a burnt edge.
To complete the bottles I added Vial Labels and Remnant Rubs. You might also notice that on one of the bottles, I used the Mini Flair Pin with the star on the red background and this I just attached to the bottle opening.

In the third and final section, I added the mini pulley wheel. Again I painted the wheel using the same combination of paints as I used on all the metal pieces and I attached this to the side wall of the box before adding more moss, a few twigs and some tiny stones all arranged around the base of the bottles.

We're nearly there and I finished the box by adding some chain, which I draped around the wheel in the top section of the box and then taking it down into the section below, securing the chain by attaching it to a screw eye fastening from the Vignette Hardware Finding set. I completed it with the number 47 Factory Tag.

All that's left is the finishing detail to tell the story and I found the perfect Clippings Sticker ... The Brothers and added this along the top edge of my box!

Thank you so much for taking the time to stop by today and hope you love this piece!
Stay safe and keep well.
Love Emma xxx
Recipe for project:
Tim Holtz Idea-ology: Backdrops Volume 1 and Volume 2, Group Paper Dolls, Mini Hardware Knobs and Handle, Vignette Finials, Gauge Frames, Urban Layers, Odds and Ends Embellishments, Junk Drawer Baseboard Mini Flair Embellishment, Halloween Trimmings,Vignette Hardware Findings, Divided Vignette Box, Vignette Boxes, Tiny Lights, Humidor Design Tape, Corked Vials, Tiny corked Vials, Metallic Stickers, Pulley Wheel, Clippings Stickers, Factory Tags
Distress Paint: Rustic Wilderness, Walnut Stain, Black Soot, Evergreen Bough, Rusty Hinge, Antiqued Bronze, Ground Espresso and Vintage Photo
Distress Crayons: Walnut Stain, Gathered Twigs, Vintage Photo
Distress Spray Stain: Frayed Burlap, Pumice Stone
Distress Inks: Walnut Stain, Antiqued Bronze and Black Soot
Stampers Anonymous: Pinked Etcetera Trims
Treasure Gold Gilding Wax, chain, moss and twine from my own stash


J'adore 💕 c'est un super travail 👌
ReplyDeleteYou know I love this project!! I love the boys sitting on the edge! I love all the layers and levels you added - so inspiring!!
ReplyDeleteAmazing project! I am loving your projects and I'm so happy when I see a new post from you. I am learning so much. Thanks!
ReplyDeleteWonderful creation. Anesha
ReplyDeleteAnother wonderful design Emma!
ReplyDeleteFabulous!
ReplyDeleteFabulous box, Emma! I love all the techniques that you used.
ReplyDeleteMy only concern would be the base of the box - you must have had access to power tools to have made the wooden base. That unfortunately, is beyond my abilities ; ).
Otherwise, I am excited to try a similar project. Thanks for sharing!