
Happy Monday friends...
Hope you all had a great weekend and I hope my friends in the US had a wonderful 4th July and as a new week begins, it's time for the brand new Simon Says Stamp Monday Challenge and this week the DT are showcasing Dina Wakley products within their projects as we encourage you to PLAY WITH PAINT. There are so many different paints available, and I'm sure we've all got some stashed away in our cupboards, so hope you'll join us and we can't wait to see what you create!
For my project, I chose to a starry night theme just because all I love all things celestial and used Dina's new Blue Edition Media Journal as a base. What I love about this particular book is that you get so many surfaces to choose from blue denim, heavy stock watercolour card or burlap...it creates some amazing texture to our work, but because I was going for a them all about dreams and wishing upon that star that shines brightly ~ I used a combination of the watercolour and denim two page spread and told the story of these children who side by side, make their happy dreams come true!

So let's get started and I will admit that this project was a little bit of a nightmare to photograph, gold metallic, shimmer and shine does not like the camera at all, lol...but I hope I've done it justice and here's how I bought it to life!


To begin with I cut a panel of cotton paper, 17 x 23.5cm, applied a layer of clear gesso over the top and allowed it to dry. I then took Dina's Night Acrylic Paint and a touch of Tim's Black Soot Distress Paint and painted a good layer across the surface of the gessoed paper, applying it heavier around the edges but dragging the paint towards the centre of the paper, so that it would add a small amount of colour. I always dry the layers of paint between applications and after doing this, I then started to create this ethereal glow in the centre of the paper using a combination of Dina's Buff Acrylic Paint, Speckled Egg and white gesso and using a large brush, stippled my paint onto the centre of the panel, allowing some of that dark to show through and create pockets of dark blue amongst the paler colours. Once I was happy with the background, I heat dried it and then added a few white splatters over the top.
When the background was thoroughly dry, I then laid my Hocus Pocus Layering Stencil over the top and applied Matte Texture Paste through the stencil creating the swirl of stars. Working quickly, sprinkle some gold embossing powder over the paste and set aside to dry. Once the paste is dry, then gently heat emboss the stars until the powder becomes molten.


After machine stitching a border around the outside of the panel, I used Matte Collage Medium to adhere it onto the denim page of the media journal, adding some torn paper underneath the page to soften the edges slightly and also applying the smallest hint of foiling around the edge, using Ranger Ink Foil Transfer Sheets that I have in my stash.


Now to create the circles that are behind the boy and girl. I used Tim's Stacked Circle die to die cut some inked card that I already had in my stash. I always keep a supply of inked card because you never know when you'll need it and this was the perfect colour combo for this project ~ I just wish I could remember what it is though, lol!
After die cutting a selection of various sized circles, five circles and 8 rings using the die set, I took six rings and individually inked each ring with the embossing dabber before sprinkling a combination of Liquid Platinum and Gold Embossing Powders over the top. Heat emboss each ring and set aside. I then inked the edges of the remaining rings and circles before adhering my little celestial collection into place, arranging them across the bottom of my page.

I colour tinted the paper doll image using Distress Marker Pens and then attached them over the top of the circle cluster.

For the star bursts, I used the gorgeous die that is in the brand new Ornamental Birds set. I just love the shape of this and it worked so well on these pages, that I had to use it but if you don't have this die, you can use any star you choose ~ it's just my favourite of the moment! I cut 9 stars from gold metallic kraft stash and attached four of those stars, 2 large and 2 small, onto my background, keeping the remainder for later.
To complete this side of the layout, I added a Mini Pin, pinned through the top right hand corner....
 ...and some small crystal gems before adding the clippings stickers, 'side by side' and 'happy dreams come true".


Moving onto the left hand page and this is something I particularly love to do...and that's to bring together the two pages to tell the story.


So to begin with I applied some Vintage Collage Medium down the spine and around the edges of the page and after allowing it to dry, I applied my Black Soot and Walnut Stain Distress Crayons over the top, blending out any harsh lines with a damp baby wipe.

I then tore small sections of the Typography Collage Paper and adhered these onto the page before applying Crackle Paste. I concentrated on the top right and bottom left hand corners with the paste and once it was dry, I once again used Distress Crayons, Pumice Stone and Walnut Stain to add some colour and accentuate the crackles.

In the top right corner, I wanted to add some stamping and for this I took the 1929 from the Field Notes set, masking off the 'agent' part of the stamp and stamped the numbers only onto plain collage paper using Black Soot Archival Ink. Underneath the number, I stamped the Office Stamp taken from the Correspondence stamp set and after tearing around the stamped imagery, I used matte collage medium and a Distress Collage Brush to adhere it onto my page and allowed it to dry.
To create the quote, Wish Upon A Star, I used the Alphanumeric Label Die set and die cut one set of letters from Blackout card and one set from gold metallic card. I then attached my black lettering onto the page with collage medium and layered the gold over the top, slightly offsetting this set of letters to create a shadow.
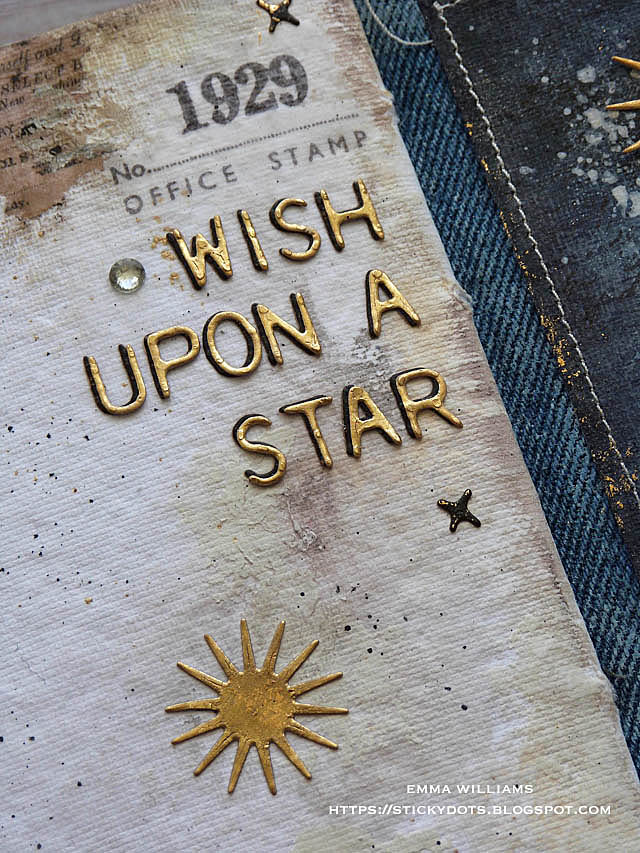
I then added a small gem and remember those remaining die cut stars? Well, I arranged those to cascade down the page.

To complete the layout, I added some small stitches which I die cut using the Media Marks die and just attached with matte collage medium.

I hope you've loved this project and it's inspired you with some ideas for this fun challenge!

Don't forget, if you would like to see more inspiration from my talented teamies over on the challenge blog and every week, one lucky random participant has the chance to win a $25 gift voucher from Simon Says Stamp and you can join in up to 5 times, which means you could have 5 chances to win. You have until Monday 8am Ohio time. 1pm UK time, 2 pm CET to join in and good luck....


Thank you so much for taking the time to stop by today ~ stay safe and well, and see you again soon, love Emma xxx
Recipe for project:
Dina Wakley products: Blue Edition Media Journal, Night Acrylic Paint, Buff Acrylic Paint, White Gesso, Clear Gesso
Tim Holtz/Sizzix: Stacked Circles, Ornamental Birds, Alphanumeric Label Thinlits, Media Marks
Stampers Anonymous Stamps: Field Notes, Correspondence
Hocus Pocus Layering Stencil
Distress Paint: Black Soot, Speckled Egg
Distress Crayons: Walnut Stain, Black Soot, Pumice Stone
Distress Marker Set
Stampers Anonymous Stamps: Field Notes, Correspondence
Hocus Pocus Layering Stencil
Distress Paint: Black Soot, Speckled Egg
Distress Crayons: Walnut Stain, Black Soot, Pumice Stone
Distress Marker Set
Tim Holtz Idea-ology: Clippings Stickers, Mini Pins, Paper Dolls
Mediums: Matte Collage Medium, Matte Distress Texture Paste, Ranger Ink Gold Embossing Powder, Liquid Platinum Embossing Powder, Distress Crackle Paste


So beautiful! Jo x
ReplyDeleteJust love your double page gems...
ReplyDeleteThis is so beautiful! I just love the stars in the background! Wow!
ReplyDeleteGorgeous! Love the celestial theme against the denim! hugs, Maura
ReplyDeleteSo beautiful, i love the background and all.
ReplyDelete