
Happy Monday friends...
Hope you've all had a fabulous weekend and ready for the new week ahead! So, I think you'll agree that last week was a rollercoaster ride of creative goodness and Tim Holtz spoilt us all with the brand new launch and addition to the Distress family!!! Oh my...Speckled Egg, I have so much love in my life for you ~ you are the colour of my dreams!!!! Not only that, we had an amazing FB live from the genius himself and with so many great techniques, I'm sure it will keep us busy for weeks to come and of course, there's no better time to get your crafty cap on because the brand new Simon Says Stamp Monday Challenge starts today and this week, we're inviting you to join us as we are GOING AROUND IN CIRCLES!
Hope you've all had a fabulous weekend and ready for the new week ahead! So, I think you'll agree that last week was a rollercoaster ride of creative goodness and Tim Holtz spoilt us all with the brand new launch and addition to the Distress family!!! Oh my...Speckled Egg, I have so much love in my life for you ~ you are the colour of my dreams!!!! Not only that, we had an amazing FB live from the genius himself and with so many great techniques, I'm sure it will keep us busy for weeks to come and of course, there's no better time to get your crafty cap on because the brand new Simon Says Stamp Monday Challenge starts today and this week, we're inviting you to join us as we are GOING AROUND IN CIRCLES!
Now, I created this project a couple of weeks ago, I'd watched one of Tim's FB lives and had a bunch of tags and panels made up, ready to use, so I'm going to revisit one of my favourite techniques from Tim, using the Embossing Glazes and combining it with the challenge ~ I just wish I had Speckled Egg at the time, that would have been perfect!
Circles are one of my favourite shapes in paper crafting, but because I love them so much ~ I have used them a lot, so....with this in mind, I wanted to challenge myself to create something that was slightly different to anything I'd done before and came up with the idea that maybe I could build up the circles, to give the appearance and look that they were suspended and what better die to use to create those circles, and the base of my project, than Tim Holtz's Stacked Circles die ~ it was a match made in heaven! I also wanted a background that would be quite subtle but at the same time, have texture and detail and love how inks, Grit Paste and Embossing Glazes can do this.
Circles are one of my favourite shapes in paper crafting, but because I love them so much ~ I have used them a lot, so....with this in mind, I wanted to challenge myself to create something that was slightly different to anything I'd done before and came up with the idea that maybe I could build up the circles, to give the appearance and look that they were suspended and what better die to use to create those circles, and the base of my project, than Tim Holtz's Stacked Circles die ~ it was a match made in heaven! I also wanted a background that would be quite subtle but at the same time, have texture and detail and love how inks, Grit Paste and Embossing Glazes can do this.


So, let's get started because the new challenge has begun and here's how I went round in circles to create this piece!

I began by creating a background for my tag and used a Size 8 Mixed Media Heavystock tag as my base and will be using this horizontally. To add colour, I used a combination of Weathered Wood, Stormy Sky Distress Spray Stains, spritzed onto the tag. After heat drying the inked tag, I then spritzed Weathered Wood, Stormy Sky and Tumbled Glass Oxide Sprays over the top, misting the inks with water. At this stage, I layer a little more of the Distress Spray Stains to create some oxidisation and let the inks blend. I also inked a piece of Mixed Media Heavystock card using the same colours and techniques and will use this for my die cut circles.


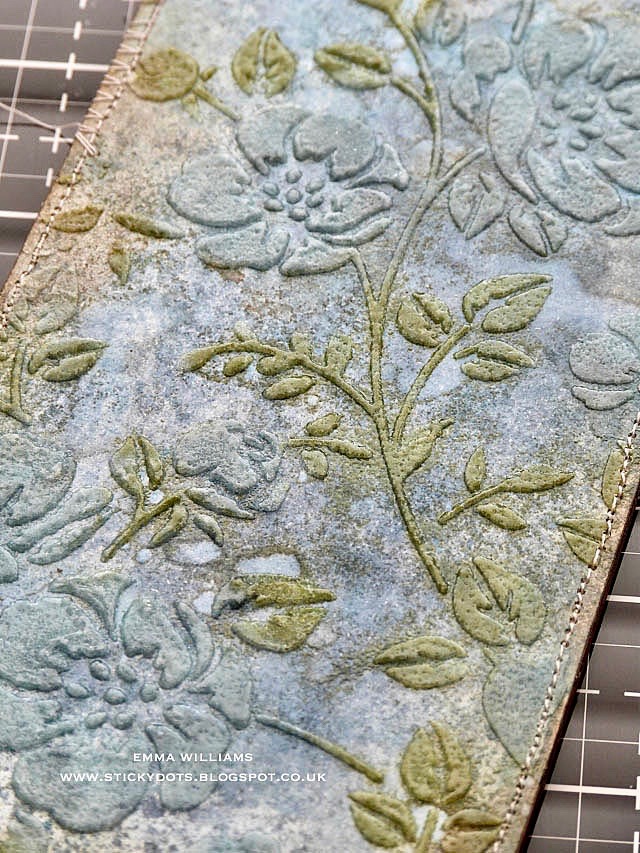
Once I was happy with the colour, I placed the Floral Layering Stencil over the top of the tag and using a palette knife, applied some Translucent Grit Paste through the stencil. After removing the stencil, I then sprinkled some Peeled Paint and Weathered Wood Embossing Glaze over the top and set the tag aside to dry.

On the separate panel of inked card, repeat the process and again let it dry.
When both pieces of card are set, I then gently heat embossed the glaze ~ as the glaze melts, you will see a slight change in appearance and at that point, move to the next area.
Now both of my pieces are ready to use and after machine stitching a border around the outside of the tag, I mounted it onto a Size 8 Etcetera Tag using Matte Collage Medium to attach it.

Using the separate embossed panel, I used the Stacked Circles Die set to die cut a selection of circles in various sizes. I then layered some of the circles over one another, to create more dimension and give the appearance of small circular frames.
To add some detail and a bit of opulence to the circles, I took a glue stick and run it around the edges of each circle before using gold foil transfer tape, which I placed shiny side uppermost and just pressed onto the sticky areas to transfer the gold foil.

Using all my die cut circles, I then mounted them onto my tag, cascading them down the right hand side of the tag, overlapping the top and bottom of the tag itself...
 ...and attaching each circle so that they appear to be suspended. Hopefully, you can see this in the photo below...


My tag is now ready to decorate and moving on, I used Shabby Shutters and Bundled Sage Distress Spray Stains to colour one piece of Mixed Media heavystock card and Gathered Twigs and Walnut stain to colour a second piece. Once I'd blended the inks to create the colour I wanted I then used the Funky Wreaths die set to die cut the green wreath, the brown twiggy wreath that sits underneath and a selection of fronds that I will add to build up the frame.

Taking all the separate pieces of both wreaths, I then built up each of the funky wreaths before placing the green wreath over the top of the brown one before attaching the wreath to my tag, placing it over the top of the cascading circles.

I then selected a photo from the Paper Dolls set, this is one of my favourite images from the selection and I used Distress Marker Pens to add a colour tint to the image.
Mount the image onto foam pads and then attach to the centre of the wreath.
To create the sentiment, I used Tim's Tiny Text stamp set and using Ground Espresso Archival Ink, stamped 'you can never have too much happy' onto the strip of card. I usually have plenty of these little strips of card, all offcuts from larger panels inked with Old Paper, Frayed Burlap and Walnut Stain Inks, and all ready to go when I need them. I cut the sentiment into a banner shape and attached it over the top of my paper dolls.

To complete this area of the project, I added some tiny cabochon pearls tucked into the arrangement and added a few little berries to the wreaths using Olive Nuvo Crystal Drops.
For the finishing details, I collaged some Field Notes Ephemera pieces in the left hand corner. I then wrapped some thread around a Story Stick, attached that over the ephemera and completed it with a Hardware Head. I also added a hardware head in the top left hand corner.


Finally, I threaded some rope through the hole reinforcer, attached a loop pin, with an Antiqued Gem, and a tiny bird charm, taken from the Milogros idea-ology set and altered with a little Evergreen Bough Distress Paint. I also added a button from my own stash, attaching it over the loop of rope.


So, that's it from me for today and I hope you've enjoyed the creative process of this piece and how I created layers using the Stacked Circles die, adding a little twist to the design for something different!


Don't forget, if you would like to see more inspiration from my talented teamies over on the challenge blog and every week, one lucky random participant has the chance to win a $25 gift voucher from Simon Says Stamp and you can join in up to 5 times, which means you could have 5 chances to win. You have until Monday 8am Ohio time. 1pm UK time, 2 pm CET to join in and good luck....


Thank you so much for taking the time to stop by today ~ stay safe and well, and see you again soon, love Emma xxx
Recipe for project:
Tim Holtz/Stampers Anonymous: Mini Etcetera Tag, Floral Layering Stencil, Tiny Text
Tim Holtz/Sizzix: Funky Wreath, Stacked Circles
Distress Ink: Walnut Stain. Speckled Egg
Embossing Glaze: Weathered Wood, Peeled Paint
Distress Marker Set
Tim Holtz/Sizzix: Funky Wreath, Stacked Circles
Distress Spray Stain: Weathered Wood, Stormy Sky, Bundled Sage, Shabby Shutters, Gathered Twigs, Walnut Stain
Oxide Spray: Weathered Wood, Tumbled Glass, Stormy SkyDistress Ink: Walnut Stain. Speckled Egg
Embossing Glaze: Weathered Wood, Peeled Paint
Distress Marker Set
Tim Holtz Idea-ology: Hardware Heads, Paper Dolls, Field Notes Snippets, Field Notes Ephemera, Story Sticks, Antiqued Gems, Milagros


Love,love, love this. What a beautiful piece of art.
ReplyDeleteStunning little artwork, Emma, Jo x
ReplyDeleteJust beautiful Emma. The background is stunning - the color is just so rich even though it was created with cool colors. The nest/wreath was such a great idea for the background to!! It really does a great job at framing the paper dolls.
ReplyDeleteAnytime I see your name on an email I know I am in for a very special treat and this is no exception. Your work is so inspiring and never fails to enthrall me. Thank you so much for sharing your work
ReplyDeleteSuch a work of art, Emma! Love everything about this beautiful piece. You are so talented.
ReplyDeleteHi Emma! This is absolutely stunning! Thank you so much for taking the time to share your process.
ReplyDeleteThis is really fabulous, Emma!!!!!!!!!!!
ReplyDeleteThat´s really Amazing !! Geat Artworks
ReplyDeleteBig hugs, Caty