
Happy Monday friends!
Hope you all had a good weekend! Here in the UK, we've been experiencing some bad storms over the last couple of weeks ~ I think we are all ready for spring but for now, I hope that everyone is safe and well and Storm Dennis didn't cause too many problems!
This week at Simon Says Stamp, our Monday Challenge is called Frame It and as the title suggests, we want you to frame your artwork ~ this can be an actual frame, by matting and layering with card layers or using dies, but whatever you choose ~ we can't wait to see what you create and hope you'll join us and play along!
For my project, I created a double framed panel, using Tim Holtz products and was inspired by the painting, The Son of Man by Rene Magritte but this piece is telling the story of Agent 1929, a man of mystery, with time on his side!


To begin with I'll start with the frames and for this I used two sizes of Framed Panels, the large 6.5" x 9 panel and one of the mini framed panels. Both panels comes as two separate pieces but for this project I discarded the hardboard backing on the mini panel. So taking the two pieces of the larger sized panel and the mini frame, I applied a coat of gesso to prime the wooden frames and the hardboard backing. Once everything was dry, I started to add colour ~ for the larger framed panel, I used Dina Wakley's Night Acrylic Paint and for the smaller frame, I used Tim Holtz's Candied Apple Distress Paint. After covering each frame with the paint, I then took a clean brush and dry brushed Black Soot Distress Paint over the surface of each frame, this just knocks back the colour slightly and gives it more of a vintage feel.

I allowed the paint to dry before applying a small amount of Old Silver Alchemy Wax to the blue frame....
 ...and Vintage Gold Alchemy Wax to the red one.

Setting the frames to one side, I moved onto the background that will cover the larger frame and for this I used the Foundry 3D Embossing Folder and embossed two separate panels of silver metallic kraft card, which I will join together to create one seamless background once stuck to the baseboard. Once the metallic card is embossed, I applied a coat of Black Soot Paint over the surface, allowed it to become a little tacky before wiping away the excess paint using a paper towel. The paint will sink into all the gorgeous embossed detail to highlight the design but to add a little more depth of colour, I applied a small amount of Gold Metallic Alcohol Ink before using the Vintage Photo and Evergreen Bough Distress Crayons to add a patina effect. Attach the panels to the baseboard using Matte Collage Medium, placing the blue frame over the top and allow to dry. I clamped the frame together with bulldog clips, just so that it sticks securely and firmly.
Moving onto the smaller red frame...
For the background panel, I cut a piece of Mixed Media card the same size as the frame. I then used the wrinkle free technique to add colour to my card. I used a combination of Old Paper, Pumice Stone and Frayed Burlap Distress Inks, together with Old Paper and Pumice Stone Oxide Inks. Once I was happy, I inked the edges with Walnut Stain Distress Ink.
To create the central focal point of this panel, I used the Distinguished Stamp Set. I began by stamping the image of the umbrella onto the centre of my inked card panel. I then stamped the bowler hat, the pocket watch, the shirt/jacket and also the umbrella, (which I stamped twice) onto watercolour card. I then watercolored the images with Distress Marker Pens and a water brush before finally fussy cutting each of the images, which includes the two umbrella images. The first of which I cut slightly larger than the second, as I'll layer these to create the finished umbrella.

To add some detail to the background, I inked through the Digits Layering Stencil using Frayed Burlap Ink and then spritzed some water over the surface and sprinkled some of the amazing new Embossing Glaze from Tim Holtz over the top. I used Rusty Hinge and after tapping away the excess, I heat embossed the glaze.
 I then used the Mini Glitch stamp set, stamping some of the images around the edge of the panel, in a combination of Barn Door, Hickory Smoke and Black Soot Archival Inks.


Once I was happy with the background, I applied a smear of Crackle Paste around the edges, allowed it to dry and then placed the frame over the top. I then attached my fussy cut stamped images to the background with foam pads, to add some dimension. You can see the layered umbrella in the photo below. Also, as a small detail, I added a mini pin to the hat and attached a small 65c. ephemera piece.

Underneath the Mr Clockface, I added a stamped sentiment ~ Identification Check which I took from the Field Notes stamp set. I stamped the wording in Barn Door Archival Ink onto a strip of inked card and then cut it down to size before attaching it to my panel.

At either end of the sentiment strip, I added a cluster of Mini Sprocket Gears, which I painted with Evergreen Bough, Antiqued Bronze and Ground Espresso Distress Paints.
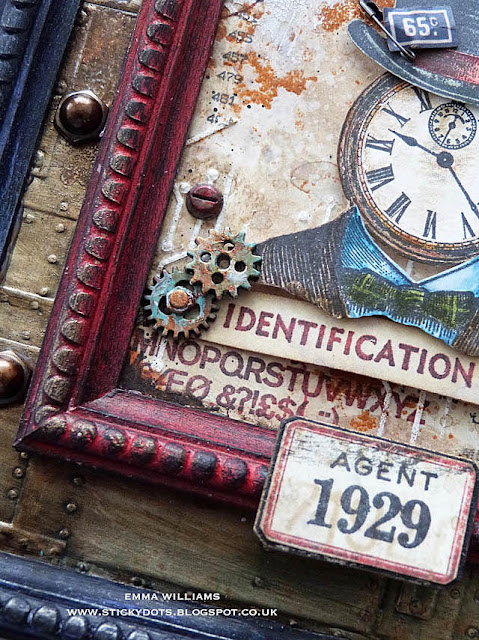 I then added small Hardware Heads to the centres and a further couple of larger Hardware Heads to either side, both of which I painted with Candied Apple Distress Paint.


Finally, I added a Tiny Clip to the top of the umbrella to replicate the spoke and placed a painted Star Adornment at the very top.

Mount the panel in the centre of the larger frame.
Add four Hardware Accents, inked with Rust and Gold Mixative Alcohol Inks and attach these to the foundry background, placing them either side of the small panel.

Finally, I stamped the Agent 1929 and Label from the Field Notes set onto a panel of inked card, cut around the label outline and then matted it onto chipboard. I then placed the label at the bottom of my small red panel, balancing it on the frame.

So, that's my Man of Mystery panel complete and I hope you've loved how I've used the products, combining old and new stamp sets to bring this to life. It was such a fun project to make...
Don't forget, if you would like to see more inspiration from my talented teamies over on the challenge blog and every week, one lucky random participant has the chance to win a $50 gift voucher from Simon Says Stamp and you can join in up to 5 times, which means you could have 5 chances to win. You have until Monday 8am Ohio time. 1pm UK time, 2 pm CET to join in and good luck....


Thank you so much for taking the time to stop by today and hope to see you again soon, love Emma xxx
Recipe for project:
Tim Holtz/Stampers Anonymous: Mini Glitch, Distinguished, Field Notes
Tim Holtz/Sizzix: 3D Foundry Embossing Folder
Distress Paint: Ground Espresso, Black Soot, Antiqued Bronze, Candied Apple, Evergreen Bough
Distress Inks: Walnut Stain, Frayed Burlap, Pumice Stone, Old Paper
Oxide Inks: Old Paper, Pumice Stone
Tim Holtz Embossing Glaze: Rusty Hinge
Distress Marker Pens
Tim Holtz Archival Inks Set 1 and Set 3
Distress Crayons: Vintage Photo, Evergreen Bough
Alcohol Inks: Rust, Gold Mixative
Tim Holtz Idea-ology: Hardware Heads, Framed Panels, Mini Framed Panels, Tiny Clips, Mini Sprocket Gears, Star Adornments, Field Notes Snippets, Mini Pins


Amazing, Emma! All of the details of your framed panels are perfect! And, of course, distinguished is always a good choice. Thanks for the wonderful inspiration!
ReplyDeleteLove all the details, and what a fabulous tutorial...can't wait to get those embossing glazes...
ReplyDeleteThis is amazing, Emma. LOVE LOVE LOVE your framed work of art. Super inspiring!
ReplyDeletePlease come link up and play along at Word Art Wednesday.
TWO PRIZES this week from Seth Apter Designs (TWO $25 gift cards).
I'd sure LOVE to have you join the fun.
Blessings,
Karen Letchworth
Word Art Wednesday
www.wordartwednesday.blogspot.com