
Hello friends and happy Monday!
Hope you've all had an amazing weekend and for all those Halloween lovers, I hope you're getting prepared for a spooktacular day on Thursday!
But back to today and the start of a brand new Simon Says Stamp Monday Challenge which this week is all about Art Journals! We can't wait to see what you create in your journals and hope you will play along and join us for this fun challenge theme....
For my journal pages, I was inspired the falling leaves that have started to collect in my garden and created a vintage style page using Tim Holtz products all about my favourite time of year, Autumn!

So let's begin and here's how I created these pages...


To begin with I cut a panel of Dina Wakley Cotton Paper to measure 16.5 x 23cm. When I attach this into my journal, it will leave a border around the outside, which is something that I love as it creates a frame to my page.
To get a hint of colour on my background, I misted the paper with Tumbled Glass Distress Oxide Spray, wiping away any excess colour with a paper towel as I only wanted a hint of blue and I also wanted to keep as much white space around the outside, as I could. I then heat dried the paper before applying some randomly torn pieces of Tim Holtz Tissue Tape that I have in my collection. At this stage, it really doesn't matter which design you use, this is really just forming a base for your mediums. I also added some torn book pages around the edges of the page, just to give some more interest to the white space.

To add some more interest to the background, I added some stamping using a text stamp ~ I would definitely recommend using the one in the Tiny Toadstools set as this is perfect for background stamping! Ink up the text stamp with Black Soot Archival Ink and just stamp randomly over different areas of the background.
At this stage I also applied some Crackle Paste, just adding small amounts directly onto the page. Allow for this to dry and the crackles to appear before moving onto the next step.

Now to add some layers of colour and for this I began with some paint, which I mixed with water. I used a combination of Antiqued Bronze, Vintage Photo and Rusty Hinge and applied the watered down paint directly to the background using a paintbrush. Allow the paint to run and create little pools of colour on the paper and if you need it the paint to be a little looser in consistency, just spritz with more water.
Once I was happy and the paint was dry, I then added some Grit Paste that I applied through the Gradient Dot Layering Stencil. You will need to allow for the paste to dry before moving on, so this is where you need a little patience.

Once the paste was thoroughly dry, I then spritzed over the top of the paste using a very light misting of Vintage Photo Distress Spray Stain, dabbing away any excess stain with a paper towel.
Gently heat dry the stain before adding some flicks of Black Soot Distress Paint over the page.
To complete my background, I machine stitched around the outside and then adhered it into my journal, using Matte Collage Medium. To make this page look as if it's been mounted into a book, I then took some torn pieces of Tim's Design Tape, again any design that works will be ok to use and just attached the tape along the edges of the page. Once the tape was in place, I just smeared some gesso over the top, using my fingertip.

Now to create the focal point of my page and I started with the leaves...

These are a selection of die cuts and stamped leaves that I cut out but they are all created using one piece of card stock. I began by colouring my card stock with a selection of Oxide Sprays and Distress Spray Stains. I began by taking some watercolour card, spritzing it with a light misting of water and then misted it with Old Paper Distress Spray Stain. I then spritzed with Spiced Marmalade, Rusty Hinge, and Fozzilised Amber Oxide Sprays, and gave the surface a blast of heat to dry the inks. To get that real feel of autumn, I finished with a flick of Walnut Stain and Vintage Photo Distress Spray Stains, again heat drying the card. I now have the perfect colour for my leaves.

Some of the leaves are stamped and for this I used stamps from the Pressed Foliage set. I inked up the leaves with Ground Espresso Ink and then stamped directly onto the stained card. I then fussy cut around the outline of each of the leaves. For the remaining leaves, I used dies from the Fall Foliage set to die cut the orange card. Once I had my die cuts in place, to create a more realistic look, I took one of the stamps from the Pressed Foliage set, inked it up and stamped the veins onto the die cut leaves.
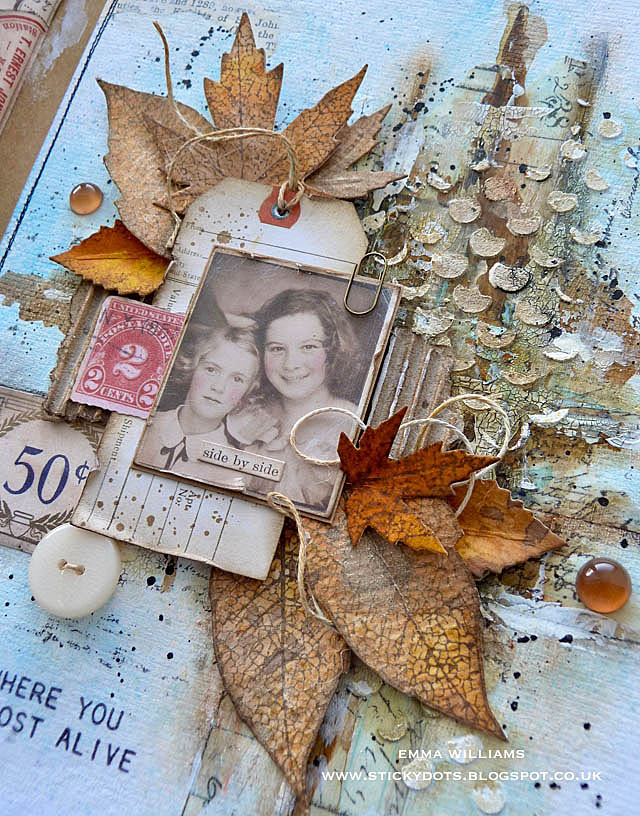
I now have all my leaves and I arranged these onto my journal page, placing them over the top of a piece of torn corrugated card, that I inked with a little Walnut Stain Distress Ink and attached horizontally across my page.

I then added a tag that I took from the Keepsakes Ephemera set and after inking the edges, I stamped some inks splats onto the surface of the tag using the stamp from the Tiny Toadstools set ~ another really useful stamp to have in your collection.
 I poked a small hole into the top of the tag and threaded some twine thought the hole before mounting my tag over the top of the leaves. I then added a vintage photo booth image, some more ephemera pieces from the Keepsakes and Snippets Ephemera sets and a clippings sticker, 'side by side'.


To complete the arrangement, I added some more twine, a button and some pebbles.
Now all that's needed is to add a stamped quote and I used one from the Nature's Wonder set and stamped this onto plain collage tissue paper. I then tore around the edge of the quote and attached the collage tissue paper onto my page using Matte Collage Medium.


We're nearly there and all that's left is to bring together the two pages, which is something that I love to do and is a theme within my journal.

For this I use torn Design Tape strips which I attached onto the left hand page of the journal spread. I then applied gesso over the top, using an old credit card to scrape the paint onto the surface.

When the paint was dry, I flicked some gold watercolour paint over the surface and then added the postmark stamp. As with the quote, I stamped the postmark from the Tim Holtz Correspondence Stamp Set onto Collage Tissue Paper and then after tearing around the edge, I adhered it into place with Matte Collage Medium.
Directly underneath the postmark I added the word, AUTUMN. I used the Alphanumeric Classic Lower die set to die cut kraft card and then adhered the letters into place with some more Collage Medium. Finally, I added a small melange pebble....

...which completes my project for this week's challenge and I hope you've loved the journal pages I've created and it's filled you with ideas of how you incorporate some of the techniques into your own work! Don't forget if you do make anything inspired by any of my projects, then I'd love to see them...just message me or tag me and I will pop over to take a look!

Have fun creating your projects and don't forget, if you would like to see more inspiration from my talented teamies over on the challenge blog and every week, one lucky random participant has the chance to win a $50 gift voucher from Simon Says Stamp. You have until Monday 8am Ohio time. 1pm UK time, 2 pm CET to join in and good luck....


Thank you so much for taking the time to stop by today and hope to see you again soon, love Emma xxx
Recipe for project:
Tim Holtz/Stampers Anonymous: Gradient Dot Layering Stencil, Tiny Toadstools, Pressed Foliage, Correspondence, Nature's Wonder
Tim Holtz/Sizzix: Fall Foliage, Alphanumeric Classic Lower
Distress Paint: Black Soot, Antiqued Bronze, Vintage Photo and Rusty Hinge
Distress Ink: Walnut Stain
Distress Paint: Black Soot, Antiqued Bronze, Vintage Photo and Rusty Hinge
Distress Ink: Walnut Stain
Distress Spray Stain: Old Paper, Vintage Photo and Walnut Stain
Distress Oxide Sprays: Tumbled Glass, Spiced Marmalade, Rusty Hinge, and Fossilized Amber
Distress Oxide Sprays: Tumbled Glass, Spiced Marmalade, Rusty Hinge, and Fossilized Amber
Idea-ology: Photo Booth, Keepsakes Ephemera, Snippets, Clippings Stickers, Tim Holtz Design Tape


This is so amazing Emma! Love the leaves 🍁 they look real, as if you brought them in from your garden. Beautiful make my lovely bestie xxx
ReplyDeleteOh Emma... my goodness... serously is there any part of crafting you don't do?? This journal layout (s) is stunning , the colors the textures... those leaves are gorgeous !!! Hey... you know the drill!! 🤗😍 #productqueeninthehouse #giddyqueenfrontandcenter
ReplyDeleteWow! This is truly an amazing creation with so many wicked cool details!
ReplyDeleteSuch beautiful autumnal journal pages! The layers and dimension that you created looks amazing 😁. Thanks so much, it was a delight to join you in the Designer Spotlight this month! Wishing you a happy new week! Hugs, Jo x
ReplyDeleteThis is exquisite and fall is not even my favorite season!
ReplyDeleteThose leaves have me in awe! Wow! You captured the feeling of Autumn perfectly with this spread. :)
ReplyDeleteYour pages are wonderful! Very exciting to just sit and stare at. I love them!!
ReplyDeleteAn absolute stunner and of course pinned! LOVE the textures...just a delight for the Autumn loving eyes!
ReplyDeleteThis art journal spread is so pretty Emma! I love how you let the page spill over on the opposite page. All the textures and colors are wonderful.
ReplyDeleteWOW! Absolutely Stunning! (I make no apology for saying those two words continually as I stop by each of your posts)
ReplyDeleteYour journal page is something very special and its has all the hearts from me . ❤️❤️ ❤️❤️❤️.......