Happy Monday friends and welcome to the brand new
Simon Says Stamp Monday Challenge. This week our theme is all about
Midsummer Blues and we want you to create something, whether it be a card or project that fits our theme!
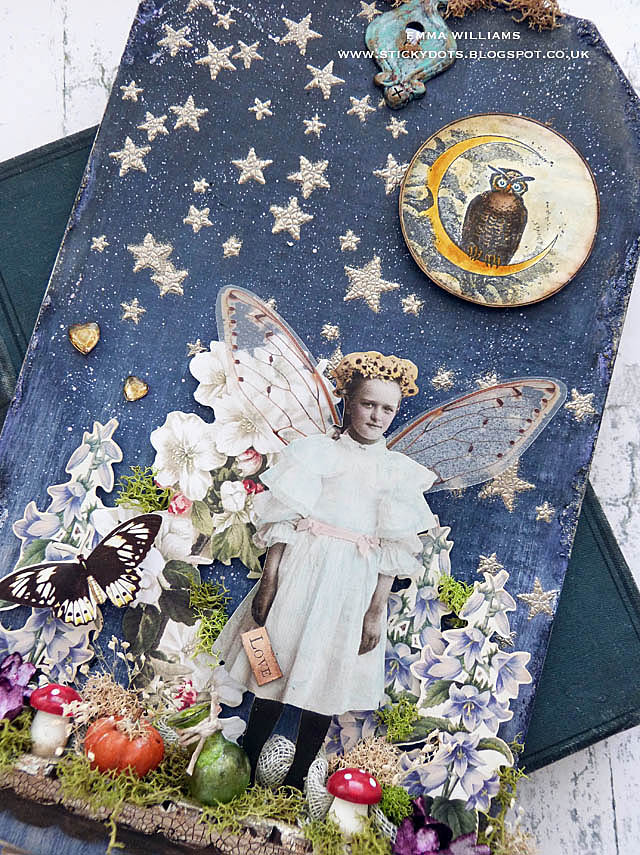
For my project this week I was inspired by William Shakespeare's, A Midsummer Night's Dream and created an Etcetera tag centred around a moonlit dark blue sky and the theme of love, woodland fairies and of course...dreams and invite you to take a look around this project and read about how I bought the story to life!
So, let's get started and here's how I created this tag...


To begin with I took the medium sized Etcetera Tag and applied a coat of gesso to prep the tag. Once dry, I applied some Grit Paste around the edges to create some texture and allowed that to dry. Once I was sure everything was completely dry, I started to layer my colour to depict the midsummer night sky and added a layer of Chipped Sapphire. I heat dried the paint before applying some Black Soot at the top of the tag, dragging the paint down with my brush so that it blended seamlessly into the Chipped Sapphire. I then took some of Dina Wakley's Buff Acrylic Paint and used this at the bottom of the tag to create the ombré effect. Once again, I used my brush to drag the paint from the bottom edge, up towards the centre. If you do need to add any more of the colours to the background, just apply lightly apply them ~ less is more and blend them to create the beautiful ombré finish. Once I was happy, I thoroughly dried the painted surface before moving onto the next stage and those stars.
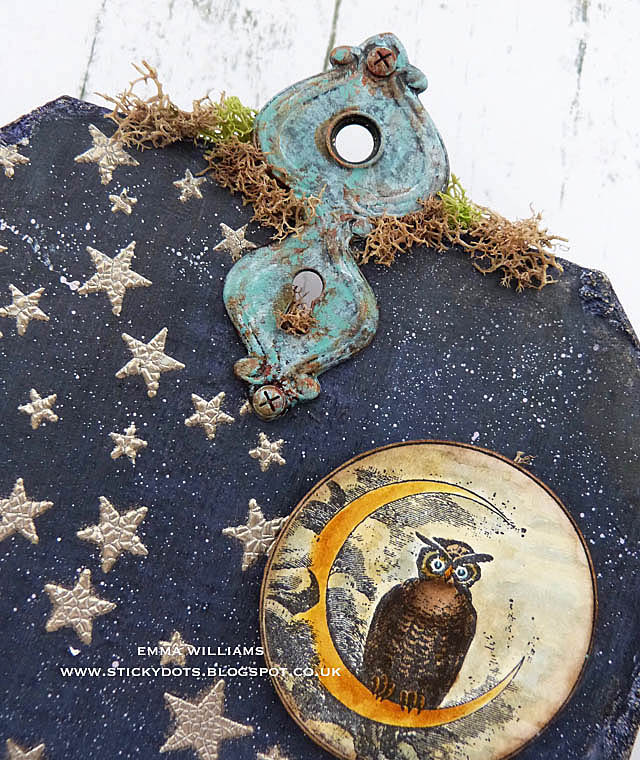
For this I used the Falling Stars Layering Stencil and applied some Crackle Paste through the stencil, arranging them in a swathe across the tag. Whilst the paste is still wet, I sprinkled some Liquid Platinum over the top, tapping away the excess and then set the tag to one side for the paste to dry. DO NOT BE TEMPTED TO MOVE ONTO THE NEXT STAGE UNTIL THE PASTE IS DRY ~ I usually give it approx 1 hour!!
Taking a heat gun, I then gently started heating the embossing powder until it started to change and became shiny. Don't you just love how the crackles appear through the powder?!?!
Now to build up my scene...
...and I started by creating the ledge ~ which I built up using three various sizes of Scalloped Etcetera Trims. I painted the one trim using Ground Espresso Distress Paint, followed by Antiqued Bronze and Black Soot. I then layered a narrower trim over the top which I crackled with Crackle Paste. I then added a smaller trim that would create the ledge, that sits at a 90° angle.
I attached the ledge across the bottom section of my tag, using Matte Collage Medium to secure it into place.
Next, I took a selection of flowers from the Botanical Layers and Keepsake Ephemera sets and layered these onto the background, placing them on various depths of foam pads to create different dimensions.
Now to create my fairy ~ I coloured her using Distress Marker Pens. I then took some of Transparent Wings and applied a coat of Collage Medium to the back of the wings before sprinkling them with Rock Candy Dry Glitter.
Allow the glitter to dry and attach the wings to the back of the paper doll before attaching her using foam pads to the project, placing her to stand on the ledge.
In her hand, I placed a tiny little message, "love" and this is cut from one of the quotes in the Clippings Stickers and backed onto cardboard before attaching it to the paper doll.
On the ledge, I attached a piece of Mummy Cloth dyed with some Pumice Stone and Antique Linen Distress Spray Stains and once the cloth is dry, I arranged in along the ledge, adhering it into place with Collage Medium. I then placed a pumpkin piece, some darling little toadstools that I had in my stash and bouquet findings dyed purple using Seedless Preserves Distress Spray Stain.
You might also notice a tiny corked vial, well this is the bottle that contained the love potion and I coloured it green using Envy Alcohol Pearl Inks, before attaching it to my ledge, that was completed with some moss and dried flowers.
Beneath the ledge, I wrapped some twine around my tag and then attached a Quote Chip ~ Dreamer Of Dreams.
As the finishing touch I added a butterfly from the Botanical Layers Ephemera set...
...and two mirrored hearts.
Now to create the moon and for this I used the stamp from Mr Bones' Stamp Set and stamped it with black ink onto Mixed Media Heavystock card and watercolored it with Distress Marker Pens. i then cut out the circular moon and attached it to my tag using foam pads.
As the finishing touch, I added a Large Keyholes to the top of my tag. I aged this with some Distress Paints ~ Evergreen Bough, Picket Fence and Antiqued Bronze, attached it to my tag and used some Hardware Heads as fasteners. I then attached moss around the top and sides of the keyhole.
So, that's my project for this week and I hope you love the inspiration behind this piece and how I bought it the story to life.
Have fun creating your projects and d
on't forget, you can find more inspiration from my talented teamies over on the challenge blog and every week, one lucky random participant has the chance to win a $50 gift voucher from Simon Says Stamp. You have until Monday 8am Ohio time. 1pm UK time, 2 pm CET to join in and good luck....
Thank you so much for taking the time to stop by today and hope to see you again soon, love Emma xxx
Recipe for project:
Idea-ology: Hardware Heads, Clippings Stickers, Bouquet Findings, Mummy Cloth, Keepsakes Ephemera, Paper Dolls, Botanical Layers Ephemera, Tiny Corked Vials, Quote Chips, Large Keyholes, Transparent Wings, Pumpkin pieces


This tag is so beautiful Emma! I just love the rich blue midsummer nights sky and the stars are gorgeous with the little cracks! I always love how you layer things and along the ledge looks so fabulous! Such beautiful work! Thank you for sharing xx
ReplyDeleteWOWZA Emma!! This is an incredible masterpiece. Love all the details from the texture pastes to the fairy in the garden. Definitely worth putting on display. xxx
ReplyDeleteOH MY WORD... okay gotta stop the giddy dance to post... I see the Product Queen is STILL on steroids ... MY, MY, MY!! The background and those star ... WOW ! The doll and those wings squeal... she's too cute . And the ledge/fairy garden... amazing detail... so fun... what fairy wouldn't want to dance through here !!
ReplyDeleteAh, great minds! It had to be A Midsummer Night's Dream, I agree. (And I've also just been doing something very similar with stars on a current project!) Love your glorious lush undergrowth with fungi and pumpkins, and the owl/moon image is perfect. Love it, love it love it.
ReplyDeleteAlison x
That looks spectacular!
ReplyDeleteWOW! What an awesome scene for Midsummer Night's Dream, Emma! I especially love that wise owl in the moon. Awesome make!! hugs, Maura
ReplyDeleteTruly magical ! This is one of hat I would call your 'specials' , Emma that totally wins my heart at first sight . Love the starry blue backdrop and your garden of ephemera and elements aswell as your well chosen winged paper doll give the finished piece a wonderful sense of magic and fantasy .
ReplyDeleteHugs x