
Hello everyone and welcome to the brand new Simon Says Stamp Monday Challenge! This week our theme is called ~ STENCIL IT and with so many fabulous stencils available right now, there are plenty of techniques that you can use with them. So, whether you ink, spray, use embossing paste or even create your own backgrounds and stencils...whatever you decide to do we will be looking forward to seeing what you create!
For my project, I used one of my favourite Tim Holtz Layering Stencils, Mosaic to create my own background paper in the style and colour that would work with my vintage style layout. I also used stencils with Grit Paste to create layers and texture before adding gorgeous ephemera pieces which I used to create the look of an open book, a paper doll and some stamped butterflies.


...and here's how I created the project!

To begin with I cut a piece of canvas paper to measure, 18 x 24cm.
I usually add a layer of a neutral coloured Distress Paint to begin with and for this project, chose Old Paper, blended with a little Pumice Stone. Once I'd covered the surface of the paper, I dried it thoroughly and then took my Mosaic Layering Stencil, laid it onto the top left hand side of paper and started to add the colour. I used Weathered Wood Distress Paint and applied very small amounts of paint through the stencil using a blending tool. Don't overload your tool as the paint will have a tendency to leak underneath the stencil ~ less is more!
Once you have finished the first section, you can move the stencil down to complete the lower left hand side of the card ~ just line up the pattern and apply the paint onto that area.
Now it came to the right hand side of the panel and because the stencil itself doesn't create a continual receptive pattern, I laid the stencil onto the right hand side but found there was a slight gap between the two stencilled areas but that's fine because I found a way that I can get around that. I continued to cover the paper by applying the paint through the stencil and then drying the surface thoroughly.

As I mentioned, there is a gap down the centre of the paper but by cleverly applying strips of Tissue Tape and various Design Tapes, (all listed below) directly over the top of the stencilled background, this can be hidden and you don't know it's there.

For the next stage, I applied Grit Paste through the Grid Dot stencil concentrating on the central area of the panel of card. Allowing the paste to dry, I then applied some Weathered Wood Distress Paint over the top, blending it out with my finger. To add more depth, I used the Pumice Stone Distress Crayon over the top, then added drips of Ecoline gold watercolour paint.
To complete the background I machine stitched around the outside and then added a few paint splatters in white, gold and black paint.
For the focal point of this piece and to tell the story of my layout, I used one of the Collector Ephemera pieces to create the look of a book for my background layer. I stitched down the centre of the piece before distressing the edges.
I gently curved each side of the piece for the book effect and then when I attached it to the background panel, I used foam pads to create the dimension and look of an open book and layered it over the top of some cheesecloth dyed with Weathered Wood Distress Spray Stain.

I then added Botanical Layers, Snippets and a Paper Doll, coloured with Distress Markers to the open book and completed it with an Index Clip. I also attached a couple of Melange Pebbles painted with Alchemy Paints and a touch of Alchemy Wax.

To add even more dimension, I used the gorgeous Flutter Stamp Set and stamped two butterflies onto watercolour card, then painted them with Distress Marker Pens before die cutting them with the corresponding Sizzix dies.


These dies actually don't cut around the stamens but don't worry about that, I just added some twists of wired attached them to the bodies.

Finally, I added a Clippings Sticker, "The Little Stars" and a quote chip, "Choose To Shine"....
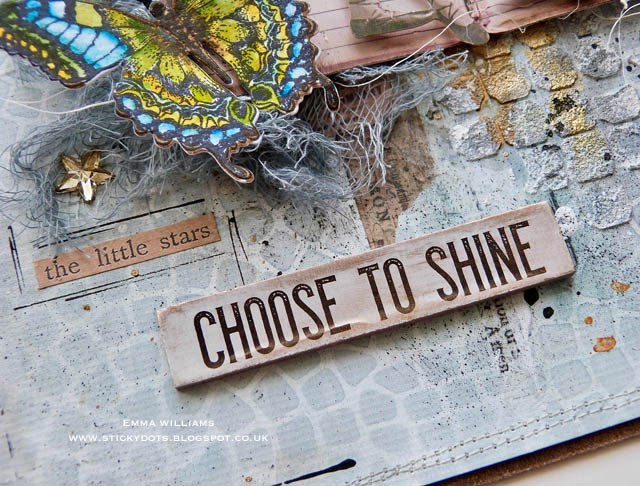
...together with some Mirrored Stars coloured with Mushroom Alcohol Ink to complete the panel.


Thank you so much for stopping by today and see you again very soon!
Love Emma xxx
Recipe for project:
Distress Paints: Old Paper, Weathered Wood, Pumice Stone
Distress Spray Stains: Weathered Wood
Distress Marker Pens
Tim Holtz Layering Stencil: Grid Dot, Mosaic
Distress Crayons: Pumice Stone, Black Soot
Tim Holtz idea-ology: Paper Dolls, Botanical Layers, Collector Ephemera Layers, Index Clips, Symphony Tissue Tape, Snippets, Quote Chips, Mirrored Stars, Journey Design Tape, Aristocrat Design Tape, Butterfly Design Tape, Clippings Sticker
Tim Holtz Watercolor Card
Mediums: Collage Medium, Grit Paste, Jet Black Archival Ink, Gesso, Mushroom Alcohol Ink
Prima Marketing Acrylic Paints: Blue Gold
Ecoline Gold Watercolour Paint
Melange Pebbles
Old Silver Alchemy Wax
Heat Gun
Canvas paper and cheesecloth from my own stash
Canvas paper and cheesecloth from my own stash


Gorgeous panel Emma :-) I love the vintage girl stepping out from the story book and the stencilling designs and colours are fabulous :-)
ReplyDeleteluv
Lols x x x
Love it ... But you KNOW that already :) Fabulous background , I love that mosaic stencil ( so far all of done is drool over mine and dream of using it ); your stencil work is amazing... the colors you used just speak to the shine :) Yummy layers ... Dance on little star !! <3
ReplyDeleteThe mosaic stencilling in the background reminds me of those gorgeous mosaic table tops you see in Europe - so beautiful. The little girl coming out of the diary is beautiful and the butterflies are divine!!
ReplyDeleteIt has been such a pleasure to work alongside you for this last month! Hugs, Anne xx
AMAZING! How I love your backgrounds! You are a master of softness. The mosaic stencil is the one I just have ordered and received and I really can tell is one of my favorites too. I love the way you built the focal panel making a faux book pages. The butterflies are amazing too. LOVELY! Hugs, Macarena!
ReplyDeleteMy gosh, this is drop dead gorgeous, Emma! I can't tell you how much fun it is to examine in awe all the amazing detail you put on each of your pieces of art. Always, always, perfect balance and texture. You're amazing!!
ReplyDeleteCathie ♥
Such a beautiful vintage canvas, Emma! You have such attention to detail, and know just how to pull it together beautifully! Love that mosaic background, and the girl on the book and butterflies, and flowers - oh yes! Gorgeous work of art!! hugs, Maura
ReplyDeleteBeautiful!
ReplyDeleteWOW! Gorgeous detail work and images, Emma! Those beautiful butterflies look like they could just about fly off the page : )
ReplyDelete*mwah*
Steph
Simon Says Stamp!
So pretty! I love the background. I didn't know I needed that Mosaic stencil till I saw this. Thank you for the tutorial. I know it takes time.
ReplyDeleteWhat an absolutely gorgeous layout! I love the texture and dimension!!
ReplyDeletethis is such a joyful and breathtaking piece Emma-wow!
ReplyDeleteI am in love with this! GORGEOUS!
ReplyDeleteThis blew me away! Awesome.
ReplyDeleteWOW I love this, your creations are always amazing!!! Hope alls well, Love Hazelxx
ReplyDeleteThis is beautiful as ever.
ReplyDeleteI hope one day to be able to meet you Emma, because i can tell from the art you make that you are an extraordinary person. I sometimes can feel your friendly and delicate heart when I look at your creations!
ReplyDeleteSo glad that I've been able to be in a team with you <3
x
You bet I LOVE it! Emma. The subtlety in tone of the background and the mosaic and grid dot stenciling is an absolute dream ( be still my beating heart....). Love how you have told a story (to me anyway) of your sweet little girl stepping out of an open diary (clever touch) from a date, marked with the clip, when maybe she got a chance to shine and was the star of her dancing show.....This is without doubt another stunning work of art.
ReplyDeleteBig hugs and hope you have a lovely weekend xxx
This is so beautiful Emma! I love the soft stenciled background and all those wonderful layers. The stitching through that book page ephemera is perfect.
ReplyDeleteanother stunning project Emma...you are the Queen of beautiful texture and details...hugs kath xxx
ReplyDeleteAnother stellar piece of artwork, Emma! I'm always on the lookout with your pieces to see how you incorporate those embellishments in such clever and original ways. Love your style!
ReplyDeleteReally Emma, I don't know what words I can use to comment on your projects! Every week, your inspiration and your way of interpreting the themes of the challenges are amazing, you get over you every time! I love very much this work, every detail is perfect, you chosen the colors so carefully and you created a fabulous design. ... Fantastic!
ReplyDelete