
It's time for the brand new Simon Says Stamp Monday Challenge to begin and this week our theme is all about MAKING YOUR OWN BACKGROUNDS! Some of the DT will be showcasing Paper Rose products within their projects but due to the ongoing situation in the world, there were a few of us who unfortunately didn't get our packages in time for this particular challenge but do make sure you go and take a look at all the amazing Paper Rose goodies!
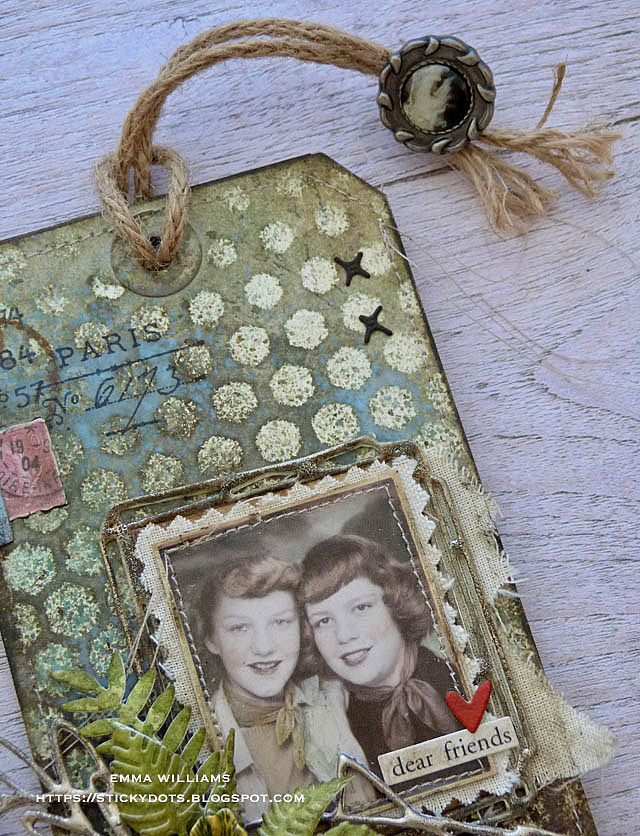
For my project, I created a tag all about friendship, I think we're all looking forward to the day when we get to spend time with our friends again and I know that I will definitely make every day count! Once again I couldn't help but be inspired by Tim Holtz's recent Facebook Lives and as I build up a collection of tags and ideas that I can look back on in those moments when Mr Mojo isn't playing nicely, I chose to create my background using Distress Micro Glaze, together with Spray Stains and Oxide Sprays, which includes the gorgeous new addition to the Distress colour family ~ Speckled Egg!


So, let's get started because the new challenge has begun...

I began by making my background and for this I used a size 8 tag which I will eventually mount onto an Etcetera Tag.
I placed the Gradient Hex Layering Stencil over the top of my tag. I then used a blending tool to apply a small application of the Distress Micro Glaze through the stencil, don't overload your sponge, you only need the tiniest of amounts and just pounce it gently through the stencil ~ I didn't go for full-on coverage, just applied it heavier in some places than others. After removing the stencil, I then added some colour and used Speckled Egg, Bundled Sage, Pumice Stone and Ground Espresso Distress Stains, spritzing each colour onto a tag slightly dampened with a misting of water. I did spritz a little more water over the stains and then watched them blend together seamlessly before drying the tag. To complete the layers of colour, I applied a final spritz of Speckled Egg Oxide Spray ~ I just love how this has oxidised in places, giving a beautiful chalky look to areas of the tag.
 I actually made a few backgrounds to see which I liked best ~ all using the same inks but different techniques.


Once dry, I inked around the edges with Walnut Stain Distress Ink and stamped some imagery onto the tag using the Paris Postmark stamp from the Shabby French Stamp Set, the circular ring stamp from the Grunged set and the numbers from the Field Notes stamp set.

To complete the tag, I machine stitched a border around the outside and the mounted it onto the Etcetera Tag.

Now to move onto the focal point and tell the story and for this I'll start with the die cut pieces and I used Media Marks, Funky Florals 3 and the Geo Frames die sets by Tim Holtz for Sizzix...
To make the frame I used the rectangular Geo Frame and cut three layers of card which I then layered together to form one frame. I then used the Embossing Dabber over the top of the die cut and sprinkled the frame with Liquid Platinum Embossing Powder. Heat emboss the powder until molten and then repeat the process a couple more times to give an enamelled look to the frame. For the final layer, I dabbed the frame once more with the Embossing Dabber and then sprinkled some Rusty Hinge Embossing Glaze over the top, only applying it to random areas, not all over the frame. Heat emboss again and you will notice the glaze just melt into the previous layers of the Liquid Platinum, creating a vintage look to the enamel.
Moving onto the decorative elements...my floral spray! The inspiration behind this was from a beautiful vintage brooch that I'd seen at the V&A museum and I thought how cool it would be to replicate it for this project using dies and idea-ology pieces...


So to begin, I took the squiggly die from the Media Marks die set, I die cut three layers of card and layer them over the top of one another to form one die cut before using the exact same technique as on the frame to create the enamelled effect.

Now for the spray of foliage ~ this is cut from watercolour card, coloured with Peeled Paint and Bundled Sage Distress Spray Stains. Once the card is dry and I have the blend of colour I need, I used a couple of dies from the Funky Florals 3 die set to create each individual piece.
I now have all my die cut elements, together with a vintage Photo Booth image that I colour tinted using Distress Marker Pens and then machine stitched a border around the edge before mountingonto a piece of cotton calico fabric, dyed with a little Frayed Burlap, cut with my nan's old Pinking Shears.

Attach the Geo Frame to the tag, adding a piece of torn calico behind the frame. I them mounted the photo booth image over the top.

For my next layer, I used the squiggly die cut, attaching it across the tag but allowing it to slightly overhang the edges before arranging the foliage in the bottom left hand corner of the photo.
In the centre of the foliage, I added a Floral Adornment.
 To add a slight hint of colour to this, I applied the Embossing Dabber over the metal and then sprinkled with Fossilized Amber Embossing Glaze. Tap away the excess powder and heat emboss but PLEASE ALLOW FOR THE METAL TO COOL BEFORE TOUCHING, IT IS HOT!

In the centre of the floral adornment, I added a Bauble that I coloured with a little Walnut Stain Crayon.

We're nearly there and all that's left is the details:
I added a postage stamp ephemera piece from the Field Notes Snippets set in the top left hand corner of the tag and then clipped a Hinge Clip to the side. I altered the colour of the clip using a combination of Picket Fence and Speckled Egg Distress Paint before adding a smear of Walnut Stain Distress Crayon.

Finally, I added my wording ~ 'dear friends' taken from the Clippings Stickers set and 'make today count' taken from the Small Talk Sticker set.

As a finishing touch, I placed a small die cut heart, that I had on my desk from a previous project and just attached this onto the photo before threading some rope through the hole of the tag and attaching a vintage style button to the end.
I hope you enjoyed this project and the ideas might have inspired you.

Just before I go, I just wanted to share a tip that I'm using to remember all the techniques ~ on the back of the tags, I've been attaching a note of the colours, inks, stains, etc that I've used to create certain elements of the tag. It really helps me to look back at these notes when Mr Mojo isn't playing nicely and you need some inspiration! Hope it helps you too...

Don't forget, if you would like to see more inspiration from my talented teamies over on the challenge blog and every week, one lucky random participant has the chance to win a $25 gift voucher from Simon Says Stamp and you can join in up to 5 times, which means you could have 5 chances to win. You have until Monday 8am Ohio time. 1pm UK time, 2 pm CET to join in and good luck....


Thank you so much for taking the time to stop by today ~ stay safe and well, and see you again soon, love Emma xxx
Recipe for project:
Tim Holtz/Stampers Anonymous: Etcetera Tag, Gradient Hex Layering Stencil, Shabby French, Field Notes, Grunged
Tim Holtz/Sizzix: Geo Frames, Funky Florals 3, Media Marks
Distress Ink: Walnut Stain
Distress Paint: Speckled Egg, Picket Fence
Embossing Glaze: Fossilized Amber, Rusty Hinge
Distress Marker Set
Tim Holtz/Sizzix: Geo Frames, Funky Florals 3, Media Marks
Distress Spray Stain: Bundled Sage, Speckled Egg, Ground Espresso, Pumice Stone
Oxide Spray: Speckled EggDistress Ink: Walnut Stain
Distress Paint: Speckled Egg, Picket Fence
Embossing Glaze: Fossilized Amber, Rusty Hinge
Distress Marker Set
Tim Holtz Idea-ology: Field Notes Snippets, Vintage Photo Booth, Floral Adornment, Baubles, Clippings Stickers, Hinge Clip, Small Talk
Mediums: Matte Collage Medium, Archival Ink Set 3, Liquid Platinum Embossing Powder, Embossing Dabber, Distress Micro Glaze
Surfaces: Tim Holtz Mixed Media Tags, Media Heavystock Card


Oh Emma!! this is just stunning!!! I love the colours, the best friends, everything about this is GORGEOUS!
ReplyDeleteGreat tip to add the details to the back too!
Hope you have a great week!
luv
Lols x x x
This is a Gorgeous tag Emma !! wonderful background and great colours, with amazing embellishments and photo.
ReplyDeleteHave a nice week,
Big hugs, Caty
Emma, Fantastic background you created for your tag. I love how you used the Adornments Floral in the center of the Sizzix leaves. Brilliant!
ReplyDeleteThis is beautiful! I especially love the techniques you applied to the geo frame as well as the gorgeous floral spray! And that background ... yummy!! Thanks so much for sharing. Really appreciate it.
ReplyDeleteIt's a fabulous tag, Emma!!!!!!!!!!!!!!
ReplyDeleteAbsolutely stunning - thanks for sharing.
ReplyDeleteBeautiful cards!
ReplyDelete