Hello friends...
Hope you had a wonderful weekend and fingers crossed the sun has finally shone where you are! Here in London, it's been lovely and hot and spring, maybe even summer has finally made an appearance as the trees are in full blossom and the leaves are adorning the trees, at last!!
So, with this in mind and spring in the air, this week over on the Simon Says Stamp Monday Challenge blog, our challenge theme is called Flower Power and we can't wait to see your floral projects and hope you'll join us for this fun challenge.
For my project, I thought it would be fun to create a couple of cards ~ we all need cards at some point and I thought this was the ideal time to make two very special ones for family members.
I was actually inspired by an embroidered tablecloth that my Grandma created as a young girl. The cloth was covered with blue flowers, periwinkles and forget-me-nots and I always adored it and would look at it for ages, touching the flowers and just in awe of such a wonderful piece...in fact she knew how much I loved it and gifted it to me when I was only 7 years old ~ even then I was always crafting and remember those wonderful times she would sit with me and patiently take the time to teach me to make clothes, knit and embroider ~ so many happy memories. But back to this project and with this wonderful piece of embroidery in mind, I thought it would be fun to recreate these pieces in paper but with a twist and give them some dimension by using Tim Holtz's Funky Floral 3 die to create the flowers.
I was actually inspired by an embroidered tablecloth that my Grandma created as a young girl. The cloth was covered with blue flowers, periwinkles and forget-me-nots and I always adored it and would look at it for ages, touching the flowers and just in awe of such a wonderful piece...in fact she knew how much I loved it and gifted it to me when I was only 7 years old ~ even then I was always crafting and remember those wonderful times she would sit with me and patiently take the time to teach me to make clothes, knit and embroider ~ so many happy memories. But back to this project and with this wonderful piece of embroidery in mind, I thought it would be fun to recreate these pieces in paper but with a twist and give them some dimension by using Tim Holtz's Funky Floral 3 die to create the flowers.
So, let's get started because it's time for the new challenge!
The backgrounds for both cards are created exactly the same, so I tend to make a few of these and then just cut them to size. I applied Frayed Burlap, Iced Spruce, Antique Linen and Vintage Photo Distress Oxide Inks to my Tim Holtz Glass Media Mat and then spritzed the inks with a light misting of water before swiping Mixed Media Heavyweight card panels through the inks, picking up the colour. Heat dry and if you need to add more colour, just keep dipping until you're happy. Once the card is thoroughly dry, I inked around the edges with Walnut Stain Distress Ink.
Beginning with card no.1...
...I cut the panel of inked card to measure 11.5 x 15cm and using the Ornate Trims stamp set by Tim Holtz, I stamped a border in Potting Soil Archival Ink, around the outside using two of the stamps from this set ~ using one stamp to stamp the first border at the top and bottom and a second, different stamp on the left and right hand sides.
I matted the background onto gold metallic kraft card, followed by a layer of blue card and a layer of kraft card. I then mounted these layers onto a panel of the burlap from the Textured Surfaces set, matted onto black soot kraft card and layered onto a kraft card blank.
Next I started to create those dimensional flowers...
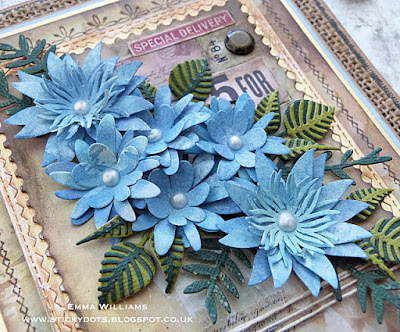
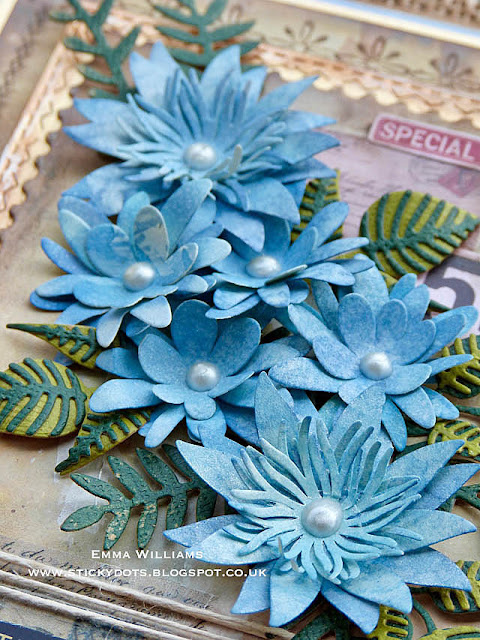
...and for these I used a light weight card that I have in my stash. I added colour to the card by using Faded Jeans, Broken China and a hint of Blueprint Sketch Oxide Inks, applied to the mat in exactly the same way as before.
Once the card was dry, I then used the Funky Florals die to die cut the various sized petals that I would need for each flower ~ I tend to use about three or four layers, which include the central stamen pieces, to make one individual flower. Once I had enough pieces, I then just layered those petals, shaping each one as I go and building up the dimension.
As a finishing touch, I added Nuvo Crystal Drops to the centres of each flower.
I the used various shades of green kraft cardstock to die cut the leaves and foliage.
Moving onto my next layer, I took another piece of the inked background card and used the Stacked Postage die set to die cut a second panel. I inked the edges of this die cut before arranging my floral display onto the panel, adding some ephemera pieces that are placed directly onto the background and adhered using Matte Collage Medium.
I then mounted the finished panel onto a piece of gold metallic kraft stash cardstock, cut with the Stitched Rectangle die and inked with Gunmetal Mixative Ink and Mushroom Alcohol Ink, before I wrapped some twine around the bottom section of the layers.
I went on to attach the floral panel centrally onto the front of the covered card blank using foam pads for more dimension and attached a vintage button to the left hand side of the twine wrap.
To complete this card, I added a Nailhead Finding and a Beautiful Day Metallic Quotations Sticker in the bottom left hand corner.
The second card basically uses the same ideas as I used on the first...it's just a slightly different colour way and the flowers have pearl centres.
The background uses a further panel of the inked Mixed Media card and I just used different border stamps around the outside and added Hex Fasteners to each corner.
The flowers are coloured with Mermaid Lagoon, Salty Ocean and that small hint of Blueprint Sketch Oxide Inks and instead of using the crystal drops for the centres, I used Bauble Findings inked with Mushroom Alcohol Ink.
For the message panel, I used the Stitched Ovals die and stamped my message using wording from the Glorious Bouquet Stamp Set...
...before matting it over the top of a die cut section of card that I had stamped using the Botanical stamp from the Botanical and Batik stamp set.
I completed this card with a Hinge Clip and a Typed Token.
I hope you've enjoyed the creative process and all the techniques that have gone into making these projects but I also hope you've loved the inspiration behind these two cards...they mean a lot to me and hold a special place in my heart.
Don't forget, you can find more inspiration from my talented teamies over on the challenge blog and every week, one lucky random participant has the chance to win a $50 gift voucher from Simon Says Stamp. You have until Monday 8am Ohio time. 1pm UK time, 2 pm CET to join in and good luck....
Thank you so much for stopping by today and I'll see you very soon!
Love Emma xxx
Recipe for project:
Tim Holtz/Stampers Anonymous Stamp Sets: Ornate Trims
Tim Holtz/Sizzix Dies: Funky Florals 3, Stitched Rectangles, Stacked Postage
Tim Holtz/Sizzix Dies: Funky Florals 3, Stitched Rectangles, Stacked Postage
Distress Oxide Ink: Antique Linen, Faded Jeans, Broken China, Blueprint Sketch, Frayed Burlap and Vintage Photo
Mediums: Matte Collage Medium, Jet Black Archival Ink, Potting Soil Archival Ink
Alcohol Ink: Mushroom, Gunmetal Mixative Ink
Alcohol Ink: Mushroom, Gunmetal Mixative Ink


WoW Emma! These are stunning and authentic. I loved hearing about your story with your Grandma, it makes your projects extra special. xxx
ReplyDeleteStunning cards Emma :-) I love the blue flowers and the backgrounds are absolutely GORGEOUS!! :-)
ReplyDeleteluv
Lols x x x
What a wonderful treat- not 1 but 2 absolutely gorgeous bespoke cards. Those funky florals in such glorious shades of blue are so eye catching on those fabulous vintage backgrounds and the detail as always is faultless.
ReplyDeleteYou really have spoiled us this week, Emma with these two flower cards that definitely have the power to WOW ! Thank you
Big hugs for a wonderful week ahead
xx
Seriously Emma, you blow me away every single week. These are stunning.
ReplyDeleteAMAZING set! I'm impressed. The colors are a dreamy ones, the vintage yet romantic look is amazing on both of them. Love the blue flowers, too. I have counted the layers and there are 9 layers on the background!!! OMG. That's impressive and I wonder how heavy the card must be! I am sure your family members will be in awe as soon as they get them! Hugs, Marzena
ReplyDeleteJust had to pop over and say again how much I love these beautiful cards! The story behind their inspiration is so lovely and your attention to detail, as ever, is just phenomenal! Two stunning pieces...hugs, Lisa x
ReplyDeleteEach week your beautiful pieces find a place in my heart, I just loved learning about your grandmother and traditions, family is everything. You have brought those special memories into these gorgeous cards. Yummy layers, gorgeous colors and fabulous cards. Thank you for sharing your talents
ReplyDeleteMagnificent!! Thank you for the details. Oh for the ability to layer like you!!!
ReplyDeleteEmma, it touches my heart how inspired you are by your Grandma! I love it! <3 The forget-me-nots are STUNNING and really just pop off the page! You are amazing!
ReplyDelete*mwah*
Steph
Simon Says Stamp!
Thank you for sharing your two beautiful cards, your techniques and your memories! What a lovely post, and what an inspiring pair of greeting cards! Hugs!
ReplyDeleteEvery week Emma I'm wait for your creations! they are always incredible! I have no more words, only AMAZING!!
ReplyDeleteThese cards are incredibly beautiful!!! I love the contrast between the brownish-vintage background and the vividly blue flowers!!!
ReplyDeleteAbsolutely stunning, Emma! Wonderful layers and details, and I just love the delightful blue flowers. I really like how you patterned these after your Grandmother's embroidery, that makes them even more special, and the embroidery must be beautiful! Maura
ReplyDeleteAlready pinned...love every gorgeous bit!
ReplyDeleteThese are both so beautiful and even more beautiful because of the memory that goes along with them, I am always inspired by your work, Emma! Thank you for sharing! Hugs! ~ Stacy ♥️
ReplyDeleteStunning cards Emma, Cathy x
ReplyDeleteI think I'd be more into gardening if my flowers turned out looking as lovely as yours! LOVE to see how you combine materials and especially liked the centers of the flowers. And as always, you've taken your art to a beautiful emotional/historical place, too.
ReplyDeletegorgeous cards Emma, love the contrast of the backgrounds with those beautiful vivid blue flowers, hugs kath xxx
ReplyDeleteLove these gorgeous cards, Emma. The layered embellishments and those flowers you created are amazing! All the details are just stunning. :)
ReplyDeleteMe han encantado esas tarjetas, son preciosas muy inspiradoras y llenas de amor y recuerdos. Para mí también, yo tenía esa relación especial con mi abuela. Gracias
ReplyDeleteBoth cards are stunning, Emma! Love the blue flowers, with the vintage backdrop. Hugs, Sandra
ReplyDeleteStunning cards. I always love your flowers though, and that blue is beautiful, and you can see its a beautiful blue
ReplyDeletesuch stunning cards, love the romantic and vintage vibes!
ReplyDelete