Showing posts with label recycling. Show all posts

Monday, 28 March 2022

With A Little Help From My Friends...

Hello friends...

How is everyone doing? It's been a week of sunshine here in London and as we turn the clocks forward and head towards summer, it's time for lighter nights and fingers crossed more sunny days and of course, that means more daylight time for crafting! Which leads me nicely into a brand new Simon Says Stamp Monday Challenge which starts today, and this week our theme is all about RECYCLING. So whether you choose to recycle some of those cardboard boxes or old packaging that we all seem to keep for those "just in case" moments, or if you want to recycle some old projects inspiration and update it with a new idea, then we hope you'll join us and can't wait to see what you make!

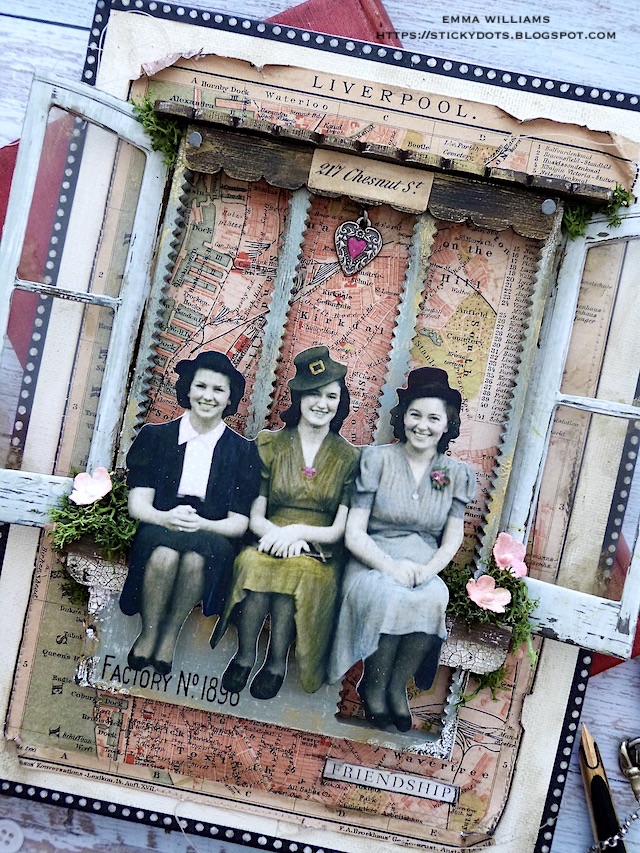
For my make, I chose to recycle some acetate packaging but also something that I seem to have plenty of and that's the waste from the packs of Stampers Anonymous/Tim Holtz Etcetera Trims! I use plenty of these trims on my projects and I've always kept those boards that I pop them out from ~ in my mind, one day they WILL have a use! So, as I hunted around to see what I could use, I suddenly cast my eye on these and thought they would look so cool as a window frame, and that's exactly what they became...a window of opportunity!

...and here's how I used the waste and acetate on my project!

So let's get started, it's time to get creative!

CANVAS BOARD

To begin with I started with my base and this is a Dina Wakley canvas board that I cut to measure 24 x 18cm. I applied a layer of Antique Linen and Picket Fence Distress Paint over the surface, and then cut a panel of the Liverpool map paper from Backdrops Volume 2. I love this map, and have been waiting for the right opportunity to use it and now was that time because I thought it worked perfectly as the backdrop for this piece.

After distressing and adding small tears around the edges of the paper, I machine stitched a border and then attached the panel to my painted canvas board using Matte Collage Medium.
I applied a coat of the medium over the entire board and paper, before adding some of the black and white dot Design Tape Trim around the edges. I honestly could do with a whole pack of that design, I absolutely LOVE it!

With the board ready, it's now time to recycle those waste products....

FRAME

I used three of the waste pieces from the Pinked Etcetera Trim pack and layered them over the top of one another to form one thick frame. You can see the depth of the frame I created, in the photo below....

After I applied a coat of gesso to the surface, I allowed it to dry before painting it with Sage Acrylic Paint from Dina Wakley. I used this colour, because I always associate it with the era of the photo ~ from kitchen accessories, to clothes and cars, it just seemed to be a colour that was everywhere at the time and I remember it so well from my grandparents and parents photos!

Once the painted surface was dry, I added crackle paste to random areas of the painted frame, allowed this to dry and do its thing before running the Walnut Stain Distress crayon over the top, blending out any harsh lines of colour with my fingertip.

Finally, I applied some of Tim's brand new Foundry Wax around the edges. I applied Gilded using my finger but you are advised to use a brush, just in case of a possible allergic reaction since this is a solvent based product.

I heat set the wax before I attached the finished frame to my board using Matte Collage Medium.

In the bottom left hand corner, I used a Eccentric Remnant Rub, "Factory No. 1896" and just applied it directly to the frame.

At this point, I also attached a Heart Adornment charm which hangs from the centre window. I fixed this to the top frame, using a screw eye fastener and then after painting the centre of the heart with a little Picked Raspberry Distress Paint, I attached the charm to my screw eye fixing.

WINDOWS

With the frame in place, I attached the windows on either side of the main frame.

This window is just one of the new Window Baseboard pieces and because I wanted to create the look of an open window, I cut it in half using a craft knife. Please be careful when doing this...

I attached some acetate, which I took from some recycled packaging and placed this behind each window frame. To create a more vintage feel to the glass, I applied a small amount of Mushroom alcohol Ink, dabbing it onto random areas of the acetate. This is so difficult to show in the photos but it makes so much difference to the project in real life. To attach the acetate, I used adhesive tape before I adhered the completed window frames at an angle onto each side of my main frame, using Matte Collage Medium down the side of each window frame. 

Whilst the medium was drying, I just propped the frames up and this seemed to do the trick, and the frames are set into place and don't move.

TRIMS

Now for the trims and I added Scalloped Etcetera trims to the top, and used one of the Bracket Trims as a ledge for my friends to sit on ~ don't forget to keep that waste!!!!

At the top of the frame, I used two different lengths of the scalloped trims and painted these with a combination of Black Soot and Ground Espresso Distress paint which gave me a rich wood tone to the surface. I also added some more of that Gilded Foundry Wax to the surface, just to add some more depth of colour.

I then attached each trim into place ~ the smaller trim across the top, and the larger trim at a 90˚ angle to form a 'L' shape.

In the centre of the smaller trim, I attached an idea-ology Snippets Number Strip, 217 Chesnut St and aged it with a smear of Walnut Stain Crayon over the top.

To complete the frame and trims, I hammered a Nail Tack onto either side of the smaller trim.

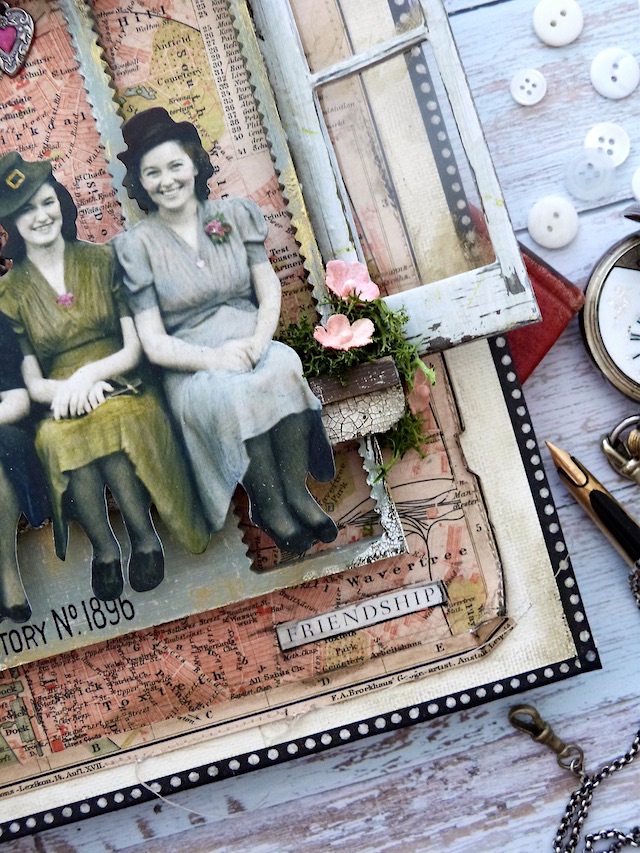
The ledge that I used for the paper dolls is one of the Bracket Etcetera Trims and I added Crackle Paste directly onto the surface. I allowed the paste to dry, before attaching it across the lower section of my frame.

I then added a straight edge strip that I cut away from some more of the waste and painted this with the same combination as before ~ Black Soot and Ground Espresso. I attached this over the top of the crackle trim, just to create a little more height for the ladies to sit on.

PAPER DOLLS

I used a Group Paper Doll for this project and added colour using Distress Crayons and a waterbrush. I also added some white dots to the blouse on the left.

I then attached my paper doll to the ledge, before adding clumps of moss.

To complete this ledge, I added some Bouquet Findings, that I coloured with Antique Linen Distress Spray Stain and Saltwater Taffy Oxide Sprays.

Finally, I added the word "Friendship" in the bottom right hand corner, which is from the Clippings Sticker Book.
So that complete's my project for this week, and I hope you've loved what I've made...

As always, if you make anything, or if you've been inspired by anything that you've seen here on my blog ~ then please, let me know by tagging me on social media or leaving a comment here and I will be right over to take a look!

Don't forget that every week, one lucky random participant has the chance to win a $25 gift voucher from Simon Says Stamp and you can join in up to 5 times, which means you could have 5 chances to winYou have until next Monday at 8am Ohio time. 1pm UK time, 2 pm CET to join in and good luck....


Thank you so much for taking the time to stop by today ~ stay safe and keep well.
Love Emma xxx

Monday, 15 March 2021

The Easter Bunny Gift Topper...

Hello friends...

Hope you've all had a wonderful weekend and ready for the new week ahead and a brand new week on the Simon Says Stamp Monday Challenge Blog! This week our theme is all about RECYCLING and we can't wait to see how you will interpret our fun theme and what you will create!

For my project, I chose to recycle some brown paper that came as packing with a parcel and after seeing which parts of the paper were nice and smooth, and unwrinkled ~ I cut a section that would be just enough to create some wrapping paper, perfect for those Easter gifts and treats!

I love making my own gift wrap and present toppers and some of you might remember my Christmas themed project from December! So with this in mind, I thought it would be such a fun idea to recycle that project idea and create a brand new one for Easter using one of Tim's Chapter 1 dies from Sizzix, the adorable Carrot Bunny and combine him with that Funky Wreath, and the addition of a little extra foliage from the Funky Nature.

So, let's get started and here's how I created my gift wrap and tag...


After finding the perfect piece of brown paper, I decided on a design and used the Spring Shadows and Mini Media Marks stamp set to stamp a floral pattern on the paper using Snowflake Pigment Stazon Ink. In the centres of each flower I used a white pen to add small dots.

Once I was happy with the design, I flicked some Picket Fence across the paper, allowed it to dry and then wrapped up my present, ready for the next step ~ the Easter Bunny gift topper and matching gift tag.

So for this I started by creating my Funky Wreath. I'm sure you'll all know how much I love this die set, it's probably one of my most used and for this particular project, I wanted the colours bright and fresh and chose Rustic Wilderness, Shabby Shutters and Iced Spruce Distress Spray Stains as my colour palette and inked some Distress Watercolour card with a combination of the sprays, creating two shades of green ~ one fresh and vibrant and the other a little more on the shabby side! I then used the green card to die cut my wreaths, and a selection of the extra foliage pieces. I also cut a few twigs from some brown card, that I'd previously inked with a selection of brown Distress Spray Stains. I inked all the foliage edges with Walnut Stain Distress Ink.

I always cut more foliage than I will probably need and what's not used, can just be saved for another day but it's better to have more, than too little.

After layering the Funky Wreaths over the top of one another, I moved onto die cutting some more foliage and used one of the leaf dies from the Funky Nature Thinlits Die set and again, I just kept cutting the foliage from the Rustic Wilderness and Shabby Shutters coloured card.

I arranged and attached all my extra foliage bits, following the round of the wreath and also added the twigs.

I now have my basic wreath ready and the next stage was to add the tiny little flowers. I used Bouquet Findings from Tim's idea-ology line and coloured them with a combination of Spun Sugar and Kitsch Flamingo Spray Stains. Just spritz the stain over the flowers and allow to dry. If you feel they a little too pink, like I did ~ I just misted some water over the top to take away some of the colour and tone down the vivid pink.

After attaching my little flowers to the wreath, I added small dots of Platinum Stickles Glitter glue to the centres and allowed to dry.

To complete the wreath and give it some sparkle, I added small sequins from a gorgeous set by Sizzix, the Rose Gold Sequins and Beads and I just attached them onto the foliage, nestling them in and amongst the greenery.

Now for the star of the show, the Carrot Bunny. I cut two bunnies from Distress Watercolour Card and also cut the little pink highlights from pink card and the nose and eyes from black card. I will be using one bunny later, so set this to one side and just use the one at the moment. Also, for this particular project, I wanted to keep him clean and white, I didn't want to add too much ink to make him look dirty, so I didn't really add any ink, just a few highlights and some pen work to bring him to life!

For the carrot, once again I cut Distress Watercolour card and coloured this with a combination of Spiced Marmalade and Crackling Campfire sprays. The leafy carrot tops were cut from the same card as the wreath.

I assembled the carrot and then attached it to the wreath, tucking it underneath some of the foliage before placing the bunny behind the wreath.

We're now ready to decorate that present...

...and to begin with I coloured some Crinkle Ribbon, using Spun Sugar and Antique Linen Spray Stains and once it was dry, I cut a strip to wrap around my gift and then tied the remaining coloured ribbon into a bow.

To complete the bow, I added an Antiqued Gem to the centre, attached with a mini pin.

I then added the Easter star of the show, and attached my Carrot Bunny Wreath topper to the gift.

The gift is now ready and all that it needs is a matching gift tag...

For this I used the Labels Thinlits Die set and cut one label from kraft card. I then cut a smaller circle to fit inside the tag from White Mixed Media Heavystock card, inked the surface lightly with Antique Linen Distress Ink and matted it onto the kraft tag. I finished with a light splatter of Walnut Stain Distress Ink and added some more of those little sequins before I punched a hole in the top of the tag, and added some more of the dyed crinkle ribbon through the hole.

Using the Happy Easter stamp from the Spring Shadows set, i stamped the sentiment in Kitsch Flamingo Oxide Ink before attaching the second die cut bunny, placing his little paws around the top of the tag and leaving his tiny foot poking out at the bottom of the tag.

So that's my recycled project ready for it's recipient and I hope you've loved the ideas I've shared today and will be inspired by what I've made! It really was a fun project to bring together...

Don't forget that every week, one lucky random participant has the chance to win a $25 gift voucher from Simon Says Stamp and you can join in up to 5 times, which means you could have 5 chances to winYou have until Monday 8am Ohio time. 1pm UK time, 2 pm CET to join in and good luck....


Thank you so much for taking the time to stop by today ~ stay safe and keep well.
Love Emma xxx


Recipe for project:
Stampers Anonymous: Spring Shadows, Mini Media Marks
Distress Spray Stain: Rustic Wilderness, Shabby Shutters, Iced Spruce, Crackling Campfire, Spiced Marmalade, Spun Sugar, Kitsch Flamingo, Antique Linen
Distress Inks: Walnut Stain, Antique Linen
Distress Oxide Ink: Kitsch Flamingo

Monday, 14 January 2019

Spread Your Wings and Fly...

Hi everyone!

Hope you all had a wonderful weekend and you're now ready for a brand new week ahead and the brand new Simon Says Stamp Monday Challenge which this week is called ~ RECYCLE SOMETHING! Maybe you would like to use some ribbon or twine from a gift you received or there might have some jars or boxes that are just waiting to be upcycled ~ whatever you choose, the DT can't wait to see what you create and hope you'll join us for this fun challenge!

After all the Christmas deliveries, I had a plethora of cardboard boxes and decided that I would put some of these boxes to good use and cut a panel of the corrugated card that I thought would be perfect as a background for this week's project and hope you enjoy the transformation of how I turned the boring old cardboard into something slightly more attractive!
So, let's begin and here's how I created this project...
 

After cutting a panel of the corrugated card from the box, I then went about making a few tears and rips in it ~ peeling away the top surface to reveal the corrugation underneath.
Once I was happy, I then added a coat of gesso over the top to prime the surface and heat dried the medium. When working with the card, be careful not to saturate the surface too much as it will buckle ~ I find it's best to heat dry the card between paint layers.

When the gesso was dry, I then added a layer of Antique Linen Distress Paint over the top, dried the surface before using a dry brush to apply a layer of Bundled Sage over the top. Again, dry the surface before the next layer and taking another brush, I dry brushed the painted surface with a layer of Pumice Stone Distress Paint. I now have the colour I wanted so it's time to start applying the Floral Collage Paper.
Using a water brush, I run the wet brush around the outline of the piece of collage paper that I want to use ~ this allows me to have a flawless join when I apply the paper to the background.

After selecting the pieces I wanted to use, I attached each of them using Matte Collage Medium. When the medium has dried, I then used a palette knife to apply Crackle Texture Paste to random areas of the cardboard. Allow the paste to dry and the crackles to appear.
To complete the background and add just a little more interest to it, I then took the script stamp from the Entomology stamp set and stamped directly onto the painted background, applying the script to random areas.

Moving onto the frame and applied a coat of gesso to the smallest sized vignette frame. I then used Weathered Wood Distress Paint to add a hint of colour.

You'll also notice from the photo below that I smeared some of the Crackle Paste over the frame ~ not a lot, just a hint to create some more texture. To complete the frame, I used the Pumice Stone Distress crayon, running it over the top of the beading and then wiping away the excess with a semi dry baby wipe.
I cut a piece of paper to add a backing to the frame, before attaching it with foam pads to my corrugated background, surrounding it with a few Snippets Ephemera pieces on the left hand side.

Now for the moth/butterfly and for this I stamped one of the Entomology bugs onto watercolour card and coloured the image with Distress Marker Pens. I then used the co-ordinating Entomology dies from Sizzix to die cut the perfect little flutterby.
I placed the die cut image onto a bed of recycled twigs from my garden and some sisal fibres, attaching these in the centre of the vignette frame. The twigs and fibres also create height and texture  to the focal point, which I loved.
I then added the quote chip, "Find Joy In the Ordinary" directly below the frame.

All that's left for me to do, is mount the panel and for this, I used a canvas panel which I painted with Weathered Wood Distress Paint before dry brushing a layer of Pumice Stone Paint over the top.

To frame the corrugated panel, I applied some torn strips of Butterfly design tape to the Media board cut down to measure 18 x 24cm and used the tape to create a border which will eventually sit around the edge.
I mounted the corrugated panel onto the centre of the canvas using foam pads....
...and finished the completed panel with four Hex Fasteners in each corner that I rusted up a little with some a combination of Vintage Photo, Antiqued Bronze, Rusty Hinge and Black Soot Distress Paint and a couple of Special Delivery Remnant Rubs that I applied to the background.

Don't forget, you can find more inspiration from my talented teamies over on the challenge blog and every week, one lucky random participant has the chance to win a $50 gift voucher from Simon Says StampYou have until Monday 8am Ohio time. 1pm UK time, 2 pm CET to join in and good luck....


Thank you so much for taking the time to stop by today and hope to see you again soon, love Emma xxx

Recipe for project:

Tim Holtz/Sizzix Dies: Entomology
Tim Holtz/Stampers Anonymous Stamps: Entomology

Powered By Blogger

Total Pageviews