Showing posts with label Sizzix Chapter 1 2021. Show all posts

Monday, 25 October 2021

Where Poppies Blow....

Hello friends and happy Monday!

Hope you all had a wonderful weekend and as we head into the final week of October, it's time for a brand new Simon Says Stamp Monday Challenge and this week our theme is called THINKING OF YOU!

With Remembrance Day and Armistice Day just around the corner, as always at this time of the year, I felt inspired to create a card that would be a tribute to all those who have served our countries and used Tim Holtz products from Sizzix and Stampers Anonymous to make it!

So let's get started and here's how I created my tribute card...

To begin with I made a card blank from white card measuring 13.5 x 21cm with the fold at the top. I wanted a decorative border around the outside of my card layers that I will be mounting onto the card blank, so for this I used Design Tape and just stuck it around all four edges of the card to create a border. 

Now for the first layer, and the chalkboard effect that I created for the background....

I cut a piece of black card, 11.5 x 19cm ( I always use smooth card for this technique) and using the Stampers Anonymous Floral Outline stamp set, I took one of the three designs that features the poppy in the design and after inking up the stamp with clear Versamark embossing ink, I started stamping the floral image over the entire background to create my background design.

I then sprinkled the stamped images with Frosted Crystal Embossing Medium and after tapping away the excess, I heat embossed the images. 

TOP TIP: Do not overheat the powder, once it has melted and you can see that the texture has become crystallised, I always move onto the next section of embossing! 

This medium leaves a gorgeous crystal gritty textured finish and as Tim demonstrated in his recent YouTube Live, this is perfect for this chalkboard technique, which is so easy but so effective and all you need to do to make the images pop is rub a piece of chalk over the textured embossing and then rub it with your finger to make sure it really gets into all those raised areas.
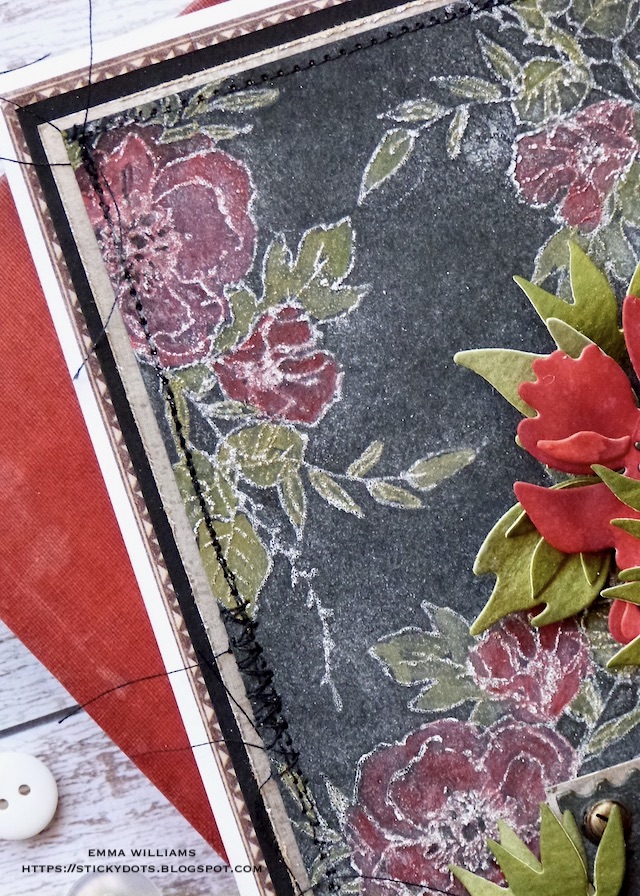
Once I was happy, I then started colouring my flowers and for this I used Distress Paints and a waterbrush.

COLOURS: Barn Door, Candied Apple, Peeled Paint, Forest Moss.

When you watercolour each of the flowers using the combination of red paints, and the leaves coloured with the green paints, you will find that you lose some of the chalk outline, so once the artwork was dry, I just gently rubbed a light touch of Matte White Wax Paste over the top to accentuate the outlines again.

With the background finished, I machine stitched a border around the outside and then matted the panel onto silver kraft stock card, followed by another layer of black card.

At this stage, I dyed some Mummy Cloth with Black Soot Distress Spray Stain and once it was dry I wrapped the cloth around my card layers, and secured it with a knot on the right hand side.

I then mounted the layers onto my card blank with foam pads, placing it with the design tape border showing around the outside of the layers.

Moving onto the next stage ~ the sentiment plaque.

For this I cut a panel of black card using an older Tim Holtz die set, Stacked Postage Stamp Thinlits Die set which I have in my stash. I then cut my lettering, 'We Will Remember Them' cutting each letter from silver metallic kraft stock using the Alphanumeric Label die set. I always adhere a piece of adhesive sheet to the back of my card as this really does make sticking the smaller die cuts, including these letters so much easier.

After attaching the letters to the black postage stamp die cut, I matted it onto more of the silver metallic card. I didn't want the silver to be too shiny, so to knock it back I ran the Black Soot Distress Crayon over the top, before I adhered the plaque to the front of my card blank with foam pads.

To finish the plaque, I added a Hardware Head to each opposite corner of the plaque.

Now the poppies...

I used the Sizzix Brushstroke Flowers 1 Thinlits Die Set by Tim Holtz, and cut the main layered sections for three flowers from Mixed Media Heavystock card that I had coloured with Candied Apple, Aged Mahogany and Barn Door Distress Spray Stains. I inked the edges with a little more Aged Mahogany Distress Ink and then assembled each piece to create my poppies, adding a black centre die cut to each flower.

I then cut a selection of leaves using the same thinlits die set, and cut these from more of the Mixed Media Heavystock card coloured with Bundled Sage, Peeled Paint and Crushed Olive Distress Sprays.

The flowers are now ready to arrange on my card and I placed them to overlap the sentiment plaque and cascade down the card front, with the leaves nestled amongst them.

For the finishing touches, I added a mini pin, and story stick to the knot of the mummy cloth....

...before clipping a tiny clip, painted with Candied Apple Distress Paint, onto the right hand side of the plaque.

So that completes my tribute card which I hope you love and I hope you've been inspired by some of the tricks and techniques I've used.

As always, if you make anything, or been inspired by anything that you've seen here on my blog ~ then please, let me know by tagging me on social media or leaving a comment here and I will be right over to take a look!

Don't forget that every week, one lucky random participant has the chance to win a $25 gift voucher from Simon Says Stamp and you can join in up to 5 times, which means you could have 5 chances to winYou have until next Monday at 8am Ohio time. 1pm UK time, 2 pm CET to join in and good luck....


Thank you so much for taking the time to stop by today ~ stay safe and keep well.
Love Emma xxx

Recipe for project:

Stampers Anonymous: Floral Outline
Sizzix/Tim Holtz: Brushstroke Flowers 1, Alphanumeric Label Thinlits Die set, Stacked Postage Stamp Thinlits Die Set from my own stash
Distress Ink: Aged Mahogany
Distress Spray Stain: Candied Apple, Barn Door, Aged Mahogany, Peeled Paint, Bundled Sage, Crushed Olive, Black Soot
Distress PaintBarn Door, Candied Apple, Peeled Paint, Forest Moss.
Distress Crayons ~ Black Soot

Sunday, 8 August 2021

Enjoy Today...

 Hello friends and Happy Sunday!

Today, I'm so happy to be back on the Simon Says Stamp Store blog to share my latest project with you all and if you love the sneak peek below, and want to see more of this piece, then you can head over to their blog, CLICK HERE to check out the step by step process of how I created this piece!

Hope you love what I've made and as always, I can't wait to see if you've been inspired by this make and if you are, then please tag me on social media or here on the blog and I will pop by to see your gorgeous pieces!

Thanks so much for stopping by and see you tomorrow for my Monday post!
Love Emma x


Monday, 19 July 2021

Black Coffee...

Hi everyone and welcome to a brand new week at the Simon Says Stamp Monday Challenge Blog!

This week our theme is all about "FOOD AND DRINK" and the DT are hoping to inspire you with some gourmet delights and if you would like to join us and play along, then all the details of how you can do this are below! We're looking forward to seeing your makes...

For my project, I created a tag all about one of my favourite cities in the world...Paris, and the wonderful café society. So with this in mind, I wanted to create a vintage style piece that was inspired by the frontages of the cafés and created these using Tim Holtz and Sizzix dies. Also, how could I resist the temptation of not using the brand new Distress colour that Tim launched on his YouTube Live on Saturday! If you haven't checked it out yet, then what are you waiting for because it is the most gorgeous shade of blue called Prize Ribbon and I combined this with other Distress Spray Stains including Ground Espresso which had the food/drink link!

So let's get started ~ it's time for me to share this project and here's how I made this piece...

To begin with I used a Size 8 Etcetera Tag, but I didn't create my background directly onto the surface! Instead I used the same sized Mixed Media Heavystock tag for this.

I then cut a panel of Mixed Media Heavystock card using the Bubbling Thinlits Die.

I started by adding colour to my tag and the die cut and chose a combination of Prize Ribbon, Ground Espresso, Speckled Egg Distress Spray Stains, together with Salvaged Patina and Speckled Egg Oxide Sprays.

I sprayed the Distress Spray Stains and Oxide Sprays directly onto a tag and the panel, both of which had already been lightly misted water. I allowed for the inks to blend and create the colour I wanted, which was a rich, indigo denim blue.

I then adhered the die cut bubbles over the tag to create the textured layer and also added a layer of Matte Collage Medium over the surface to seal the inks.

I allowed for the tag to dry before rubbing Walnut Stain Distress Crayon over the top, blending out any of the harsh lines with a semi dry baby wipe.

Finally, I spritzed a very light misting of Speckled Egg over the tag and just allowed this to dry on it's own.

Once the tag was thoroughly dry, I then added some rusty colours around the edges and for this I used Crackling Campfire, Antiqued Bronze, Black Soot and Ground Espresso Distress Paints which I applied one at a time, drying in between layers to build the colour and create the rust finish.

With the tag ready, I machine stitched a border around the edge and then attached it to my Etcetera Tag with Matte Collage Medium.

Now for the embellishments and I used the Cafe Colorize Thinlits Die Set for my 'coffee cup'. I cut each individual piece from Mixed Media heavystock card and coloured them with a combination of brown Distress Inks to build up the layers. The only colour I used was Tumbled Glass for the band. I applied the inks directly to the card with a blending tool. To add a bit more intensity of colour, I added shading with Polychromos Pencils before I assembled the cup and the plume of steam.

I wanted to sit my cup on a ledge and used two Etcetera pieces to create an 'L' shape. I used the smallest and narrowest Pinked Etcetera Trim and added a straight edged trim which is in the Webs Trims.

On the pinked trim, I used a strip of paper from the Backdrops Volume 2 and chose this piece because of it's restaurant/cafe theme and using the Decorative Trims Thinlits Die set, I cut the specific section that I wanted to use.

I attached my die cut trim to the Etcetera Trim and cut away the excess before applying a layer of Matte Collage Medium to seal it.

I then added some rusty crusty layers to each end of the trim using Translucent Grit Paste and placed a Hardware Head onto either end, sinking it into the paste. I only applied a small amount of the paste as I don't want it to become to heavy, it's just to add texture to the smooth paper.

Once the paste was dry, I used the same colours of Distress Paint as I used around the edges of the tag and then applied a light touch of Gilding Wax over the top. This is from my own stash...

I attached the trim across my tag and then attached the cup using foam pads and placed this onto a small piece of Mummy Cloth that I dyed with Frayed Burlap and Antique Linen Sprays.

To complete the coffee cup, I added three metallic droplets around the die cut plume of steam.

All that's left to do is the wording. I cut the word CAFE using the Alphanumeric Bold and the word Paris using the Stretch Lower Thinlits Die set. All the letters are cut four separate times and layered over one another to resemble the thickness of chipboard.

I wanted to create a worn look to the lettering but also create an enamelled finish and so I used Embossing Glazes and gold embossing powder.

CAFE: Speckled Egg, Walnut Stain and Gold Embossing Powder

PARIS: Antique Linen, Walnut Stain and Gold Embossing Powder

I applied Tim's Embossing Dabber over the surface of the lettering and then applied each layer of the Glazes one at a time, reapplying the dabber between layers. I recommend to always start with a solid layer of the palest colour of glaze to begin with and then a sprinkle of the Walnut Stain over the top. I heat embossed the powders until molten. This will build up the thickness of the glaze and create a beautiful enamelled effect. I then finished with a sprinkling of gold embossing powder over the top which I heat embossed.

With the letters ready, I added the CAFE lettering onto gold metallic kraft stash to add a shadow and attached it to the left of the cup, running vertically down the side.

I attached the Paris lettering beneath my ledge, allowing it to slightly overhang the bottom.

Finally, I added a hinge clip, altered with Distress Paints, Speckled Egg, Picket Fence and Crackling Campfire, hung a Hook Clasp from it and added a Thought Token on the end, which I altered with Picket Fence Distress Crayon to accentuate the wording.

...as always, if you make anything, or been inspired by anything that you've seen here on my blog ~ then please, let me know by tagging me on social media or leaving a comment here and I will be right over to take a look!

Don't forget that every week, one lucky random participant has the chance to win a $25 gift voucher from Simon Says Stamp and you can join in up to 5 times, which means you could have 5 chances to winYou have until Monday 8am Ohio time. 1pm UK time, 2 pm CET to join in and good luck....


Thank you so much for taking the time to stop by today ~ stay safe and keep well.
Love Emma xxx

Recipe for project:


Distress Paints: Crackling Campfire, Antiqued Bronze, Picket Fence, Black Soot and Ground Espresso 
Distress Spray StainPrize Ribbon, Ground Espresso, Speckled Egg, Frayed Burlap and Antique Linen
Oxide Spray: Salvaged Patina and Speckled Egg
Embossing GlazesSpeckled Egg, Walnut Stain, Antique Linen

Monday, 28 June 2021

Born In The USA

Hello there...

Hope you all had a wonderful weekend! Did you all watch Tim’s epic YouTube Live on Saturday? I hope you enjoyed the release of the brand new Stampers Anonymous stamps and stencils and the amazing new inks from Ranger Ink! It's definitely something we've all been waiting for and I can't wait to share my five samples, which actually includes a piece that I’m sharing with you all today. All the stamp sets are available to buy now at Simon Says Stamp, or if you need them all, then they have a special I WANT IT ALL bundle which includes FOUR free ink pads! Click HERE to buy.

But back to today, and this week's Simon Says Stamp Monday Challenge which is all about Red, White and/or Blue! There are so many interpretations for this challenge, and whatever you choose, then we hope you'll join us and play along.

With the 4th of July just around the corner, I thought this was the perfect time to celebrate all my friends in the US and that's exactly what I did with my US themed project using my favourite set from the Stampers Anonymous release. A couple of years ago I created an Etcetera tag that you can see here, and on this tag I used the Stars and Stripes theme as the base of the tag. So with this in mind, I chose to create today’s tag using a similar backdrop to the previous one but this time it would showcase the stamp set!


So let's get the challenge started and here's how I made this tag...

To begin with I used a mini Etcetera Tag and primed the surface with a coat of white gesso.

Once the gesso was dry, I then applied masking tape to mask off my stripes. From the top of the tag, I measured placed the first line of tape at 6.8cm, and then placed the remaining tape at 3.2cm intervals.

This creates 5 separate sections on the tag and I started by painting each section above the tape line.

I then applied my paint, starting with blue at the top. For this I used Dina Wakley's Night Acrylic Paint. This is the perfect blue for the top section of my stars and stripes. Dry the paint before removing the tape and placing this along the bottom line of the blue section.

Moving down the tag, I painted the next section with PaperArtsy Heavy Cream Chalk Paint. Once the paint was dry, I then used the dry brush technique to add Frayed Burlap Distress Paint over the top. You only need a light brushing of this paint, you don't want to obliterate the colour that is beneath. 

Dry this section thoroughly before moving onto the next section and paint this with a combination of Candied Apple and Black Soot Distress Paint. Repeat the Heavy Cream and the combo of Candied Apple and Black Soot until the tag is painted.

To add the distressed look to the tag, I sanded the edges with sandpaper before then adding a coat of Matte Collage Medium over the top to seal the paintwork.

After drying the medium, I used Walnut Stain Distress Crayon and ran this around the edges of the tag before blending the colour with my fingertip.

Along the bottom edge of the tag, I placed two Etcetera Trims, one slightly narrower than the other. I painted the wider trim using the Night Acrylic Paint and then added Crackle Paste to the second trim. Once the crackle paste was dry and the cracks had appeared, I then applied Walnut Stain Distress Crayon over the top, blended it out with a semi dry baby wipe which will help to accentuate the crackles.

I attached the trims along the bottom with Matte Collage Medium.

To create the stars at the top of the tag, I used the Stars Mini Layering Stencils, which is from Set 37 and applied Grit Paste through the stencil. You will need to do this in two separate applications as the stencil doesn't extend across the width of the tag.

Allow for the paste to dry and whilst that's happening, I moved onto the stamping...

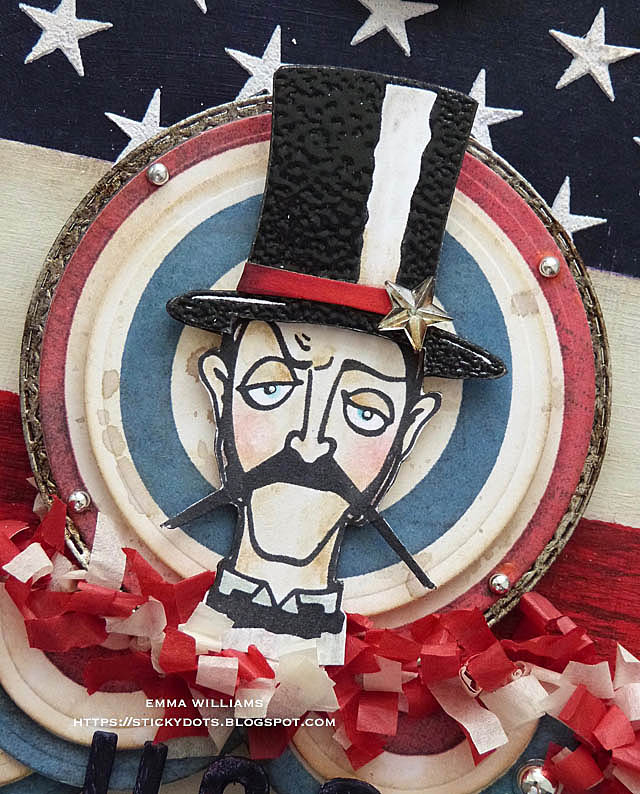
For this I used one of the characters from the Inquisitive Stamp Set and stamped the image onto Watercolour card using Black Soot Archival Distress Ink. I coloured the image with Polychromos Pencils and then fussy cut around the outline.

I then stamped the image once more but this time I'll only be using the hat which I embossed with clear embossing powder.

After fussy cutting around the outline of the hat, I attached it to my main image using foam pads.


I then cut a small strip of red card to add the band across the hat before attaching a Mirrored Star from my stash, which I altered with a little Mushroom Alcohol Ink.

Moving on to the circles and the 'bunting' which I created using the Bullseye 🎯 from the stamp set. I stamped three separate targets in Barn Door Archival Ink onto card that I inked with Old Paper and Frayed Burlap Distress Ink. I then stamped the next layer 3 separate times in Faded Jeans Archival Ink, again onto paper inked with Old Paper and Frayed Burlap DI. I repeated this a further couple of times.

You should now have 3 red bullseye and three blue.

Using a circle nesting die set from my stash, I cut the circles ~ all measurements are approximate and according which die set you use. Simon Says Stamp have a die set which would be perfect for this.

1 x red circle 7cm

1 x blue circle 6cm

2 x blue circles 5cm

2 x red circles 4cm

I then took the larger of the two circles and layered the blue circle over the top of the red using foam pads to form one circle. I matted the circles onto silver metallic kraft stash that I cut with the Sizzix Stitched Circle die by Tim Holtz that I again have in my stash.

With the remaining circles, I cut each of them in half to form four separate pieces and layered these with foam pads to create dimensional semi circles.

Using all the die cut circles, I arranged them onto my tag in a pyramid shape to form the look of bunting.

I mounted the large circle at the top and then adhered my Inquisitive gentleman in the centre of the red, white and blue circle.

Along the top of the semi circles, I added some fringe trim that I had in my stash. This trim was released by Tim about 3 or 4 years ago...I think!!! I still have some in my box of goodies and thought it would work really well on this piece. If you don't have any of this in your stash, you can use red and white tissue paper which you can cut with scissors to form the ruffled fringe. It's a bit more time consuming but quite easy.

I attached the fringe with Collage Medium and also added some Silver Metallic Droplets. Four around the edge of the large circle, two in the centres of the outer semi circles that form the bunting.

We're nearly there and all that's left is to die cut the wording USA from card using the Alphanumeric Stretch Lower Thinlits Die Set. 

I used Mixed Media Heavystock card for this and cut each letter five times before layering them to form thick substantial letters. I painted each letter with more of the Night Acrylic Paint and then attached them to my tag. They are placed to carefully balance along the trim and just attach to the bottom edge of the semi circles.

For the final details, I added a Flair Button at the top, placing it over the hole of the tag and also added a Stitched Scrap which I folded in half to form a loop and just stuck with a  small amount of medium.

Finally, I added some Hardware Heads down the side of the tag, and onto either side of the trim and finished with two Adornment stars placed just beneath the semi circle bunting. These metal additions are all painted with Candied Apple Distress Paint.

So that completes this week's project which I hope you love and as always, if you make anything, or been inspired by anything that you've seen here on my blog ~ then please, let me know by tagging me on social media or leaving a comment here and I will be right over to take a look!

Don't forget that every week, one lucky random participant has the chance to win a $25 gift voucher from Simon Says Stamp and you can join in up to 5 times, which means you could have 5 chances to winYou have until Monday 8am Ohio time. 1pm UK time, 2 pm CET to join in and good luck....


Thank you so much for taking the time to stop by today ~ stay safe and keep well.
Love Emma xxx

Recipe for project:

Sizzix/Tim Holtz Dies: Alphanumeric Stretch Lower Letters and Numbers, Stitched Circles Thinlits Dies from my own stash
Stampers Anonymous: Inquisitive, Mini Etcetera Tag, Pinked Etcetera Trims, Mini Layering Stencil Shifter Set 37
Distress Paint: Candied Apple, Black Soot, Frayed Burlap
Distress Crayon: Walnut Stain
Distress Inks: Old Paper, Frayed Burlap
Powered By Blogger

Total Pageviews