
Hello friends...
Hope you all had a great week and ready for the weekend!
Today, I'm sharing a guided tour around my winter village make that I created for Tim Holtz's YouTube Live. I put my heart and soul into this make, and as I've mentioned before in a previous post, my Grandfather was actually a master builder and architect and everyone in our family has always said how alike we are and maybe I had inherited his skills and taken it into my crafting. So, if that is true and I have just a minute amount of his talent...then this one is dedicated to you Grandad, you will never be forgotten!
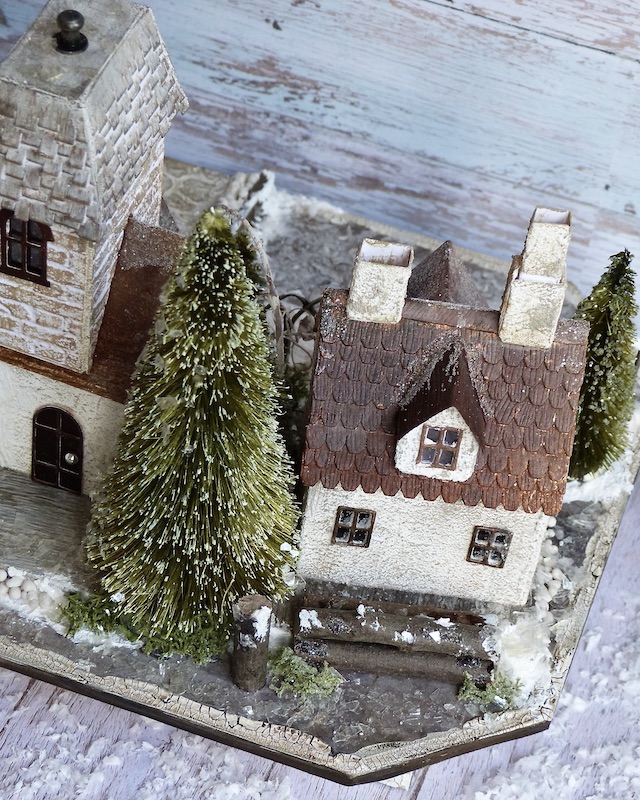
So, it's time for the tour and was all inspired by a village which is here in the Cotswolds, in the UK. I created three separate buildings, the manor house, the church and the small cottage that sits in the grounds.

This post is photo heavy but I did pack a lot of detail into it and I've tried to make sure that I've photographed every single one of those details to share with you ~ if you want to click on any photos, to make them larger to see more detail, just click away.
At the end of this post, I have listed all the main products I've used to create this, but of course any village make is in your imagination and I just hope this inspires you with a few of the techniques I've used!
 |
| Front of village |


 |
| aerial shot of village front |
 |
| aerial shot of village back |
The base of this village is constructed from the largest size of Vignette Tray, which I covered with Crackled Paste and a large Etcetera Tag, cut into a ticket shape to match on both sides and covered with Tim Holtz papers. To create the icy effect, I added a generous amount of Glossy Accents to the surface and sprinkled Mica Flakes over the top. For any snowy effects I used either Grit Paste or the Snowfall Grit Paste from the Holiday Textures Set, listed below.

For the techniques that I've used to create the stucco effect on the walls is all detailed in a previous post, THE HAUNTED COTTAGE OF OSWALD T HALL but for this village, I wanted a softer colour palette and used Antique Linen, Frayed Burlap, Pumice Stone, and a touch of Walnut Stain Distress Paints. I also recommend you use Tim Holtz's Cardstock for the construction of your villages, from the houses, roof tops and window frames to the cobblestone driveways, my entire village was made from White Heavystock card, and I used Distress Paints, Distress Sprays, and Distress Inks to colour the card.
The Manor House
For the first stop, we visit the Manor House ~ this is two houses that I've stuck together to form one large house. I added two top sections to each of the houses.

For the pathway to the house, I used the Mini 3D Cobblestones Texture Fade to create the flooring and I actually used the waste from one of the Stampers Anonymous Etcetera Tomb Stones to create that sweeping step that sits in front of the house.

There is an Entry Way attached to each of the houses, which creates that beautiful double frontage and these are complete with little blue doors and tiny knobs that are Metallic Droplets! You'll also notice in the photo below, I added tiny little doormats in front of each door, which were small offcuts of burlap.

Above the doors are tiny wreaths, made from the circular die cut windows in the Village Collection Die Set and I covered them with moss, sprinkled them with Rock Candy Glitter and then added tiny red twine bows. There are also plenty of Woodland trees placed around the front of the house...all coloured with Distress Spray Stains in various shades of green and then given the icy look with Distress Rock Candy Dry Glitter and Mica Flakes and then combined with Floristry fibres.


...and the back!

The brown roof is embossed using the Mini Lumber 3D Texture Fade and I added Rock Candy Glitter over the top for the icy effect.

For the roof tiles, I used the Woodgrain Distress Card, again coloured with Distress Paints, using the dry brushing technique.


I have been transported to a quaint English village with your intricate incredible make! Thank you so much for sharing your art and techniques! It is so very much appreciated and inspirational!!
ReplyDeleteThis is stunning! I just love this tiny village realistic village and the fact that you shared your inspiration is appreciated! I’m sure your Grandfather is very proud of you! You did an amazing job! Tim will be so proud!
ReplyDeleteEmma,, this is such a wonderful creation, you have totally inspired me to build one. I loved seeing all the details close up. A wonderful tribute to your Grandfather! xxx
ReplyDeleteJust a whole lotta WOW right there! Your talent is so inspiring! Thank you for sharing this!
ReplyDeleteThank you, thank you, thank you for this incredible guided tour! You know how I feel about this masterpiece! Just perfection and beautifully done my friend! ❤👏🥰
ReplyDeleteOh yes and I forgot to mention what a great tribute to your grandad , I have a feeling you have make him very proud with your incredible talent! ❤
ReplyDeleteThis is absolutely stunning. Your grandfather would be extremely proud. It is enchanting. ❤️
ReplyDeleteYou definitely have the talent to be a Master Builder! I love the precision of these buildings but you have touched them all with magic. Thank you for sharing all the details. You and your work have certainly inspired me. 💕✨
ReplyDeleteStunning!
ReplyDeleteYou created my dream home in a dream village. Great work Emma, I'm sure your grandfather would be immensely proud xox
ReplyDeleteThank you for the tour of the village. It’s beautiful!
ReplyDeleteThank you for the tour of the village. It’s beautiful!
ReplyDeleteThank you for the tour of the village. It’s beautiful!
ReplyDeleteThank you for the tour of the village. It’s beautiful!
ReplyDeleteThank you for posting this project....I have been waiting on it...now I will start my Christmas projects...this one first...it is amazing and I have an empty shelf just wating for mine to sit upon...Happy Thanksgiving....
ReplyDeleteThank you for sharing this project. I am in awe! So many wonderful details!
ReplyDeleteSo Amazing, you have done some Awesome work and the details are wonderful!
ReplyDeleteThere are no words for how magnificent this is! You are one very talented lady! Thanks for sharing your awesome talents. It is... perfection!
ReplyDeleteGorgeous you need to work as a miniature set designer for the movie industry!
ReplyDelete