Showing posts with label easter. Show all posts

Monday, 30 March 2026

No.63 Warren Street...

Hello everyone and Happy Monday....

As we start the new week, it's time for the brand new Simon Says Stamp Monday Challenge and this week our theme is called EMBOSS IT and with so many ways to add embossing to a project, I'm sure you'll want to join us and play along...

For my project, I chose to make a tag to celebrate Easter and I used a Tim Holtz embossing folder to create the background for Mr Rabbit, who is proudly residing over his garden at No.63 Warren Street.

So, let's get started because it's time to share how I created my tag...

For this make, I used a Mini Etcetera Tag and an Etcetera Facade.

TAG

To begin with I flipped the tag 180° and covered it with a sheet of Tim's Worn Wallpaper from the idea-ology range. Before adhering the paper with Matte Collage Medium, I added some rips and tears around the edge and then machine stitched a border.

Once the panel was in position, I crumpled the corners of the paper, folding them back to reveal the tag, and then added some Crackle Paste directly to the surface of the tag. Allow for the paste to dry, and work its magic, before applying Gathered Twigs Distress Crayon around the edges and also over the top of the paste to accentuate the crackle.

ETCETERA FACADE

For the next layers, I used an Etcetera Facade and the waste frame from the facade pack that holds the 'risers', which once added to the back of the facade, create dimension to your project. These risers are secured in the frame and that's the piece that I've used at the back of the facade, to create a window for this piece.

I covered the waste frame with some more of the Worn Wallpaper that I used on the tag and added some twine and a mini pin on the right hand side...

...and a Stitched Scrap, which I wrapped around the frame and attached to the left hand side.

Adhere the frame to the tag using Matte Collage Medium.

Moving onto the facade, and I covered this with my embossed card panel.

I cut a panel of Mixed Heavystock Card to match the shape of the facade I was using, and spritzed this with a light mist of water and then used the following Distress Spray Stains:

Evergreen Bough, Bundled Sage and Speckled Egg

Once happy with the blend, I heat dried the card and then added some stamped detail using the plaid stamp from Mr Rabbit and randomly stamping this onto the background in Rustic Wilderness Distress Ink.

I then added another layer of stamping using the calligraphy stamp from Tiny Toadstools, inked with Black Soot Archival Ink and once again, randomly stamping this onto the background.

With my panel complete, I then placed this into the Sizzix Botanical 3D embossing folder by Tim Holtz and ran it through my Big Shot to emboss the card.

To accentuate the embossing, I applied some Gilded Foundry Wax to the raised areas. I used my finger but if you have allergies or sensitivities then please use a brush. Heat set the wax.

Machine stitch a border around the outside and then adhere the embossed panel to the facade,

Attach the facade to the tag, placing risers on the back and attaching it over the top of the frame.

To complete the layered frame and facade, I hammered a nail tack into the top left and top right hand corners of the facade itself.

MR RABBIT

Now for the star, the great adventurer and I began by stamping the image of Mr Rabbit from the Stampers Anonymous/Tim Holtz stamp set of the same name, onto watercolor card and watercoloring the image with Distress Watercolor Pencils. You will also need to stamp Mr Rabbit's jacket and bow tie onto a second piece of watercolour card.

I used the Simon Says Stamp coordinating die set to die cut all my pieces ~ Mr Rabbit, his jacket and the bow tie. Layer the jacket and tie over the top of the main image using foam pads,

For buttons I used metallic silver pearls.

I also added a monocle to this handsome rabbit and this is die cut from gold metallic card using the monocle die from one of Tim's older Sizzix Dies, The Gent which is now sadly retired. If you don't have this set, then you can always use make a monocle using a Jump Ring.

I flipped the die cut piece over so that it would fit on the left hand side of Mr Rabbit and adhered it into place with a tiny amount of adhesive.

Place Mr Rabbit on foam pads and attach him to the facade, placing him over the top of a Worn Wallpaper scrap ~ the pink flower border.

To complete Mr Rabbit, I added a Mini Plaquette, no.63 and also stamped the wording 'Mr Rabbit', which is taken from one of the stamps in the stamp set and then just cut down to size and placed underneath the plaque itself.

DIE CUT FOLIAGE AND FLOWERS

For the foliage, I inked some watercolour card with Peeled Paint and Bundled Sage Distress Spray Stain and once the card was dry, I cut my pieces using a combination of dies ~ Brushstroke Flowers 1 and foliage from the Foliage Wreath die set.

After arranging the foliage around the base of Mr Rabbit, I added small clumps of moss in and around the frame.

Using the Foliage Wreath die set, I cut the flowers from scrap card in my scrap box and layered them to create different sizes. I attached the six flowers to the foliage arrangement and added small pearls to the centres.

FINISHING DETAILS

Finally, I added the finishing details...

I attached the Theories Quote Chip ~ 'never stop exploring' to my tag, and completed this with a screwhead on either side.

I also added some Cello Sticker Tape...

At the top, I clipped a Large Hinge Clip to the tag and attached a piece of chain. I then attached a Word Tag to the end of the chain and accentuated the wording by adding Picket Fence Distress Paint to the metal, before wiping the paint away from the raised area.

As the final touch to the project, I altered all my metal adornments with Distress paint (Black Soot, Crackling Campfire, Antique Bronze), to create a more rusty finish to the surface and that's my make complete and I hope you love the finished piece and will be inspired by the ideas.

Don't forget that every week, one lucky random participant has the chance to win a $25 gift voucher from Simon Says Stamp and you can join in up to 5 times, which means you could have 5 chances to winYou have until next Monday at 8am Ohio time. 1pm UK time, 2 pm CET to join in and good luck....


Thank you so much for taking the time to stop by today!
Love Emma xxx

Recipe for project:

Distress Paint: Black Soot, Crackling Campfire, Antique Bronze
Distress Crayons: Gathered Twigs
Distress Spray Stain: Peeled Paint, Evergreen Bough, Bundled Sage and Speckled Egg
Distress Ink: Rustic Wilderness
Surfaces: Mixed Media Heavystock Card, Distress Watercolour Card
Chain from my own stash

Monday, 14 April 2025

Just Looking…

Hello friends...

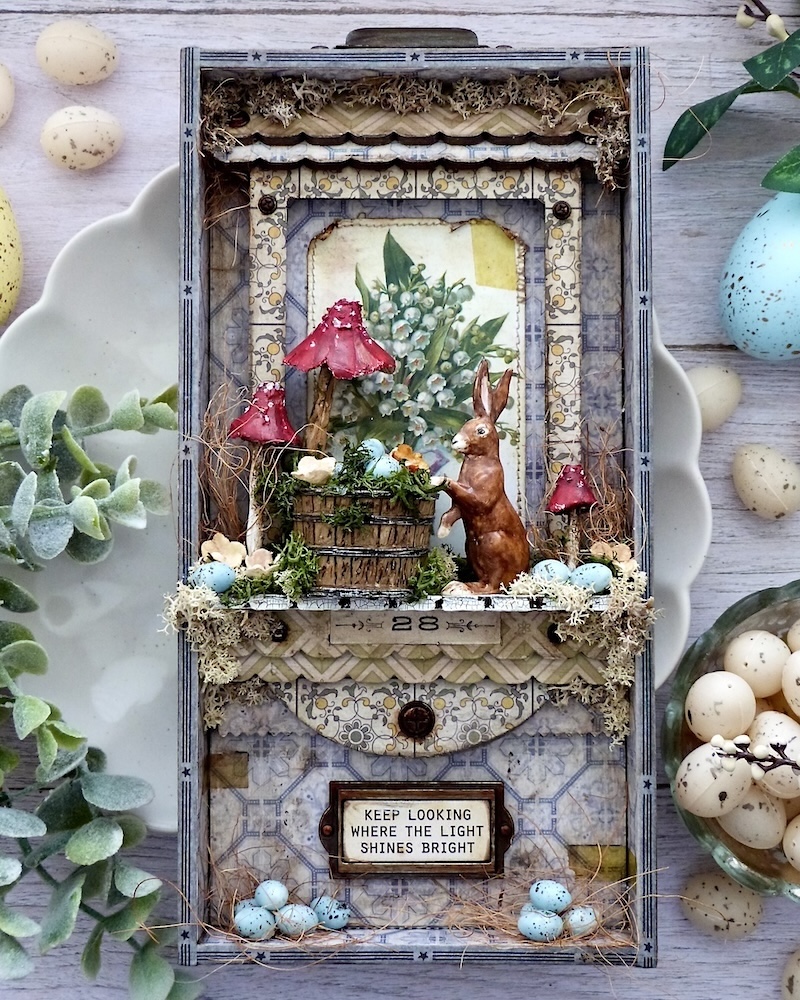
With Easter just days away, I wanted to share a project that I made a couple of weeks ago and shared on Instagram and Facebook. Since then, I have had so many requests for a tutorial on this piece and I couldn't ignore them, so...here it is! Say hello to Mr Bunny who is ready for the Easter Parade...

To begin with I used the smaller Vignette Tray from Tim's idea-ology range and chose to cover this with some of the gorgeous papers from the recent releases of paper stashes that are back from the vault. This release was a limited edition and many places have now sold out ~ I hope that you were lucky enough to get it before it's gone and if you didn't then, there are many more papers from Tim that will be perfect for this make!


VIGNETTE TRAY

To begin with, I lined the inside and outside of the tray using the 12" x 12" Wallflower papers and I added Design Tape around the edges to create a nice finish.


I attached all my panels of paper with Matte Collage Medium and then applied a coat over the top to seal the papers.

Once dry, I ran the Walnut Stain Distress Crayon around the edges, using my fingertip to blend the colour and smooth out any harsh lines from the crayon.

To complete the tray, I added a drawer pull to the top. I used the pull from the Mini Hardware set, together with screw heads and painted these with a combination of Crackling Campfire and Black Soot Distress Paint which knocked back the silver colour tone of the pull and creates the vintage feel we're looking for with this piece. In the tiny window of the pull, I added a Clippings Sticker, "the meadow sweet".


BUILDING THE INSIDE OF THE TRAY

With the tray covered, I'm ready to create the inside. For this I used Stampers Anonymous Scalloped Etcetera Trims, together with an Etcetera Facade.
Taking the facade from the pack of 4, I removed the inside piece, which I can use on another project, and covered this with more of the papers from the Wallflower stash. trimming away the excess with a craft knife and sanding the edges for a neat finish.

I then adhered two of the stacking strips on the back of the covered facade to create dimension to this piece and attached the completed frame inside the box.

In the aperture of the frame, I placed an ephemera piece taken from the Palette Ephemera Pack. After stitching a border around the edge, and ripping and tearing the ephemera piece, I inked the edges with Walnut Stain Distress Ink and then attached this onto the inside of the facade, using Matte Collage Medium, which I also applied over the top to seal the paper.

Moving onto the trims and for this project, I used 5 Scalloped Edge Etcetera Trims, 4 of which I covered in a combination of co-ordinating papers from the Wallflower stash, die cut to fit the trims using Tim's Decorative Trims die by Sizzix and the 5th trim has Crackle Paste applied to it.

I attached the die cut paper to each of the trims with Collage Medium, and applied Walnut Stain Distress Crayon around the outside edges.

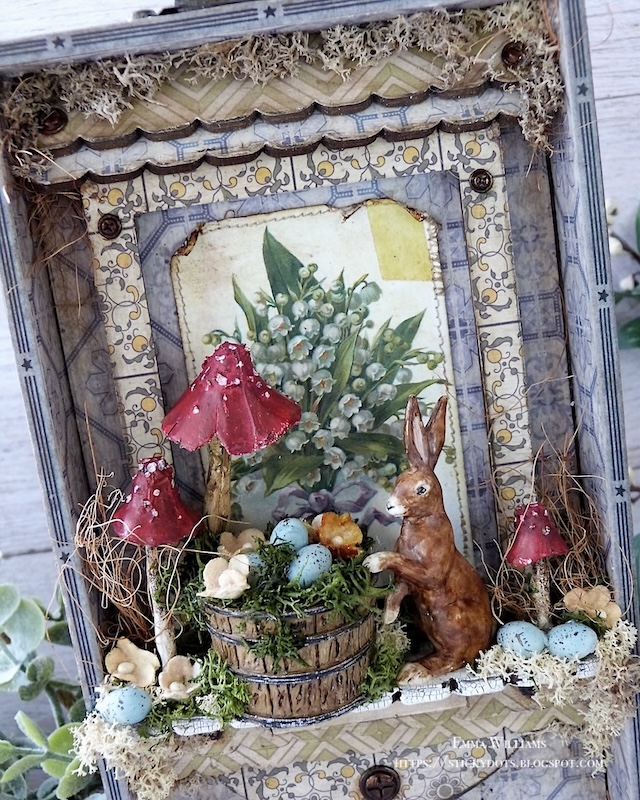
Taking two of the trims, I placed these at a slight angle across the top of the facade, fixing them into position with Collage Medium. These trims form a roof to the facade.
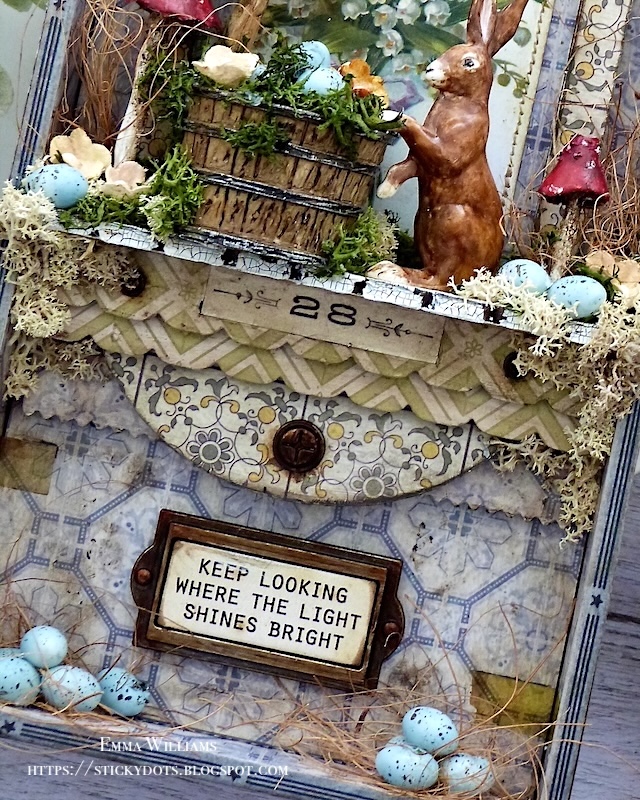
Across the bottom section of the facade, I added the remaining three trims, attaching the two trims covered with paper, so that they sit flush across the facade itself and then attaching the third trim, which I crackled with Crackle Paste, so that it forms a shelf.


Run the Walnut Stain crayon over each of the trims, again blending out any harsh lines with a cotton bud or your fingertip.

Finally, I added some Screw Heads and a Machinery Head to the Facade ~ a Screw Head in each of the corners and the larger piece at the bottom. All these pieces are painted with the Crackling Campfire and Black Soot Distress Paint combination to make them look rusty.

To complete this part, I attached the Number 28 Numbers Strip to the centre of the trim....
...and added some Cello Stickers to the tray.

With my tray ready, it's time to decorate and bring this scene to life....

CREATING THE SCENE

For this scene, you will need:
Salvaged Rabbit, Barrel, Toadstools, Moss and Natural Fibres, Tiny Eggs and Bouquet Findings.

PAINTING THE SALVAGED RABBIT

Using one of the Salvaged Rabbits, I began by applying a coat of Vintage Photo and Gathered Twigs Distress Paint over the surface. The paint will self level but I wanted to create a slightly textured look, so I took a dry brush and whilst the paint was still wet, I dabbed the brush over the surface of the rabbit, to create the textured finish, and the look of fur that I was looking for.

I then painted the insides of the bunny ears with Spun Sugar Distress Paint, and used Black Soot on his eyes and Antique Linen on his paws and feet.

SPECKLED EGGS

To colour the salvaged tiny eggs, I used (clue is in the title) Speckled Egg Distress Paint and once the paint was dry, I used the Splatter Brush to splatter Ground Espresso paint flecks over the surface. Leave these to dry...

SPRING FLOWERS

For my tiny individual flower heads, I used Bouquet Findings that I cut from the bunches. I spritzed the flowers using Distress Spray Stain ~ Scattered Straw and Spun Sugar which I applied directly to the flower heads, before I heat dried them.

TOADSTOOLS

Finally, we have the toadstools and using the pack of 3, I painted each piece with a combination of Candied Apple, Lumberjack Plaid and then once dry, I dry brushed Black Soot over the top. Once again, I dried the paint before adding the tiny white dots with gesso.

BARREL

To fill the barrel, I began by adding a small offset piece of wood to the bottom. I then stuck a circle of mount board directly onto the wood. This technique lessens the depth of the barrel, which in turn means you don't need to use all your precious goodies to fill it. With this in place, I added some moss to the barrel, and then arranged the tiny eggs and flowers, which I attached using hot glue.

TELLING THE STORY


With everything ready, I placed all my pieces onto the shelf, arranging them so they create the scene and adding moss and natural fibres to add texture.
At this stage, I also added moss across the top of the roof, tucking it into the trims.

Finally, and we're nearly there ~ all that was left was to place the Quote Chip Label, " Keep Looking Where The Light Shines Bright" inside the Label Frame, which again was painted with Distress Paints for that rusty finish to the metal....

...and the finishing touch of some speckled tiny eggs, in each corner of the tray, nestled onto natural coconut fibres that I have in my stash.

So, that completes my Easter make for 2025 and I hope you've enjoyed the tutorial. If you've been inspired by this piece, then just tag me on my socials, or here on my blog and I'm already looking forward to seeing all your makes.

Thank you so much for taking the time to stop by today....
Love Emma xxx

Recipe for project:

Stampers Anonymous: Etcetera Facade, Etcetera Trims
Distress PaintBlack Soot, Crackling Campfire, Vintage Photo, Speckled Egg, Ground espresso, Gathered Twigs, Spun Sugar, Antique Linen, Candied Apple, Lumberjack Plaid
Distress Spray Stain: Scattered Straw, Spun Sugar
Distress CrayonsWalnut Stain
Moss from my own stash


Click below for your one stop shop at Simon Says Stamp

SHOP HERE:
Powered By Blogger

Total Pageviews