Showing posts with label altered book. Show all posts

Monday, 4 October 2021

We Are All Mad Here...

Hello friends and Happy Monday...

Hope you've all had a wonderful weekend and if you watched Tim's latest YouTube Live, then I hope you felt inspired by the launch of the new Village series! Isn't it amazing? Thank you to everyone who has messaged me to say how much they loved my village make, I am hoping to share it here very soon, and I also want to say a huge thank you to you all for the comments you've been leaving throughout the making season! It's definitely been busy but so much fun and when I read all your kind words which have meant so much to me, it makes all that hard work so worthwhile!

Anyway, back to today and this week's new Simon Says Stamp Monday Challenge! This week the DT are showcasing Stamperia products within their makes and combining it with the theme ~ ANYTHING BUT A CARD!

For my project, inspired by my love of all things Mad Hatter and Alice In Wonderland, I chose to create a new notebook using the beautiful Stamperia Alice Through The Looking Glass collection. Notebooks are something that I can never resist, I have so many...some might say too many but I don't think you can ever have enough but these date back to my teens when I collected anything from Snoopy, Disney and my favourite bands and now I have books from museum visits, Lulu Guinness, my obsession for all things David Beckham and I still collect Snoopy, Mickey Mouse and my favourite band! So, what's better than to add a handmade one to my collection and here it is....

So let's get started on how this book was made! Are you ready for the trip into wonderland...

To begin with I used a cheap A5 ring bound notebook in my stash ~ I think this cost me about £1.50. This has a hard cover front and back and then lined paper inside...

To prep the book, I applied a coat of white gesso around the edges of the front cover. I also added a very light brushing of gesso to the back cover and on the inside covers of the book. You don't need to apply paint all over as these will be covered with paper.

Once the gesso was dry, I then added my colour to the front cover and chose to use Aged Mahogany Distress Paint. Once I'd painted all the areas that will be on show, I dried the first layer of paint before adding Black Soot Distress Paint over the top, using the dry brushing technique.

Again I allowed this to dry and whilst that was doing it's thing, I moved onto prepping the papers that I'll be using. I used the papers from the Collectables pad and cut the panels to size to mount on each of the covers. 

Taking the panel that I'm using on the front...I wanted to add some rips and tears to this so that it created more of a vintage feel. Once I'd done this, I then attached small offcuts of a second paper design behind the places that I tore and ripped ~ this creates the look of layers but you haven't had to use an entire sheet. You can see the chequered paper I used in the corners and I also attached some down the sides.

With these in place, I inked around the edges with Walnut Stain Distress Ink, paying particular attention to where I'd torn the paper and then machine stitched a border.

I then adhered the paper onto the front of the book using Matte Collage Medium.

At this stage, I opened the book to work on the inside, it's better to do this now before adding the elements to the cover. I used a different paper design on the inside and again cut it to size and machine stitched a border around the edge.

In the collectables paper pad, they've got sheets of images and I chose fussy the images of Alice, the Alice logo, the White Rabbit and the playing cards which I then fussy cut.
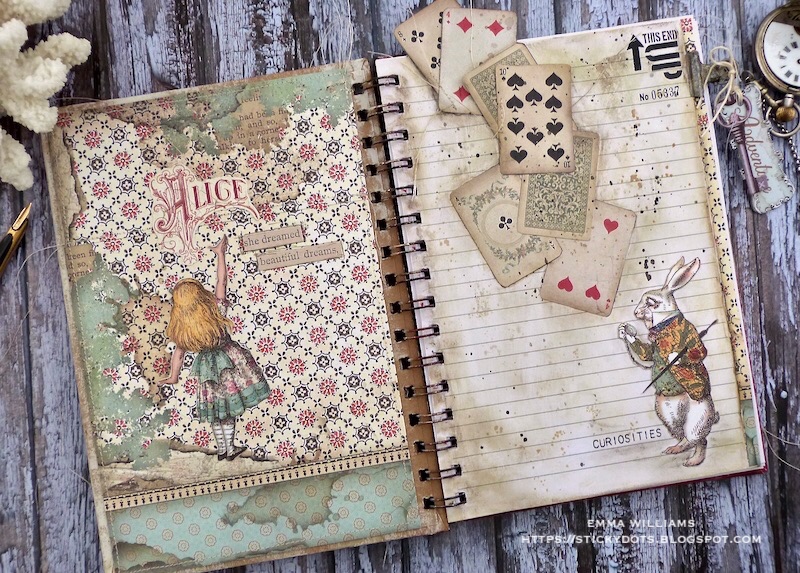
Taking the image of Alice and the logo, I adhered these to the inside cover with Matte Collage Medium. I then added the wording 'she dreamed beautiful dreams' which I took from Tim Holtz's Clippings Sticker book and cut these into two pieces before attaching them to my cover, doodling a black line around the outside of them.

On the opposite page...

...I began by applying a coat of Matte Collage Medium over the page, then to achieve a more vintage feel to the paper that would match the colour palette of the collection, I scribbled Old Paper and Antique Linen over the page, blending out the excess with my finger tips and a semi dry baby wipe. I then attached my playing cards which I placed to slightly overlap the top edge of the page, and these cascade down the page...

...towards the White Rabbit which I adhered in the bottom right hand corner. 

After adding a few splatters of Black Soot and Pumice Stone Distress Paint, I added some Remnant Rubs ~ 'this End Up' is from an older set I have in my stash and 'No. 05337' in the top right hand corner, and the word Curiosities in the bottom right corner are both taken from the Specimen Remnant rubs set. I completed the page by adding a small amount of Walnut Stain Distress Crayon around the edges and dragging some of the colour into the page, just to add that touch more vintage.

To complete the inside, I attached a Hinge Clip and after punching a small hole into a couple of the die cuts, I tied these to the clip.

For the back book cover, I used another sheet of the paper from the Collectables set, this time the black and white polka dot and once again, I machine stitched a border around the edge and also across the border strip design at the bottom of the page.

I then fussy cut Tweedledum and Tweedledee from the pad and adhered this in the bottom left hand corner of the cover.

The inside is now ready, the back cover is finished and I can move onto the front cover...

To begin with I formed the ledge for the scene and using the Pinked Etcetera Trim, I covered this by die cutting a piece of the same paper I'd used to cover the front of the book, and cut with the Tim Holtz Sizzix Decorative Trims Thinlits Dies.

I attached my die cut to the trim itself and then adhered the trim across the bottom section of my book cover.

To create the scene I used the chipboard Mad Hatter, a clock and toadstool chipboard Die Cut from the Alice Through The Looking Glass set and the other images, tea pot, butterfly, extra toadstool and playing cards are all fussy cut from the Collectables pad.

I then arranged these images along the trim to create the scene, using foam pads to add various heights to each piece and also fanning out the playing cards to cascade down the book cover.

I also added some moss and a few Bouquet Findings that I dyed with Antique Linen Distress Spray Stain. In the centres of each flower, I added a dab of glue and sprinkled them with some glitter from the Tim Holtz Holiday Sparkle Set.

To complete the scene, I added a small "Enclosure' Snippets Ephemera piece by Tim Holtz and also added teh '5 For" Ephemera piece to the top right hand corner.

Finally, I added the quote plaque ~ again both of these layers are fussy cut from the Collectables Pad. I then used Tim's Embossing Dabber over the top of the quote and embossed this with Frosted Crystal Embossing Powder before I mounted the quote over the top of the frame using foam pads and then attached the layers directly onto the cover.

As the finishing touch, I added a drawer pull taken from the Tim Holtz Hardware Pull idea-ology set and placed this just beneath the Etcetera Trim and then added the wording Dreamland, from the Clippings Sticker book in the window.

So that's it from me for today and I hope you've enjoyed this altered notebook, as much as I loved making it. It really was so much fun to use these Alice images and bring the scene to life....

As a final make to this book, I created a bookmark! This is just one of the chipboard die cuts from the set, and I punched a hole in the top and threaded some Velvet Ribbon through. I thought this a nice little addition and a different way to use the die cuts.

...as always, if you make anything, or been inspired by anything that you've seen here on my blog ~ then please, let me know by tagging me on social media or leaving a comment here and I will be right over to take a look!

Don't forget that every week, one lucky random participant has the chance to win a $25 gift voucher from Simon Says Stamp and you can join in up to 5 times, which means you could have 5 chances to win. You have until Monday 8am Ohio time. 1pm UK time, 2 pm CET to join in and good luck....


Thank you so much for taking the time to stop by today ~ stay safe and keep well.
Love Emma xxx

Recipe for project:

Stampers Anonymous: Pinked Etcetera Trim
Distress Spray Stain: Peeled Paint and Frayed Burlap
Distress Paint: Black Soot, Pumice Stone, Aged Mahogany
Distress Crayons: Antique Linen, Old Paper, Walnut Stain

Monday, 23 November 2020

Santa's Wish...

Hello friends and Happy Monday!

Hope you all had a good weekend and as we head into a new week, the Simon Says Stamp Monday DT are ready for you to join us for a brand new challenge, which this week is all about FOOD & DRINK!

At this time of year, if you're like me then there's always something food & drink related going on and even though the holidays will be slightly different for all of us this year, I still want to make this Christmas, one to remember because I have so many fond memories of Christmas' past and some very special times that I have spent with my family.

...and that's where my inspiration for this project came from ~ family and in particular my Mum and Nan. Even though Nan isn't with us any more, I will always remember how special she made Christmas. From the feast that she used to prepare to the family get togethers, it was always a wonderful time to remember and after my Nan passed, my Mum carried on the tradition, making Christmas the most wonderful time of the year! But what I remember most about both of them ~ is the time spent in the kitchen cooking, and that old handwritten recipe book that's been handed down through the generations, with new additions and some old traditional recipes ~ it's a book to be treasured but also one that needs to be preserved before it becomes to worn. So, now it's time for me to take over and this was the ideal time to place that old book safely in my memory box and make a new book ready to fill with some Christmas recipes and here it is...so, let's get started!


To begin with I found a really cheap notebook from my local £1 shop. It's a lined notebook and has a hard front and back cover, which I painted with a coat of gesso on the back and front, inside, and out. Once the gesso was dry, I then painted the covers with a layer of gold paint, let it dry thoroughly before dry brushing a layer of Picket Fence Distress Paint over the top. I've explained dry brushing may times before and all this is, is taking a dry paint brush, dipped into paint before removing the majority of the paint from the brush and just dry brushing it over the surface of your substrate, allowing the minimum of paint to be applied. It's that easy but creates a beautiful vintage look to a project.

Before I started the covers of the book, I did decorate the inside...

...and for this, I used some decorative paper that I took from one of Tim's Christmas paper stashes, (I think this was actually from last years), cut the paper to measure slightly smaller than the cover and adhered it with Matte Collage Medium. I then attached a Salvaged tag to the inside cover, together with some Christmas Ephemera pieces, all from the idea-ology brand.

On the right hand side of the book, I cut a panel of Mixed Media Heavystock card, again slightly smaller than the actual page size and inked with Old Paper and Antique Linen Distress Sprays. I then applied some of the Christmas Trim Tape to the top and bottom before machine stitching a border around the outside.

Now because this book is all about home comforts, I found the perfect stamp to create the title ~ 'HOME FOR THE HOLIDAYS'. This stamp is from the Stampers Anonymous Bold Tidings stamp set by Tim Holtz and I stamped it using the Stamp Platform in a combination of Barn Door and Black Soot Archival Ink. 

I adhered the page into my book with matte collage medium and once again, added some more ephemera pieces, including the little December calendar, circling the big day in red pen.

Right now to create the covers and I started by cutting two panels of Cracked Leather Cardstock, both the same size and coloured these with a combination of Speckled Egg, Iced Spruce, and Pumice Stone Distress Inks. I used the wrinkle free Distress technique and just built up the intensity of colour from applying the inks to my glass mat.

On one panel only, I added some stamped layers using the script and music stamps from the Vintage Holiday stamp set and just stamping randomly over the background. This will become the front panel of my book.

After machine stitching a border around the outside of each panel, I adhered them to my book covers, back and front.

I wanted to make the book look as if it was slightly worn and tattered and to create that look, I used some cream coloured Vintage Foil Transfer Sheets from Ranger Ink. I have these in my stash but if you can't get hold of them, then any neutral shade of foil transfer sheets will be ok and give you the same effect. To apply the foil, I used a glue stick which I applied to the edges of the book and then pressing the matte side down, I applied the foil to the sticky areas.

To add some texture to the covers, I used the Stunning Snowflake die ~ I had these die cuts already cut from a previous project but never used them and as they sat on my desk, I just thought they would be the perfect texture for this piece. So after painting each of the snowflakes with a little Speckled Egg Distress Paint, I adhered them to my front cover with some Matte Collage Medium. Once the medium was dry, I splattered the cover with a little Picket Fence Distress Paint.

Now for Santa to make his appearance! 

Santa's Wish Colorize Die is one of my favourite dies from Tim's Sizzix releases, I just fell in love with him the minute I saw him and after die cutting each of the layers from watercolour card, and hand colouring each piece with Distress Inks and Polychromos Pencils creating the tones and shading that I wanted ~ I then assembled Santa. If you want to see how to layer Santa, and it really is so easy ~ then just click HERE as this YouTube video shows you how to do it!

To complete Santa, I added some Rock Candy Dry Glitter touches to the holly and berries and onto his hat.

Santa is now ready to put into place and I attached him with foam pads, placing him on the centre of a Vignette Frame, painted with Speckled Egg Distress Paint and mounted onto a panel of Worn Wallpaper, which creates a border around the edge of the wooden frame.

To add a touch of shimmer to the frame, I added some more of the Vintage Foil Transfer sheets, this time using the gold foil but applying it in exactly the same way as I applied it to the edges of the book cover. I also added some die cut gold stars around the outside of the frame.

To create the lettering, I used the Sizzix Alphanumeric Shadown Upper Thinlits die set and cut each letter three times from Mixed Media Heavystock card before layering them over the top of one another to create the thickness of a chipboard letter. I then painted them with a little Candied Apple distress Paint, allowed them to dry before using the Embossing Dabber, applied over the top of each letter and then sprinkling them with Tim's amazing Embossing Glaze in Fired Brick and combining it with a little sprinkle of Emerald Creek Rocky Road Baked Texture Embossing Powder by Seth Apter.

I attached my letters to the cover, placing them beneath the frame and adhering them with Matte Collage Medium before adding a Ruler Piece directly underneath. 

To add more of vintage feel to the ruler, I inked it with Frayed Burlap Distress Spray Stain, dabbed away any excess colour and once dry, sanded the edges back before adding some red cotton around each end.

As the final detail, I added a Type Chip that I wrapped around the edge of the book and then placed a Tiny Clip onto it.

We're nearly there and all that's left is the finishing touches...

...including some green Christmas Velvet Trims tied down the spiral binding on the side of the book.

I also attached a Christmas Token onto a Mini Pin and pinned this to the ribbon.

Inside the book, I added some tabs, the salvaged tag as mentioned before, a strip of fabric tape and a Christmas Milk Cap, (love that this set has this milk cap included, it's such a cool touch and a little nod to someone we all know and love, Mr Mario Rossi).

I also added a sticker from the Sticker Book that I placed along the top edge of the book.

So that's my project for this week finished and complete and I hope you've enjoyed the creative process and the inspiration that was behind this piece ~ it was definitely a project from the heart and something that will be treasured for many years to come!

All I need to do now, is fill it with some of Nana's recipes....which includes her amazing Christmas Cake and her relishes and chutney.

Don't forget that every week, one lucky random participant has the chance to win a $25 gift voucher from Simon Says Stamp and you can join in up to 5 times, which means you could have 5 chances to win. You have until Monday 8am Ohio time. 1pm UK time, 2 pm CET to join in and good luck....


Thank you so much for taking the time to stop by today ~ stay safe and well, and see you again soon.
Love Emma xxx

Recipe for project:

Stampers Anonymous: Bold Tidings 3, Vintage Holidays
Distress Paint: Black Soot, Candied Apple, Picket Fence, Speckled Egg
Distress Spray: Frayed Burlap
Distress Ink: Speckled Egg, Pumice Stone and Iced Spruce
Embossing Glaze: Fired Brick
Powered By Blogger

Total Pageviews