Showing posts with label Tim Holtz Halloween 2020. Show all posts

Monday, 28 September 2020

Things Are Not What They Seem...

Happy Monday friends and welcome to the brand new Simon Says Stamp Monday Challenge...

Our challenge theme for this week is called ADD A PHOTO and all we want you to do is included an image somewhere in your project ~ so whether it be on a scrapbook layout or a mixed media piece, the choice is yours but as always, there's plenty of inspiration from the DT.

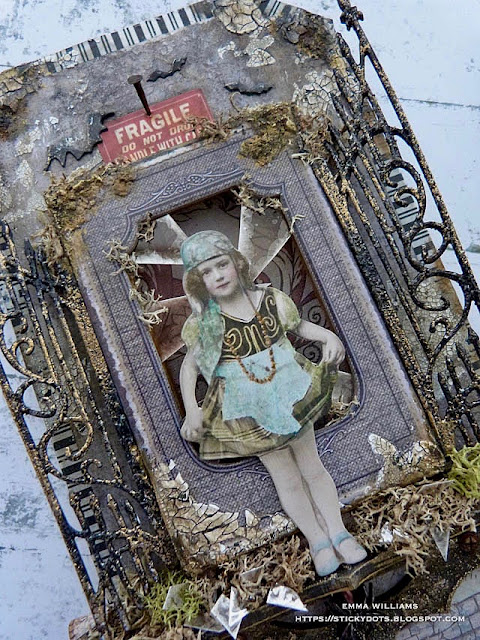
For my project, I chose to use a Tim Holtz Paper Doll ~ one of my favourite ways of including photos within my pieces and I created a Mini Etcetera Tag that is perfect to display for Halloween and I hope you'll read along to see how I combined Sizzix die cuts, Tim Holtz idea-ology and various products from Stampers Anonymous to create a story where things are not what they seem....


To begin with I took the mini sized Etcetera Tag and I covered the entire tag with two different designs of co-ordinating papers from the Departed Paper Stash, adhering them with Matte Collage Medium and adding a coat of the medium over the top to seal the papers. This stash is fabulous if you want to add texture to your projects and you'll see that I adhered one design to cover the majority of the tag but along the bottom section I added a different design.

I then added some of Tim's Design Trimmings Tape around the edges, the striped tape on three sides and along the bottom I used the pinked edge tape.

To add some texture to the background, I used a combination of Translucent Grit Paste and Crackle Paste, applying the grit paste first and then layering the crackle over the top. Allow for both pastes to dry before adding some colour. For this I chose to use Walnut Stain Distress Crayon, followed by layers of Distress Paint to build up the colour: Black Soot, Rusty Hinge, Antiqued Bronze and Ground Espresso. Once the paints were dry, I added some Gilding Wax over the top, something that I have in my stash.

My tag is now ready to embellish and I started by creating the frame in the centre and for this I used a Vignette Frame, the second largest in size and a baseboard frame from the Halloween Baseboard set.

I painted the wooden frame using a gold acrylic paint and then to just take the bright gold look away, I dry brushed a touch of Ground Espresso over the top to give more of a vintage feel.

I then attached a panel of Halloween Worn Wallpaper to the back of the frame before attaching it to my tag.

Taking the baseboard frame, I added some Mica pieces cut into shards and attached these to the back of the frame with collage medium, to create the look of shattered glass.

Once the mica is stuck, I attached the frame over the top of the wooden frame and added some more of the Translucent Grit Paste, Crackle Paste combination around the edges. I allowed for everything to dry before adding the same paint colours to the pastes as I used around the edges of the tag.

Moving on to the ledges that sit below the frame and for these I used a combination of the Web Trims and the Bracket Trims from Stampers Anonymous and a paper roll that I made from an offcuts of paper from the Departed Paper Stash and just rolled tightly around a pencil, securing the paper with some strong adhesive before attaching beneath my frame. This isn't a necessity but it just filled the gap I needed between the frame and the trims which I'm adding next and gave more support for when I add the paper doll.

On each of the trims, I added some more of the Translucent Grit Paste and once the paste was dry, I painted both pieces with Black Soot Distress Paint. Again allow the paint to dry before dry brushing some Antiqued Bronze Distress paint over the top to accentuate the rusty, crusty pasted areas. You can add more black paint if you need to, you only want a hint of the bronze showing. As a finishing touch, I used the Metallic Distress Crayons over the top and blended them with my fingertip.

Attach the bracket trim underneath the paper roll, in a 90 degree angle to the web trim that is placed flat and horizontal, directly onto the tag. Both of the trims and the paper roll overlap the sides of the tag.

Along the bottom of the tag, I created a second ledge using another couple of trims ~ these are two different sized straight edged trims that I took from the Web Trims set. I painted each of them black, and once the paint was dry, added some crackle paste before attaching them horizontally along the bottom of the tag, adding some moss to either side.

Now for the gates and for this I used the Gatekeeper Thinlits die from Sizzix to die cut black card, three separate times. Take each of the die cuts and layer them over one another and adhere to create a pair of gates, left and right.

To colour the gates I used embossing powder and dabbed each die cut with the Embossing Dabber before adding a combination of Seth Apter's powders; Wow Weathered Gold and Emerald Creek Rocky Road.

Heat the powders until molten and then attach the gates to either side of the Baseboard Frame. I placed them with the longest length to the outside but if you prefer they will go either way, so just play around with them and have fun.

Once the gates are securely adhered to the frame, because you've die cut them three times and applied embossing powder over the top, you'll find that they are really substantial and will hold their shape perfectly. They also bring some amazing dimension and depth to the project, which I hope you can see below.

We're nearly there and all that's left is details, details....details and the Paper Doll.

This adorable doll is taken from the Halloween Paper Doll set and I coloured her with Distress Crayons, Broken China, Mowed Lawn, Peeled Paint and Evergreen Bough. For her cheeks, just a touch of Aged Mahogany.

I attached the girl to my tag, building up some foam at the back so that she will be solid and supported and then added some moss around the base of her feet, at the top of the frame, inside the frame and along the trim.

I also cut up small shards of Mica to appear as if there is broken glass from the shattered background that has fallen around her feet.

Just beneath the bracket ledge, I added a spider hanging down and used one of the tiny spiders from Tim's Halloween Adornments set and painted it with Black Soot Distress paint, with a touch of Candied Apple on the body.

I added an Ephemera piece at the top, "FRAGILE, Do Not Drop" and placed a nail from the Vignette Hardware Findings set through the top of the piece.

No project of mine would be complete without some Hardware Heads and these are just added to the bottom of the tag and also onto the web trim.

I also added some bats that I die cut from more black card using the small bat dies from the Gatekeepers die set and attached them with Matte Collage Medium.

...and finally a Halloween Clippings Sticker, Things Are Not What They Seem which I added to the trims attached at the bottom of the tag.

Don't forget that every week, one lucky random participant has the chance to win a $25 gift voucher from Simon Says Stamp and you can join in up to 5 times, which means you could have 5 chances to winYou have until Monday 8am Ohio time. 1pm UK time, 2 pm CET to join in and good luck....


Thank you so much for taking the time to stop by today ~ stay safe and well, and see you again soon, love Emma xxx

Monday, 14 September 2020

Lost In The Darkness...

Hello friends and happy Monday...

Hope you've all had a good weekend and you're now ready for the week ahead and the brand new Simon Says Stamp Monday Challenge! This week our theme is called FRAME IT and with so many possibilities, we would love for you to join us and play along with this fun challenge.

For my project, I created an Etcetera tag using some of the brand new Stampers Anonymous stamp sets from Tim Holtz, including the really popular Specimen set which is definitely one of my favourites from the release and a must have for your collections! There is also a little surprise to this piece, which you can look out for further along in this post...

So, let's get started and welcome the uninvited guest to my blog...

To begin with I took the small sized Etcetera Tag, 5.5" x 10" and using the Spider Web Thinlits Die Set, I cut a few of the webs from Mixed Media Heavystock card ~ you will probably need approx 5 webs. I then adhered the webs onto my tag using Matte Collage Medium and arranging them all over the tag surface.

Moving onto the next stage, I added some texture around the edges and for this I used Translucent Grit Paste. I usually use my finger to apply the paste ~ I just find they give me an even coverage but you can also use a palette knife or any other tool of your choosing and once you've added the paste, allow to completely set.

Once the webs and the pasted areas were dry and securely in place, I primed the tag with a coat of black gesso, allowed for it to dry before then applying a layer of Black Soot Distress Paint over the surface. You can gently heat dry the surface but be careful of the pasted areas, too much heat will cause these to bubble and disintegrate.

After drying the surface, I then used a combination of Metallic Distress Crayons and Alchemy Waxes in Old Silver, Vintage Gold, and applied the wax and crayons over the top of the raised die cut webs and the pasted areas, and then using my fingertip to blend it onto the surface.

For the hole reinforcer piece, I added some Crackle Paste to the circle, allowed for the crackles to appear and then used a light wash of Black Soot Distress Paint over the top. Attach the piece over the hole at the top of the tag with Matte Collage Medium.

Now to create the layered frames and for this I used a combination of the a Vignette Frame, and two Baseboard Frames.

Paint the surface of the wooden frame with Black Soot Distress Paint and once dry, I used the same combination of waxes to accentuate the beadwork on the frame. Attach the frame to the tag.

I then took two of the baseboard frames and layered a smaller one over the larger one, attaching them with Matte Collage Medium. Apply paste around the edges of the frames using a little more of the Translucent Grit Paste and once dry, I used Black Soot, Antiqued Bronze and Rusty Hinge Distress Paints to add colour and create a gnarly, rusty finish. Layer each of the paints, one at a time, over the pasted areas and heat dry between each application. 

Ensure that the paint is thoroughly dry before adding a touch of the Gilding Waxes over the top.

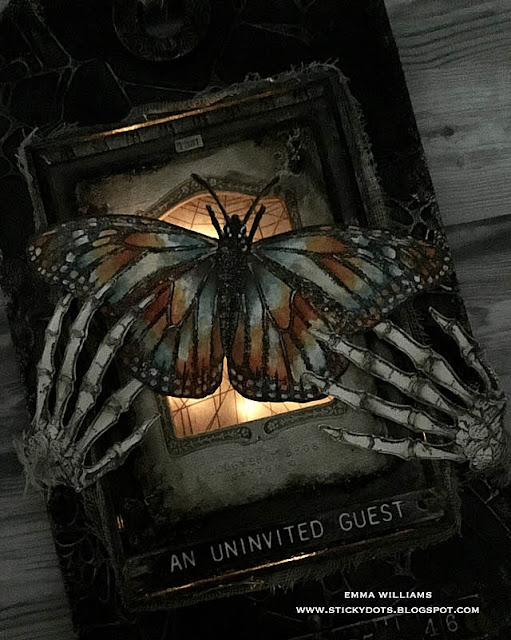
Now for the treat...this panel is going to be lit from a vellum panel set inside the frames!

...and for this, I used the Vellum Haunts. These are a set of beautiful transparent panels in various sizes that can be used as I have with lights or just to add a decorative panel behind your embellishments. I chose the webs to continue my background theme and cut a section of the panel which I then stuck using red line tape, behind my layered frames.

For the lights, I used the orange set of Halloween Tiny Lights by Tim Holtz and after boring a small hole through the back of the tag using a drill, I then threaded the wire string of lights through to the front. Arrange the lights and attach them onto the inside of the frames.

Mount the baseboard frames over the top of the painted wooden frame already attached to the tag and adhere with Matte Collage Medium. Once you flick the switch, the lights will shine through from behind, giving a warm, mysterious glow.
To complete the frames, I attached some Mummy Cloth. I dyed the cloth using Frayed Burlap and Pumice Stone Distress Spray Stains and then attached the dry cloth around the outside using Matte Collage Medium but also hammering a couple of nails into the top as a decorative detail.

Now for that beautiful butterfly which I stamped onto Distress Watercolour Card and water-coloured the image with Distress Inks and Marker Pens ~ Crackling Campfire, Gathered Twigs, Peeled Paint, Bundled Sage and Speckled Egg.

I then stamped a pair of hands, using the stamp in the Anatomy Chart set and coloured these with Polychromos Pencils.

Fussy cut around the outline of all the stamped images before attaching the butterfly to the vellum panel, shaping the wings slightly either side to make it look as if it's in flight. Add the bony hands to either side of the butterfly to appear as if it's reaching out to capture it.


Beneath the images, I added a Quote Chip from the Halloween Baseboards set. I punched a hole in either end of the chip and wrapped some twine, securing the ends at the back of the chip.

Attach the quote onto the lower section of the frame.

We're nearly there and all that's left is to add some details...

...underneath the frame I placed a Measurements ruler piece, attaching with Matte Collage Medium and adding some Hardware Heads and a few pieces of metal hardware. Just as I added some texture to the edges with the Translucent Grit Paste, I added some more of the paste around the edges of the ruler. Once this was dry, I used the same combination of Distress Paints, layering the colours to add that rusty crusty goodness.

Finally, at the top of the frames, I added a small number from the Curiosities Sticker Book.

So, that completes my tag for this week and I hope you've loved how I bought this wicked tale to life and how I used tiny lights to illuminate the piece which will be perfect to add amongst my Halloween decorations for 2020!

Don't forget, if you would like to see more inspiration from my talented teamies over on the challenge blog and every week, one lucky random participant has the chance to win a $25 gift voucher from Simon Says Stamp and you can join in up to 5 times, which means you could have 5 chances to winYou have until Monday 8am Ohio time. 1pm UK time, 2 pm CET to join in and good luck....


Thank you so much for taking the time to stop by today ~ stay safe and well, and see you again soon, love Emma xxx

Wednesday, 26 August 2020

Open Day Or Night...

Hello friends...

Hope you're all well and having a good week! Today, I'm back on the blog to share a project that I created for the Tim Holtz idea-ology Halloween Facebook Live ~ the Open Day Or Night Vignette Box! Before I share all the details of this box, I just wanted to say thank you because I have had so many wonderful messages saying how much you loved this particular project and asking when I'll be posting it...so, I'm sorry I've made you wait but today's the day you finally get to meet the evil doctor in person, a man of medicine who is always open for business, day...

....and night!

So, let's get started and and I'll be showing you all the details of how I created that tiny light bulb that sits in the back of the box, together with those little books that sit on the bookshelves and at the end of this post, I've listed all the full recipe of everything you need! 

For this project, I used the second largest and second smallest of the vignette boxes which come in a set of 4, together with the largest sized vignette panel and added some of the new Halloween Tape Trims around the raw edges on the front of each of the boxes. I used the neutral shade tape that has a pinked edge and just applied it to the edge, adhering it with a touch of Matte Collage Medium.

I then covered the outside and the backs of each of the boxes using one of the gorgeous designs of the Worn Wallpaper. To add a real touch of vintage to these boxes, I also added some Crackle Paste around the edges and created some small rips and tears in the paper. These are simply made by picking away at the paper, to create a rip and then folding back the edges of the torn paper and smearing some of the Crackle Paste over the top. Once all the pasted surfaces are dry, I used the Walnut Stain Distress Crayon over the top to accentuate and colour the crackle paste.
Moving onto the insides of each box and the vignette panel and to cover these I used some of the papers from the Departed paper stash. Inside I used a design that complimented the Worn Wallpaper perfectly and on the panel, I chose a crackled design which will be ideal to create the look of flooring!
To create the texture around the edges of the panel I used Translucent Grit Paste that I applied quite thickly and after allowing it to dry, I then took a fine detail brush and just painted some Black Soot Distress Paint over the pasted areas. One the paint was dry, I added a touch of Treasure Gold Gilding Wax over the top to highlight the pasted areas and all the gnarly little bits.
I now have all my boxes covered and after using Matte Collage Medium to attach the small box onto the larger box, I placed them both onto the vignette panel and set it to one side to dry thoroughly. Once they're dry, I used one of the Pinked Etcetera Trims which I painted with Distress Paints and after cutting it down to size, I attached the trim across the centre of the larger box, to form a bookshelf, attaching it with Matte Collage Medium on the edges of the trim.

Now the boxes are in place, I wanted to create the light for the small box and for this I used one of the Tiny Corked Vials with the rounded end and a set of Tiny Lights. I bore a hole into the back of my box to place the lights through and then taking a pair of scissors to the lights, I cut them down so that only three bulbs remained on the wire! Cutting the lights does not affect them from illuminating, they will still work as long as the wire at the back remains intact. I attached the battery box with a foam pad.
You now have the three lights on the wire on the front and to create the glass fitting, I took the tiny corked vial and crackled it. To do this, I primed the surface of the bottle with Matte Collage Medium, allowed it to dry and then applied a layer of Rock Candy Crackle Paint. Allow for the paint to dry, the crackle to appear and once it has, I used a combination of Mushroom, Sepia and Gold Mixative Alcohol Inks to colour the crackle. Just drizzling the ink over the surface of the glass. Attach the glass over the top of the tiny lights, feeding them into the glass bottle and then apply some Matte Collage Medium around the top of the rim and attach to the back wall of the box. You might need to hold it for a few minutes, until it adheres and then I would walk away ~ don't be tempted to touch it! I can tell you now, that's not a good idea!!
...and once it is set into place, this is how it makes the whole box shine once it's lit!
To complete the box, I added a handle on the top which is from the Hardware Pulls set and attached this with matte collage medium and added some Hardware Heads so that it looks like it's nailed on.
Around the edge of the box, I cut strips of the mummy cloth from the Halloween Trimmings set, dyed it with a combination of Frayed Burlap and Antique Linen Distress Spray Stains and then pulled the cloth, to create these fine shredded pieces, which I adhered around the edge of the box. YOu'll also notice that I have a domed piece sitting just below the lightbulb and this is simply a piece of Halloween ephemera that I adhered with Matte Collage Medium onto the back of a Prima Melange Pebble. I then allowed it to dry before inking the front of the pebble with some Mushroom Alcohol Ink before attaching it inside my box.
So we now have the main structure, lit and ready to be decorated with the embellishments, and starting with the books which are so much fun to create but really simple. The size of each book cover really does depend on how small or large you want your book to be, so if you need a complete book measuring 2.5 x 3cm, then cut a panel of card, any colour you want to use but I chose red and black and cut this to measure 2.5 x 6cm. Bend the card around a pencil to create the spine of the book. I then inked the edges of the book cover, and added a touch of gilding wax. For the insides, I used some old book papers that I cut into small sections. You need to cut the book paper to measure 2.3 x 5.7cm in size and I used approx 10 pieces for the inside of each book. Fold each piece in half before attaching them inside the book cover, layering them over the top of one another and attaching each of them down the centre to create the pages. You now have one mini book and will probably become addicted to make more.

I added Remnant Rubs and Snippets Ephemera pieces to create the book titles and images on the front of each of them.

Now for my Paper Doll to be put in pride of place ~ I coloured this with Distress Marker Pens and placed him into the box, adhering a Halloween Baseboard piece next to him ~ this creates a support to the figure and he also has support from the boxes across his back, so add the adhesive wherever he leans against something and he should be nice and secure.
The next embellishment will be all the bottles and these are a mixture of Tiny Corked Vials and Apothecary Vials. I added crackle to each vial using the same technique as I used on the light bulb but used different alcohol inks to add colour to each one ~ from browns to green, but this is your choice and you can decide what you love! To complete each little bottle I added either a Snippet ephemera, a label and some black twine from the Halloween Trimmings set. You'll also notice that some have wax dripped over the corks, this is achieved by simply lighting a candle and dripping the wax.

To create the scrolls, I cut used some offcuts of papers from Tim's paper stashes, all of which I pop in a box for one of those days when I might need them, and this was the day! I rolled the papers around a pencil and then after securing them with a dab of Matte Collage Medium, I inked the edges, created a few rips and tears and made them look a little older in appearance.
I now have the majority of my embellishments and attached my vials, scrolls and books into the box with Matte Collage Medium, and I also added some moss, a few die cut spider webs placed into the back and some coconut fibre strands, all scattered around to add that extra hint of creepiness to the room!
I also added some boneyard findings, painted with a little gesso to make them whiter and placed these into the vials, and a resin skull sat on top of the scrolls in the box at the top.
Now for those finishing touches...and that spill of blood on the floor!

This was created by drizzling a good amount of Glossy Accents onto my craft sheet, (make sure the craft sheet is non-stick) and then allowing it to dry. I left it overnight and once it was dry, I then coloured it with Cranberry Alcohol Ink before carefully peeling it off my sheet and adhering it to the floor of my vignette, so that it appears to be spilling out of the bottle.
The finishing touch of a Halloween Clippings Sticker, 'Open Day Or Night' was added along the front of the vignette panel and finally, I placed the whole piece of decor onto some Mini Foundations which were painted with Black Soot Distress Paint.


I really hope you've enjoyed how I created this project ~ it was so much fun to make and as always, thank you Tim, Paula and Mario for inviting me to bring my crazy imagination to life and create with so many wonderful products! Love you all... ❤️

Thanks for all your visits and I'll see you all again really soon...Emma x

Powered By Blogger

Total Pageviews