
Today, is the first day of the Simon Says Stamp Celebrate You Blog Hop and I'm really excited to be joining so many talented designers as one of the stops on this hop! You can see the fabulous new release in full by just popping over to Simon Says Stamp and if you've been hopping along, you'll have arrived here from Lea's blog but if you've just popped by and want to join us for this fun hop, then just head back to the beginning and Simon Says Stamp's Blog.
We are also have a special promotion running in conjunction with this hop and all you have to do is use this code: BTF842 to claim a FREE pack of Tim Holtz idea-ology Butterfly Adornments with any purchase. But hurry as you only have until 19th May at 11:59pm EDT or while supplies last to claim this gift.

For my project, I created a card that uses the cutest stamp and die set EVER ~ the Chillin' Frenchies and I combined this with the Filgree Message Circle die to create a background for my supercool pup!

So, let's get started and here's how I created my card...

This card has quite a few layers and plenty of dimension which you can see from the photo below, and I'm going to talk you through how I built up the layers, starting with my background.

I cut a panel of kraft card and using the little bone stamp from the Chillin' Frenchies set, I stamped the image in a random pattern over the card panel using Ground Espresso Archival Ink before using a white pencil to lightly colour the bones.
After inking the edges of the card with Frayed Burlap Distress Ink, I then matted my background onto gold metallic kraft stash, followed by a layer of brown linen textured card before mounting the panels onto a white card blank.
Moving onto the next layer, I cut a piece of watercolour card and to achieve the vintage feel I wanted for this piece, I applied Distress Inks to my glass mat ~ I used Antique Linen, Frayed Burlap, Antique Linen Oxide and Old Paper Oxide. I spritzed the inks and the card very lightly with some misted water and then swooshed my card through the inks, picking up the colour to create the look of old paper. I always heat dry the inks between layers so that they don't become too muddy and I also start of lightly, building up the colour by dipping in and out of the inks.
Once the card was dry, I then inked the edges of the card with Frayed Burlap Ink before placing my Filigree Message Circle die onto the top section of the card panel and running it through my machine. I then machine stitched a border around the outside of the card panel.

To create the frame that sits around the circle, I used Tim Holtz's Stitched Circle die set which was the perfect fit. I placed one circle die inside the a larger circle die and then cut a piece of woodgrain card to create my frame. After applying Distress Paint to the frame ~ Ground Espresso, Black Soot and Antiqued Bronze, I attached the frame to my die cut card panel.

Now to build up those layers and I attached my die cut panel using foam pads to a piece of card that I coloured green using Twisted Citron, Peeled Paint and Mowed Lawn Distress Oxide Sprays.
I attached the die cut panel over the top of the green card, which I then layered onto black kraft card, each time leaving a border showing around the outside.. I then wrapped some twine around the bottom section of my layered panels.

I adhered the panel centrally, onto the front of the card using foam pads.

Now for the focal point of this card, the cute Chillin' Frenchie which I stamped onto watercolour card using my Tim Holtz Stamp Platform and watercoloured with Distress Marker Pens.
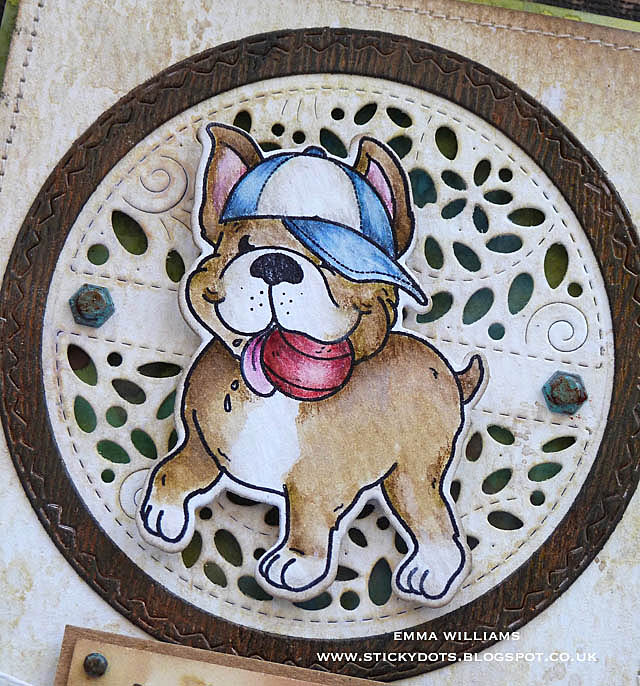
I then used the corresponding die to cut out the image and placed him on some foam pads before attaching him to the front of my card.


So, that completes my stop on this hop and my fun vintage style card, full of dimension and layers. Don't forget that we would love for you to share your work in our Celebrate You Gallery and look forward to seeing what you make using the products.
HOP DETAILS:
Simon Says Stamp is giving away a $25 coupon to every stop on the blog hop! This means you can leave a comment here and on every stop along the way to increase your chances. Winners will be posted on the Simon Says Stamp blog on Wednesday, 22nd May...
HOP ORDER:
Simon Says Stamp Blog
Jennifer McGuire
Kristina Werner
Cathy Zielske
Nina-Marie Trapani
Nichol Spohr
Jessica Frost-Ballas
Suzy Plantamura
Amy Rysavy
Lisa Addesa
Kathy Racoosin
Heather Hoffman
Lea Lawson
Jennifer McGuire
Kristina Werner
Cathy Zielske
Nina-Marie Trapani
Nichol Spohr
Jessica Frost-Ballas
Suzy Plantamura
Amy Rysavy
Lisa Addesa
Kathy Racoosin
Heather Hoffman
Lea Lawson
Emma Williams (YOU ARE HERE)
Thanks so much for hopping by today, hope to see you again soon and don't forget to make a date in your diaries for Day 2 of the hop, coming tomorrow!
Emma xx
RECIPE FOR CARD:
Simon Says Stamp Celebrate You Release: Chillin' Frenchies Stamp & Die Set, Filigree Message Circle
Tim Holtz/Sizzix: Stitched Circles
Distress Ink: Frayed Burlap, Antique Linen
Distress Marker Pen Set
Distress Oxide Inks: Antique Linen and Old Paper
Distress Oxide Spray Stain: Mowed Lawn, Twisted Citron, Peeled Paint
Distress Marker Pen Set
Distress Oxide Inks: Antique Linen and Old Paper
Distress Oxide Spray Stain: Mowed Lawn, Twisted Citron, Peeled Paint

