
Hello everyone...
This week over on the Simon Says Stamp Monday Challenge Blog we are getting ready for some Halloween tricks and treats with our SPOOKY theme and whether you enjoy the darker side or the fun side of this season, we would love for you to join us and play along.
Now I'll admit that I do like the wicked side of Halloween and for my make, I chose to create a display panel using Tim Holtz Halloween idea-ology because when it comes to this season, Tim always brings us the very best Halloween products.


For this make, I used the larger sized Etcetera Panel from Stampers Anonymous and I applied the crackle design from last year's Halloween Design Tape around the edges so that it gives them a nice finish.

COVERING THE PANEL
Taking a panel of paper from the Halloween Backdrops pack, this one was the design that looked like a book cover, I cut it down to fit the panel, but took the piece that I've cut away and placed this along the bottom so that it has the frame showing all the way around and would look like a cover of a book.
I made some rips and tears around the edges of the paper and then adhered it to my board, curling back the corners to reveal and expose the tape underneath.
Where I've joined the papers, I attached a Halloween ephemera trim over the top. Sometimes there's little things in these ephemera packs that are so useful and I would be so happy to have a whole pack of these because I love them!

Now to move onto building the scene...
WINDOW FRAME
I used one of the frames from the Halloween Baseboards and Transparencies pack and placed a shattered window behind it, attaching it with red line adhesive tape and then adding some Mushroom Alcohol Ink to make the 'glass' appear slightly dirty in appearance.

To complete the window, I applied Translucent Grit Paste for added texture, placing it along each of the ledges and along the top. Once this was dry, I painted it with a combination of Black Soot and Crackling Campfire Distress Paint.
In the top right hand corner of the window frame, I attached a small flying bat from the Ephemera pack.

The next step was to add the flying bats which are again taken from the same pack as the frame and shattered window.

I pierced a hole into the bodies of each bat and then threaded florist wire through the holes, applying a small amount of glue behind each to secure them. The wire I used is very thin and can be easily twisted and manipulated. I attached the wire to the frame, and placed the bats to appear that they're flying through the shattered window.
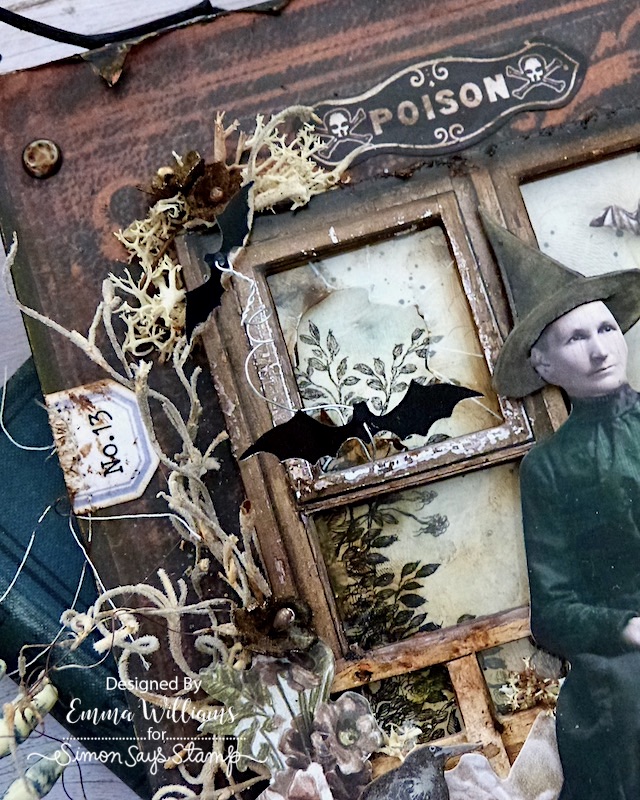
Behind the window, I added the scene. This particular piece is from the Halloween Layers and Paper Dolls pack and I cut it down to fit behind the frame. I added a very light colour wash over the panel using Distress Crayons ~ Stormy Sky, Peeled Paint, Black Soot, Gathered Twigs and Pumice Stone.

After attaching foam pads to the back of the window frame, I positioned it over the top of the background layer before I attached the completed frame to my Etcetera Panel with matte Collage Medium.
Just above the frame itself, I placed the Poison ephemera piece that I adhered with the collage medium and then rubbed a little Walnut Stain Distress Crayon over the top to age it.

PAPER DOLLS AND LAYERS
Next are the paper dolls and I selected these two characters as they worked so well together. I colour tinted the images with Distress Crayons and then added the accessories. The witches hat and the mask are both from the Halloween Stickers book and after placing the mask on the little girl, I cut a slit in the hat and placed this on the older ladies head.

I added some foam pads to each image and used various depths to create dimension before attaching them to the right hand side of my frame.

To the left of the images, I layered some of the floral ephemera pieces from both the Halloween Layers and Ephemera packs and I placed them onto foam pads, and arranged them around the bottom of my window frame.

I also added the small black crow, (or maybe it's a raven??) from the Ephemera pack, which I placed amongst the floral arrangement.

ADDING THE MOSS, FLOWERS and BROOMSTICK
To the right of the frame, I attached the broomstick from the Graveyard pack and propped this against the window, attaching it with hot glue.

Around the frame, I added small clumps of moss which I attached with hot glue ~ I used a combination of reindeer moss and Spanish Moss. I also attached some moss in, and between the floral arrangement...

...and beneath the feet of the little girl.

In amongst the moss, I placed some cut bouquet findings flowers. I coloured the flowers with Crooked Broomstick Mica Spray and once they are dry, I cut them from the stems and tuck the flowers into the mossy clumps.

FINISHING DETAILS
We're nearly there and all that's left is the all important finishing touches.
After sanding the edges of the Dreadfully Wicked Quote Chip from the Baseboards Pack, I inked over the top with Walnut Stain Distress Ink and then attached it to my panel, placing it beneath the images, using foam pads to add height. On either end of the quote chip, I placed two Hardware Heads that I painted with Black Soot Distress Paint.

On the left hand side, just creeping out from underneath the flower arrangement, I used Black Soot Distress Paint to paint a spider from the idea-ology spiders adornments and branches pack and then positioned it onto the panel using matte collage medium.

Details, details, details and you might just notice that on the left of the window I attached a label, cut in half and complete with the No.13. The label is from the Vials pack and the number is from and older pack of Tim's Halloween Remnant rubs that I have in my stash.

Finally, I cut the legs from the back of two Large Fasteners, and used the texture hammer to add a few dents to the surface before I attached one to the top, and a second one to the bottom of the panel, adhering them with collage medium on the left hand side. I then painted each one with a combo of Black Soot and Crackling Campfire Distress Paints to add a vintage touch.

...and that completes my spooky make for this week, which I hope you love!

Don't forget that every week, one lucky random participant has the chance to win a $25 gift voucher from Simon Says Stamp and you can join in up to 5 times, which means you could have 5 chances to win. You have until next Monday at 8am Ohio time. 1pm UK time, 2 pm CET to join in and good luck....


Recipe for project:


No comments:
Post a Comment
Thank you for all your comments and messages, they are all appreciated and I hope you'll come back and visit again soon...
Emma ~xx