Hello friends....
Today’s post is all about the new Distress Watercolour Pencils that I’m sure most Tim Holtz addicts already own, used and have in your stash!
I've been lucky enough to be able to play, and experiment with them for a few weeks and as someone who has always loved to watercolour, and used a lot of pencils in the past ~ I can honestly say that these are amazing! They really do everything you would expect from a watercolour pencil and as always with Tim’s products, they go that extra mile and do a little bit more...
So let’s get started, and believe me, this is just the start because there will be so much more to come but the purpose of this post is to give you some ideas of the colours and what they look like on the various surfaces…
I’ll begin with colour swatches that I made for each individual colour using the Mini Glitch Stamp Set. I always find these helpful to have by my side when I’m making projects, it just helps to see the colour once they are laid down on a surface. For my swatches I stamped the circle image from the set onto watercolour card before applying the rich colour pigment from these pencils direct to the card, and then blended them out with a little water. I also repeated this on Mixed Media Heavystock and White Heavystock. On the back of each swatch, I scribbled the pencil so I could see the colour in it’s ‘raw state’ before any water is applied.
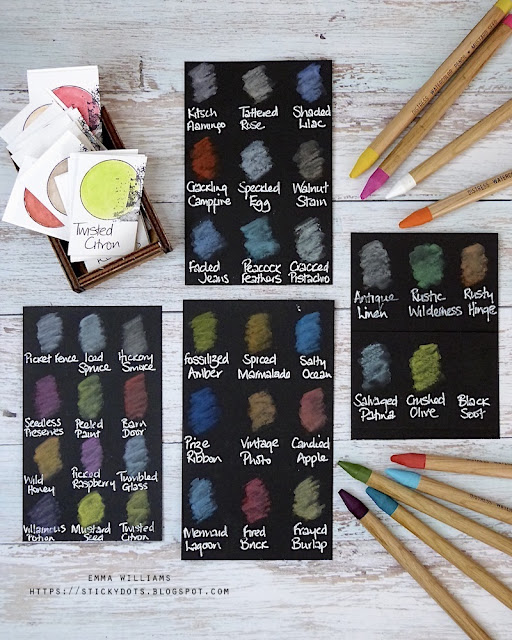
My next step was to see what they would look like on black card and, I think you'll agree that they look good and from the photo below, you can see they haven't lost any of the colour ~ they still look rich and bright.
So we have now seen how that rainbow of Distress colour looks on light and dark surfaces, now it’s time to use the pencils with a stamped image.
So let’s go to my happy place and with my brushes, water and pencils laid out on the desk in front of me, I began by stamping The Scarecrow from the Tim Holtz/Stampers Anonymous onto watercolour card in Black Soot Archival Ink.
I used a water brush to blend the colour onto the image and I also added a wash onto the background. The beautiful pigment creates such intensity and depth of colour and they blend so beautifully...
Next stop was to see how they would react on another surface...kraft card! This can be a tricky surface to add colour to, especially watercolour but as you can see, they still kept the depth and intensity of colour, but they took on an oxidised effect, similar to the effect of Oxide Inks and I just loved that Matt, chalky finish.
What I also loved is that I could wet my paintbrush with a little water, pick up the colour direct from the pencil nib and then flick the ink across the card to create those tiny splatters.
I made my little stamped images into small notecards, adding a sentiment stamp on each from the Tiny Text stamp set and below, you can see how the different surfaces look side by side.
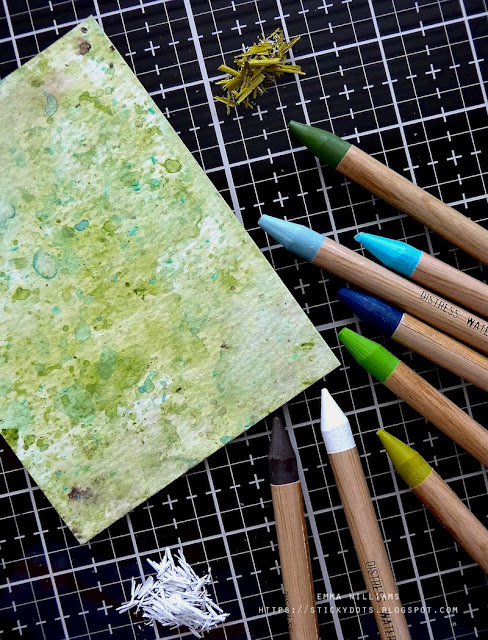
When it came to sharpening my pencils, I used a Derwent Sharpener and because these pencils are woodless, it meant that I could save this precious shavings and mix them with a little water to create inky backgrounds.
So below you can see how I made a background, using the shavings of the colours I used on my scarecrow, (all except the red) and then by adding the water, I turned these into an instant pigmented ink that was mixable and could be used to create backgrounds.There will be more ideas coming soon, and you will see these pencils featuring in many posts to come and I also recommend you look at some of the other maker's posts as they really are inspiring in so many different ways.
Thanks for stopping by today and see you soon...


Thanks Emma the pencils look great xxx
ReplyDeleteLove how the Scarecrow looks on the Kraft paper...love the oxidized look.
ReplyDelete