Hello friends and Happy Monday...
Hope you are all keeping well and had a wonderful weekend! Did you all manage to see Tim Holtz's YouTube Live Launch of the brand new Halloween stamps from Stampers Anonymous? All the stamps and stencils are available to buy now from Simon Says Stamp.
It always such a honour to be asked to design for the lives and as my longtime followers of this blog will know ~ I LOVE Halloween, so I was in my element making some of the samples, alongside so many other talented makers. I will be sharing my makes very soon, and in the meantime, if you didn't get time to watch on Saturday, or if you just want to watch the Live all over again, then you check out the replay HERE!
So back to today and the latest Simon Says Stamp Monday Challenge and this week our theme is all about SPRITZ AND SPLATTER! So if you want to get your sprays and inks ready, then we would love for you to join us and play along.
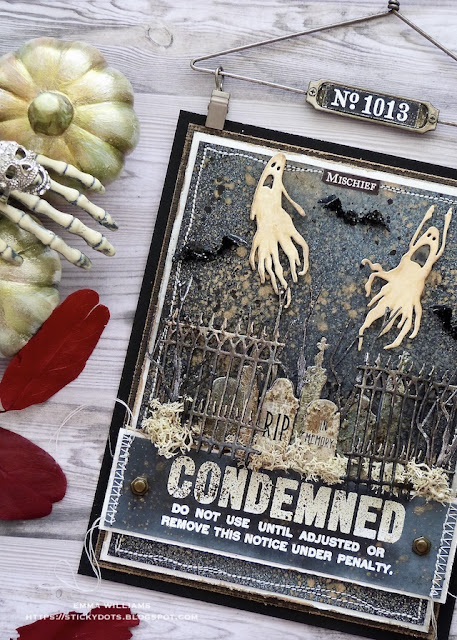
For my project, I have made a wallhanging which includes a stamp from the latest release, combined with the brand new Halloween Vault Series Thinlits Die Set, which includes one of my favourite dies, those mischievous ghosts!
To begin with I'll start with the background and this is created using the gorgeous new Seasonal Mica Stains from Tim and Ranger Ink. These stains are only going to be around for a very short time, and unfortunately they have already sold out at Simon Says Stamp! So if you haven't managed to get a set as yet and you do see them for sale ~ I urge you to get them now before they're gone forever!
Background
I cut a panel of black watercolour card, 12 x 16cm and spritzed a very light misting of Antique Linen Oxide Spray over the background. I then spritzed the Mica Stains, Empty Tomb and Crooked Broomsticks. These are my favourite of the stains and I just love the effect they give when spritzed onto black. You don't want to give a solid coverage to the card surface, just a hint of the spray with the black still showing through.
After heat drying the inks for quickness, you can allow them to dry naturally...I machine stitched a border around the outside, before matting the inked panel onto silver metallic kraft card. Using foam pads, I then mounted these layers onto blackout kraft stash, which I sanded, followed by a piece of black chipboard which will form the base of the hanging.
Setting this to one side, I moved onto the scene and those mischievous ghosts...
Ghosts
I began by cutting three separate layers of both of the ghosts from the Halloween Vault set, and cut these from Mixed Media Heavystock card. I then lightly spritzed one layer of each ghost die cut with Antique Linen Distress Spray Stain and Oxide Stain and heat dried the ink before inking the edges with Gathered Twigs Distress Ink.
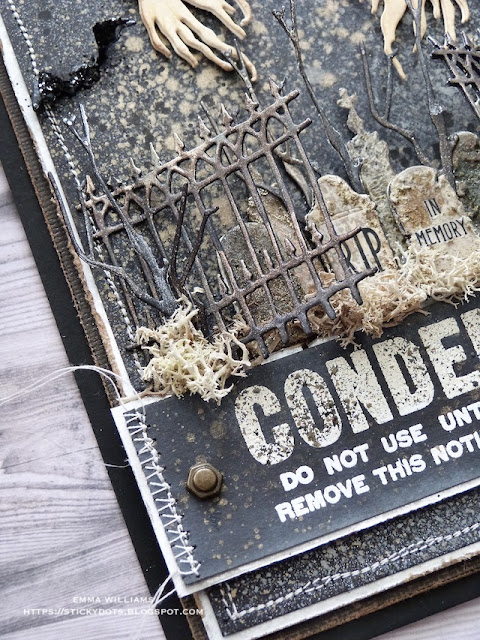
Across the bottom section of the project I used the CONDEMNED stamp from the Rest In Peace stamp set. I inked the stamp with clear embossing ink, stamped onto black card, lightly spritzed with the same Mica Stains as I used on the background. I then sprinkled Bone Mixed Media Embossing Powder over the top of inked sentiment and heat embossed the wording until it became molten.
I cut the stamped panel down to size so that it would fit across my background and machine stitched the edges. I matted this onto a further piece of silver metallic kraft stash, showing a border around the outside and then mounted the wording across my background panels, using foam pads to add some height.
To complete the banner, I added two Hardware Heads to either side.
Next step...
....the graveyard scene!
For this I cut the little tombstones from black card, layering them as I did the ghosts to create more dimensional, thicker pieces.
I then coated each of the tombstones with a combination of Crypt Grit Paste and Grave Texture Paste. Each of these will create a slightly different texture and combining them really gave me the finish I wanted for these tombstones. Once the pastes were dry, I then added some Remnant Rubs to two of the tombstones that I will be placing at the front of the scene before spritzing all the little tombstones with the Mica Stains that I've been using throughout. Very gently heat dry, or even better leave these to dry naturally, whilst finishing the other die cuts. Arrange and attach the tombstones with foam pads, onto the background, overlapping them and grouping them together in a cluster, placing them to sit just above the banner.
The Gates
The gates are another of the dies from the Vault series and I cut them four times, layering them over the top of one another, and adhering them with Matte Collage Medium, to form two gates. Then, once again I used the Mica Sprays to add the metallic finish to the die cuts but this time, I brushed the stains over the top before heat drying them. I then added a touch of Gilding Wax to the highlight the detail.
Take one of the gates and create a fold down the left hand side, approx 1 - 1.5cm from the edge and fold the gate towards you. Attach the gate to the background, using Matte Collage Medium. Repeat on the other gate, but this time on the right hand side and attach. This now creates the look of the gates being open, which I hope you can see in the photo below...just click to enlarge!
The Twigs
The final die cut pieces are the twigs, again from the same die set, and cut from more black card. I then applied a small amount of Vintage Gold Alchemy Metallique gilding wax over the twigs to add shimmer.
Arrange the twigs in and around the gates and tombstones.
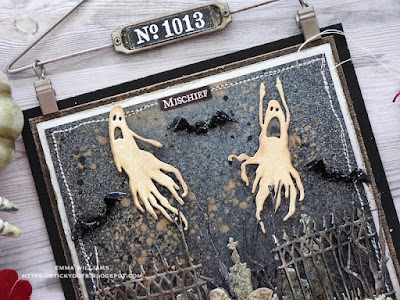
With the gates and the tombstones in place, I attached the ghosts above the gates, and used foam pads for dimension...
...before adding some moss around the bases of the tombstones.
The bats...
I cut six separate bats. I wanted to glitter three of these die cuts and for this I applied a layer of Glossy Accents and then sprinkled the beautiful Nightfall black glitter over the top. Set these aside to dry thoroughly before layering them over the top of the three remaining die cuts, attaching them by their bodies only and shaping the wings. I then attached them to my background, placing them around the ghosts.
Now it's all about the finishing touches and I added a "Mischief" clippings sticker, that I had in my stash from last year and adhered this along the top of the panel.
...and finally, I clipped it onto the Display Hanger and added the No.1013 to the hanger. This is another stamp from the Rest In Peace set and stamped it in clear embossing ink onto black card, then sprinkled it with the Bone Embossing Powder, before heat embossing it, cutting it down to size and placing it into the window of the hanger.
So, that's it from me for this week and I hope you've been inspired by my Halloween project...
...as always, if you make anything, or been inspired by anything that you've seen here on my blog ~ then please, let me know by tagging me on social media or leaving a comment here and I will be right over to take a look!
Don't forget that every week, one lucky random participant has the chance to win a $25 gift voucher from Simon Says Stamp and you can join in up to 5 times, which means you could have 5 chances to win. You have until Monday 8am Ohio time. 1pm UK time, 2 pm CET to join in and good luck....
Recipe for project:


Love it....all the dimension and it draws you into it in a creepy kind of way...LOL. Thanks for the tutorial...
ReplyDeleteMind Blowing Emma xxx
ReplyDeletevery cool, love the texture and dimension!!
ReplyDeleteI'm speechless, I will save this forever- with hopes someday I could be this creative, talented and a bit twisted! Thank you
ReplyDeleteWhat a great project!
ReplyDelete