Flipping the box over, I covered the raw edges on the front with Design Tape. I will admit, I'm not sure which set this tape came from, it is one of Tim's older products and one of my designs, but if you haven't got this particular one, then any of Tim's tapes will do the job.
With the tape in place, I then covered the sides of the tray with a dark coloured paper from the Backdrops Volume 1 set of papers, adhered with Matte Collage Medium. I also added the medium over the top to seal the papers.
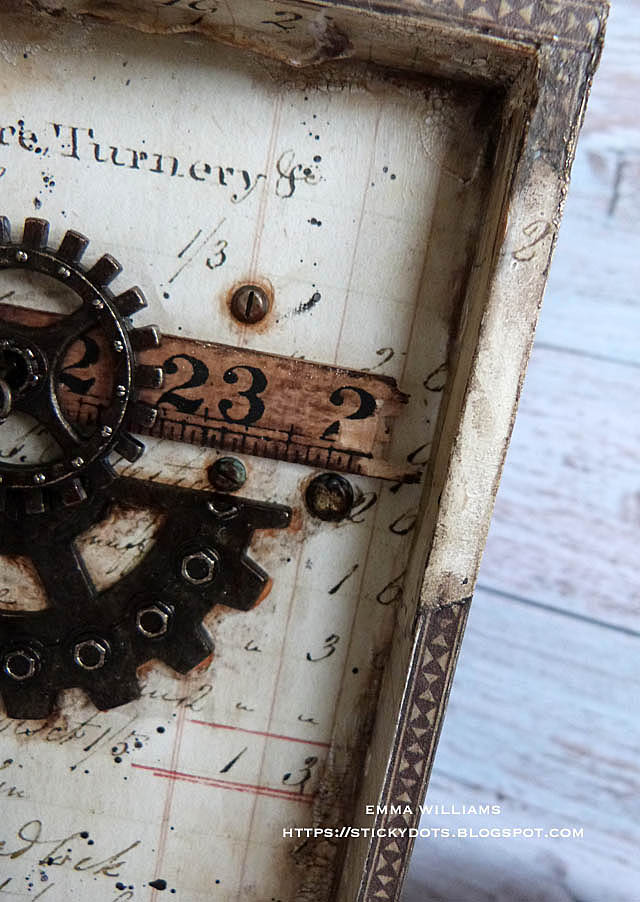
On the inside of the box, I used another sheet of paper from the Backdrops set, featuring the Hardware Turnery invoice and after cutting the panels to size, I adhered them inside my tray with Matte Collage Medium.
Once the medium was dry, I added detail to the inside and the front edges where I've applied the tape and used some of the remaining offcuts of paper, which I tore to create a raw, uneven edge and attached.
With the torn pieces attached, I then smeared some Crackle Paste onto the inside of the box ~ paying particular attention to the joins and also adding some to the raw edges of the torn papers. Once the crackle had done it's thing, I then took the Walnut Stain, Gathered Twigs and the Vintage Photo Distress Crayons, applied them to the background and over the crackle paste and using a water brush and a damp baby wipe, I blended the colour over the background to create a really vintage feel to the tray. Hopefully, you can see all the details and the effect of this step in the photos below.
To complete the box and add some texture around the outside, I used Translucent Grit Paste, applied around the edges and along the top. After allowing it to dry, I then used a combination of Black Soot, Rusty Hinge, Vintage Photo Distress Paints and Black Soot, Walnut Stain Distress Crayons to colour the paste and create this rusty, crusty look before applying a little Treasure Gold Gilding Wax from my stash to accentuate the texture.

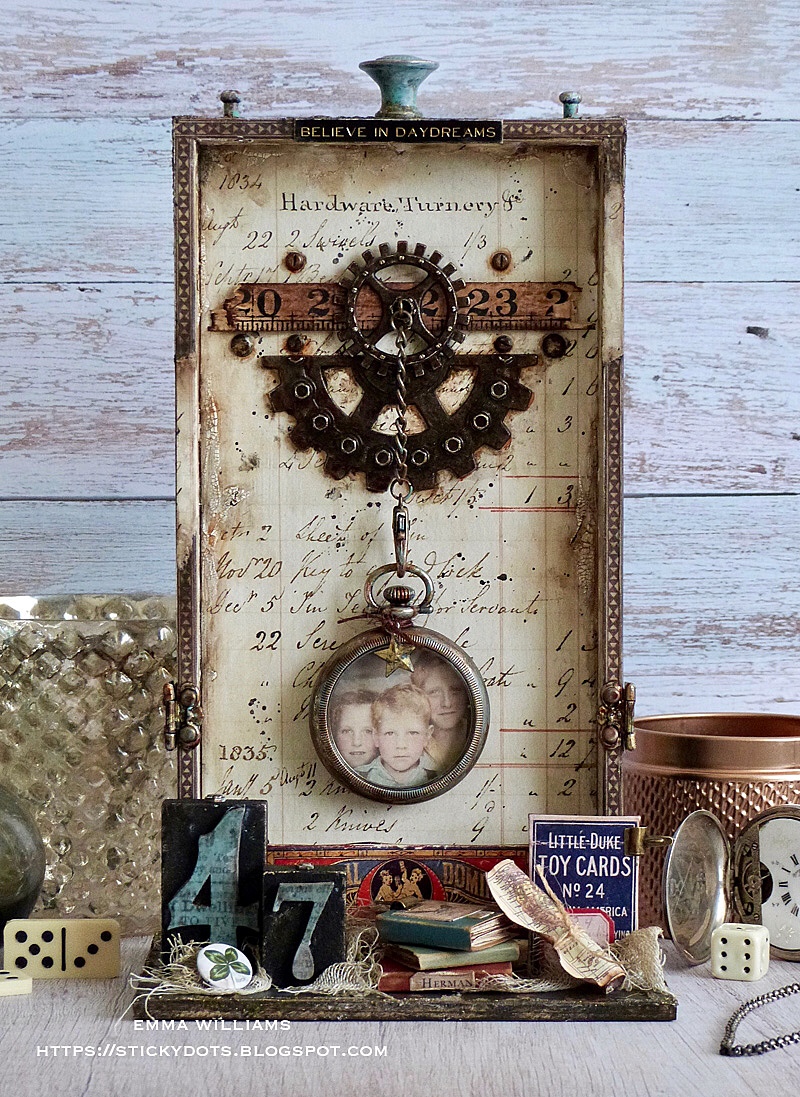
As the finishing touch to the top section, I added the metal hardware ~ the circular knob from the Mini Hardware set and two Hitch Fasteners attached to either side. To create the colour on each piece, I used a combination of evergreen Bough, Vintage Photo and Black Soot Distress Paints, layered individually and applied directly to the metal. Note: Allow the paint to dry before each application, otherwise you will end up with mud, and you don't want that effect! I attached the painted metal hardware to the top of the box with Matte Collage Medium and also added a Metallic Quote Sticker along the top, Believe In Daydreams.

To add just a little more detail, I had some offcuts of embossed metal on my desk. This was Metallic Kraft Stash embossed with the Foundry 3D folder and just cut into strips, coloured with Distress Paints and then wrapped around and adhered to the sides. I also added some of the smaller Sprocket Gears, which once again were altered with Distress Paints and arranged these on both sides of the tray.
The final detail was to add a Hinge on either side of the box, again painted with Distress Paints to add a rusty finish and just adhered into place with Matte Collage Medium.
So the box is now prepared and we can move onto the base...
For this I used a Vignette Panel, covered it with the same paper that I used on the outside of the box and adhered it using Matte Collage Medium.
I then added some Translucent Grit Paste around the edges of the covered panel, allowed it to dry before colouring it with the same paints and crayons as I used previously on the top of the tray. I then added some more of that embossed metal and Hardware Heads to look as if it's been riveted into place.
Attach the tray to the box and then walk away until the Matte Medium is dry and the box is in place and not going to move....
...and whilst this is happening, I moved onto all those metal embellishments, the Industrial Gears, Metal Clasp, Hardware Heads and the Pocket Watch, together with the ruler piece.
To colour the ruler and make it look more vintage, I snapped each end off to create the broken effect and then dragged my Walnut Stain Distress Ink Pad across the surface and using a baby wipe, just wiped this across the inked wood, blending the colour onto the surface. I then attached the ruler piece inside the tray.
All the metal on the gears and the Pocket Watch is painted with Black Soot, Evergreen Bough, Rusty Hinge, Ground Espresso and Vintage Photo Distress Paints, with a light application of Treasure Gold White Fire Gilding Wax over the top.
Taking the painted gears, I arranged and attached these to overlap one another and also overlap the ruler piece. I then added some of the painted rusty hardware heads around the gears, adding a touch more paint to give the rust effect.
Now to add the photo inside the painted pocket watch. As I mentioned at the beginning I used an image from the Photobooth set and coloured it with Distress Crayons. I then cut the photo into a circle that would fit inside the pocket watch. Place the photo onto a foam pad and attach to the back of the watch before clipping the front into place.
I clipped the pocket watch to the Hook Clasp and to attach this and secure it onto my tray, I used a screw head fastening from the vignette Hardware findings set, and placed this in the centre of the smaller gear that is attached to the ruler piece. The screw head is then screwed into the wood of the ruler until secure and the watch is free to hang from this.
The final touch was a star, coloured with Gilded Alloy Alcohol Ink and tied onto the pocket watch.
Now to add and attach all those bits and pieces at the bottom using Matte Collage Medium...
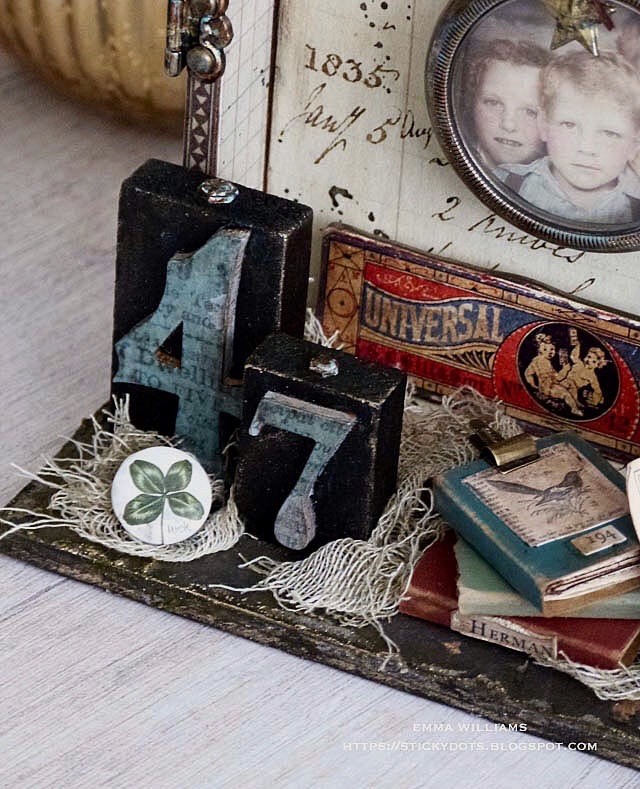
I used some Junk Drawer Baseboard pieces, the Little Duke Toy Cards complete with Tiny Clip and placed this in the right hand corner and the Universal Dominoes piece that sits right at the back of the arrangement, along the base of the tray.
The little stack of books are all made exactly as I made them for a previous project, which you can see
here but this time I used some of the new Kraft Stash to create the covers. To create little covers for the books, I used imagery from the Field Notes Ephemera set and added some Clippings Stickers to the spines. I then stacked these and attached them, nestled and surrounded by a little Mummy Cloth that I hand dyed using Frayed Burlap Distress Spray Stain.
I used a map from the Keepsakes Ephemera set. I rolled the map into a scroll and then tied some twine around it before attaching it to lean against stack of books.
For the number 47, I used the Number Blocks and painted the numbers with Evergreen Bough Distress Paint. Once the paint was dry, I stamped onto the numbers with Jet Black Archival Ink, using the advertising stamp from the Professor 2 Stampers anonymous stamp set. I then dabbed the surface with Tim's Embossing Dabber before applying Weathered Wood Distress Glaze over the top and heat embossing it until molten. I added some more Hardware Heads to the top of each number and then attached the numbers to my arrangement...
...before finally adding the finishing touch, the lucky clover Mini Flair pin.
So, that's my first project for the idea-ology release and I hope you've enjoyed the creative process and all the tips and techniques I used to bring this to life and tell the story of these three children, and their dreams! The one detail that I can’t capture with photos is that the pocket watch swings freely from side to side...I didn’t want to attach it as I loved how it moved and if you want to see this, then Tim shows it perfectly on the replay!
Thank you so much for taking the time to stop by today ~ stay safe and keep well.
Love Emma xxx
Recipe for project:
Distress Paint:
Black Soot, Evergreen Bough, Rusty Hinge, Ground Espresso and Vintage Photo Tim Holtz Idea-ology: Backdrops Volume 1, Mini Hardware Knobs and Handle, Metallic Sticker Book, Hook Clasps, Lucky Adornments, Tiny Clips, Junk Drawer Baseboard, Keepsakes Epehemera, Cool Kraft Stash, Mini Flair Embellishment, Photobooth, Halloween Trimmings, Number Blocks, Vignette Tray, Vignette Panel, Hinges, Hitch Fasteners, Ruler Pieces, Pocket Watch, Vignette Hardware Findings Treasure Gold Gilding Wax and twine from my own stash


Awesome!!! What a beautiful creation. Thank you for sharing.
ReplyDeleteThere are no words! Stunning, creative!!!!
ReplyDeleteWONDERFUL!! You know I love the rivets and hardware. So many good grungy details to this piece!!!
ReplyDeleteThis comment has been removed by the author.
ReplyDeleteWhat a beautiful piece you've created - awesome design! (Sorry, I deleted my first comment - so there would be only one comment). Just wondering if you made the tiny books or if there is a vendor for these wee adorable books. Thanks for sharing your wonderful art piece.
ReplyDeleteThank you so much for your lovely comment, it means a lot to me and I really do appreciate your visit! The tiny books on this project are all handmade by me and I do have a tutorial for them on an earlier piece that I made last year which you can find here:
Deletehttps://stickydots.blogspot.com/2020/08/open-day-or-night.html
If I do have some spare time, I might try and do a tutorial specifically on how I made this, so watch this space...
Hope that helps and if you need anything else, please don't hesitate to ask! :)
Emma,
DeleteThank you kindly for taking the time to reply to my query! I am learning so much from you, as well as other members of Tim Holtz's team of makers. Again, thank you so much!
This is a fantastic piece of art, Emma! Thank you for always providing the tutorials - they mean so much!
Delete