Hello friends...
Hope you all had a good weekend and for all those Tim Holtz addicts out there, hope you enjoyed our favourite time of the week with Tim on YouTube. If you don't want to miss out on any of Tim's lives, you can subscribe to Tim's Channel HERE!
So as the new week begins, it's time for a brand new Simon Says Stamp Monday Challenge and this week, we challenge you with our theme, ANYTHING BUT A CARD! We can't wait to see what you will be making and hope you will join us and play along.
For my project, I'm so happy to share a piece that I created for the recent Tim Holtz Sizzix Chapter 1 2021 Live! So many people have kindly messaged me and emailed about this particular project asking if I would share a tutorial and today, you get your wish because this was perfect for our theme and I hope you enjoy reading all about it!
I'm sure that most people will instantly recognise the inspiration behind this panel and as soon as I saw this beautiful die set, I knew I wanted to create a project that was all about Mary Poppins and with this in mind and with so many gorgeous dies to work with, the framed panel took shape and came together perfectly.
So, it's time to begin this week's challenge and let's go fly a kite!
To begin with I prepped and painted the frame. I've used quite a few of these frames in the past and I think they really are my favourite substrate to use. They come in two pieces, the frame and a backboard and I gave both pieces a coat of gesso before applying Dina Wakley's Ancient Acrylic Paint which is a gorgeous gold. Once the paint was dry, I then added Black Soot Distress Paint over the top, using the dry brush technique. This allows just a hint of coverage but just creates more of a vintage, worn look to the wood. Once again heat dry before moving on to the next paint layer which was Picket Fence. I applied this with my finger to get into all the little grooves of the beading around the edge of the frame and if any was applied to heavy, I just wiped it away with a soft cloth. Once I was happy with the finish of the frame and it was dry, I applied a light touch of gilding wax over the top.
Moving onto the background of the panel...
For this I used the beautiful Flowery Thinlits Die and started by cutting a piece of Mixed Media Heavystock card that fits the aperture of my framed panel. I then applied in order, Speckled Egg, Weathered Wood and Antique Linen Distress Paints to the card panel to add colour. I layered these paints over the surface, applying a solid layer of speckled egg before dry brushing the following layers over the top and heat drying between applications.
Taking the die, I cut two separate sections of the design and then carefully, I matched up the pattern, before attaching it using Matte Collage Medium onto my painted card. (NOTE: the design of the die isn't made to be a continual pattern but if you play around, you can get quite a good match without it looking wrong and not showing a join).
I adhered the background to my framed panel backboard and then applied a coat of the medium over the surface to seal it. Once this was dry, I used Speckled Egg, Pumice Stone and Walnut Stain Distress Crayons to tone down the background. I just scribbled these over the top of the cardstock, and because I have the collage medium applied, this allows me to be able to move the crayon around with a semi dry baby wipe and just add that extra touch of vintage.
Right we now have the background and all that I did to complete the panel, was add Butterfly Design Tape so that it will create an inner frame to the wooden frame, and then attached my painted gold frame over the top and adhered it with matte collage medium. I usually clip my frame with bulldog clips, just to make sure it is well and truly attached.
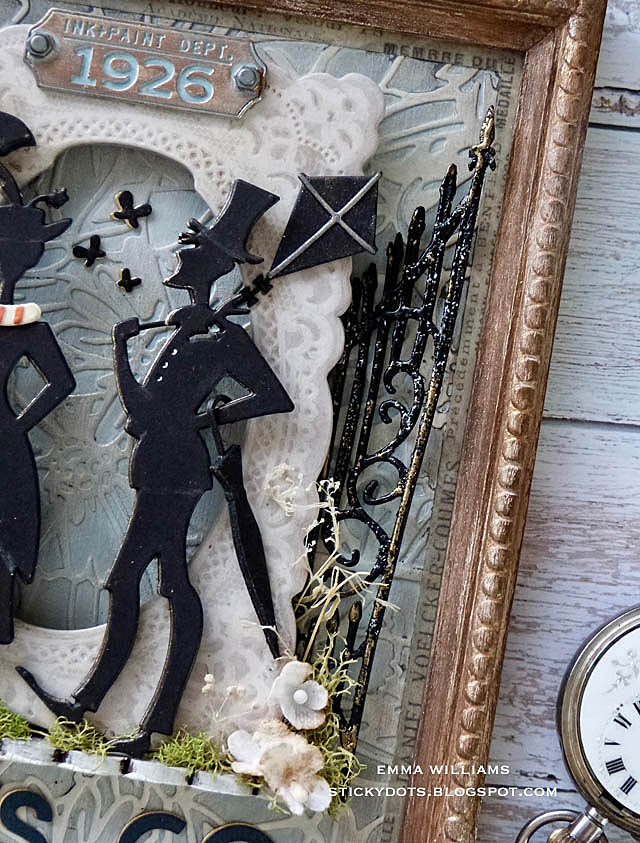
Now for the scene and I began by cutting my figures, umbrella, kite and those teeny little butterflies using The Park die set. I cut each of these pieces from black card, four separate times and then layered them over the top of one another, attaching each layer with Matte Collage Medium so that the die cuts resemble the thickness of chipboard/mountboard.
I added some white pen and pencil highlights before layering the dies onto a gold die cut layer which adds the shadow. This layer is cut from metallic kraft stash and just slightly offset behind the main die cut.
As the finishing touch to Mary, I added the scarf which was actually die cut using the Reindeer Snowman Papercut Colorize Die Set from Christmas and all I did was cut the snowman's scarf from Mixed Media card, coloured it with Distress Inks and placed it around Mary's neck.
Now that I have all the die cut pieces ready, I can assemble the scene inside my frame...
I used a Lace Baseboard Panel and attached this to my background using foam pads. Underneath the lace frame, I attached and placed a ledge which the characters will stand on. This is created using the Scallop Etcetera Trims and as with the gates, I've got a previous tutorial,
HERE which you can follow on how I create these ledges and attach them to my projects.
To attach the gates to either side of the panel, I placed them slightly lifted so they appear to be open and just applied a fine line of Matte Collage Medium to adhere them into place. Hopefully, you can see how they are attached in the photo below.
I then added my figures, complete with their umbrellas, kite and scarf, onto the frame using some more foam to create dimension and attached the butterflies in the aperture of the lace baseboard frame, placing them between the figures.
Around their feet, I added some moss, some floristry grass and a few little Bouquet Findings flowers, which I misted with a little Antique Linen Spray Stain to just remove some of the whiteness of the flowers.
To complete the frame, I added an idea-ology Factory Tag at the top, complete with Hardware Heads. I accentuated the wording using Speckled Egg Distress Paint, applied directly to the metal before wiping away the excess, just allowing the paint to sit inside the recessed wording.
We're nearly there and all that's left is the Let's Go Fly A Kite wording and for this I used the Alphanumeric Bold Thinlits die set to cut some blue coloured card from the Classic Kraft Card Stash.
I then layered each letter onto a die cut of gold metallic kraft stash card to create a drop shadow before attaching the letters to the background of my framed panel, placing them beneath the shelf that the characters are standing on.
...and that is the finishing touch to my Mary Poppins inspired panel.
I really hope you've loved this project and for all the lovely people who've contacted me, I hope you've enjoyed the walk through the process of how it was created.
As always, if you've been inspired by anything that you see here on my blog, please just tag me on my social media or leave a message so I can pop by to take a look ~ I always love to see your work!
Don't forget that every week, one lucky random participant has the chance to win a $25 gift voucher from Simon Says Stamp and you can join in up to 5 times, which means you could have 5 chances to win. You have until Monday 8am Ohio time. 1pm UK time, 2 pm CET to join in and good luck.... Thank you so much for taking the time to stop by today ~ stay safe and keep well.
Love Emma xxx
Recipe for project:
Moss and floristry products from my own stash


This is amazing Emma! I love all the wonderful details and the whole idea behind your project.
ReplyDeletethis is just darling! I love THE PARK die and you have made it shine! SO many great details, like the gate and the butterflies make this sensational!
ReplyDeleteThis is so cute!!!!!
ReplyDeleteamazing! Love your creativity. Thanks for your sharing!
ReplyDeleteThis project is amazing! Your ideas are so inspirational. Love seeing your ideas for Tim's products. Thanks for sharing.
ReplyDeleteLove this! So many great details!
ReplyDeleteLovely artwork
ReplyDelete