Hello friends...
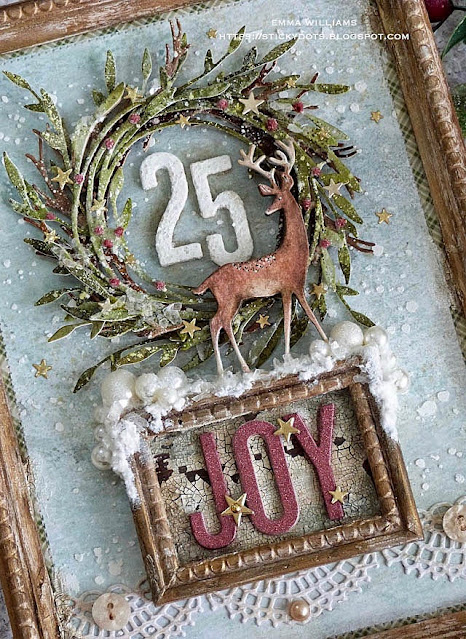
Hope you're all well and having a good week! I thought I'd drop by today to share a project that quite a few of you have been asking to see after Tim shared it over on his Sizzix Facebook Live, and it definitely seems to be one of your favourites from the projects that I created! If you did miss out on watching the LIVE the first time around and want to catch up and watch the replay, then you can see it here, together with all the other fabulous projects from Tim's makers!
So, let's get started on this and here's how I created my festive framed panel...
Walnut Stain
Gathered Twigs
Antiqued Bronze
Ground Espresso
(At this stage, I also painted the smaller frame for the deer to stand on. This is the smallest size from the Vignette Frames set and painted with the same paints as above)
You'll notice that using the dry brushing technique allows some of the chalk paint to show through, creating more of a worn vintage feel and not a solid, heavy painted finish!
Once the paintwork was dry, I then applied a small amount of Gilding Wax to accentuate the beadwork on the frame.
Setting both of the painted pieces to one side, I moved onto the background and for this I cut a panel of Watercolour Card, slightly smaller in size than the frame and lightly spritzed the card with a mist of water. Whilst this is still damp, I used a combination of Distress Spray Stains ~ Speckled Egg, Tumbled Glass and Weathered Wood and just applied the colour to my damp card.
Once I was happy with the colour, I then heat dried the card thoroughly before applying Grit Paste through the Speckles Layering Stencil and allowed this to dry before machine stitching a border around the outside of the card panel.
I then attached the card to my backboard section of the frame, placing it centrally and adhering it with Matte Collage Medium.
Resting the frame over the top of the background, I just made a very light mark with a pencil where the frame will sit. I then took the green tape from the Christmas Trims Tape set and I strips to each side of the inked background panel, ensuring that I slightly overlapped the pencil mark, therefore creating a narrow tape border that will sit just inside the frame once this is adhered into place.
To attach the wooden frame, I used Matte Collage Medium and then clamped it with bulldog clips, leaving it overnight or until the frame is definitely stuck!!!
In the morning, once the frame was in place and set, I applied some Crackle Paste around the inside edges and allowed for this to crackle and do it's thing before accentuating the crackles with the Walnut Stain Distress Crayon, just applied over the top and worked into the crackles with a damp paint brush.
Ink a strip of Mixed Media Heavystock with Antique Linen and Old Paper Distress Inks and then die cut a Crochet Border strip using the Crochet die set. Ink the edges of the die cut with Frayed Burlap ink and then attach across the bottom section of the completed frame.
So, we have the frame ready and can move onto making the scene....
...and I began with the wreath. I used two colours to create the layers for this wreath, brown for the twiggy wreath and green for the leafy one and to do this I inked one panel of Mixed Media Heavystock Card with Gathered Twigs and Walnut Stain Distress Inks and a second panel with a combination of Bundled Sage and Peeled Paint Distress Inks.
Die cut the inked card using the two circular wreath dies from the Funky Wreath Thinlits die set and cut two of each. Layer each of the wreath die cuts over the top of one another to create more substantial pieces before cutting a selection of foliage using the remaining dies from the set.
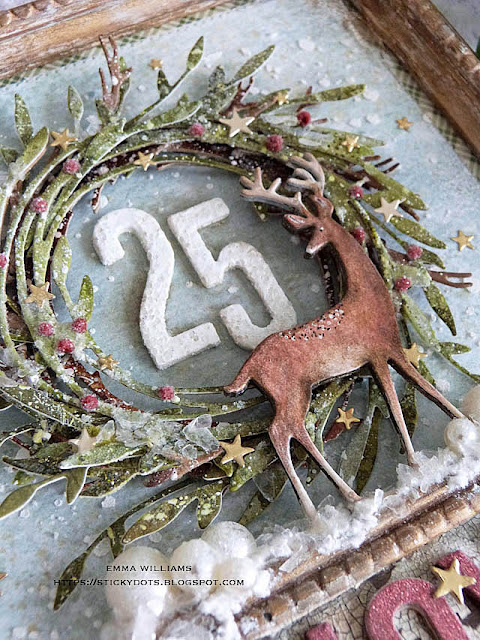
I then layered the green wreath over the top of the brown wreath using foam pads, cleverly hidden at the back of the die cut. Once in place, I attached all my little foliage pieces, using a hot glue gun to tuck the foliage into the layered wreath and eventually creating a really frothy wreath with plenty of dimension.
With all the foliage in place and to complete the wreath I added some little ‘berries’ by applying small dots of Postbox Red Nuvo Vintage Drops and then allowing them to dry before flicking some Picket Fence Distress Paint over the top. Finally, I smeared small amounts of Matte Collage Medium over the surface of the wreath before sprinkling Mica Flakes and Rock Candy Dry Glitter over the top and placing it to one side to dry before adding and tucking in the tiny little gold stars, which were die cut and left over from a previous project.
Now for the Darling Deer, who really is 'darling' and so majestic in it's stance.
Once again to create a substantial die cut that would be able to stand freely, I cut the deer four times before layering it together to create one solid die cut shape.
I then inked the deer with Distress Inks, creating pockets of light and shade to resemble his beautiful coat. I used the following inks:
Vintage Photo
Gathered Twigs
Ground Espresso
Frayed Burlap
Once happy, I then added some more shading using Polychromos Pencils and some black and white pen work.
The number 25 was die cut using the inner, solid parts of the Shadow Alphanumeric Die Set. Once again to create the look of chipboard, I cut four layers, layered them together and then painted them with Picket Fence Distress Paint. Once dry, I then used the Embossing Dabber over the top of each letter and embossed them with Emerald Creek Marshmallow Rock Embossing Powder to create a twinkly number 25.
Taking the previously painted small Vignette Frame, and a matching size of Vignette Panel, I attached the frame to the panel and then applied a good amount of Crackle Paste on the inside. As before, I accentuated the crackle by using Walnut Stain Distress crayon.
Place and attach the frame, so that it slightly overlaps the top of the crochet die strip and leave to set in place...
...and whilst this is happening, I cut my lettering to spell out "JOY" using the same die as I used to cut the number 25 but this time cut three layers of card and a final layer using the red glitter card from Sizzix's Festive Glitter and Pearl card pack. I then attached the wording inside the small vignette frame and added a few more gold stars, complete with Metallic Droplets in the centres.
We're nearly there and all that's left is to put everything together...
Attach the wreath using a little more cleverly disguised foam tape at the back and then placed the glittery number 25 in the centre. I also added some more of the leftover gold stars onto the background, attaching them with Matte Collage Medium.
Apply some Grit Paste to the top of the small frame on the inside, allowing a little to cascade down the sides and then place some Baubles in clusters on either side.
Lightly brush a layer of Matte Collage Medium over the top before sprinkling with Mica Flakes and Rock Candy Glitter.
Place some more foam at the back of the deer and attach to the right hand side of the wreath, placing his feet in the glistening grit paste snow that is sitting on the top of the small vignette frame.
You can see in the photo below how much dimension is in this piece...
As a finishing touch, I added two buttons to either side of the Crochet border and a flat backed pearl in the centre.
I hope you've enjoyed the tutorial and seeing how I put this winter wonderland together! As always, it was such a fun project to work on and the dies are so beautiful, it always makes it so easy to come up with ideas ~ everything works together so well! If you have been inspired by this project, then I'd love to see what you make, so please leave a message here or just tag me on social media and I'll pop by to say hello!
Thanks so much for stopping by today and see you again soon!
Stay safe ~ love Emma xx
Recipe for project:
Stampers Anonymous: Speckles Layering Stencil
Tim Holtz Idea-ology: Tiny Bells, Bauble Adornments, Metallic Droplets, Framed Panel, Vignette Frames, Christmas Trim Tape, Vignette Panels
buttons and flat back pearls from my own stash


So. so beautiful! I love how you edged it with Trim Tape, painted the deer and that wreath...well, that is just stunning.
ReplyDeleteGorgeous Emma!
ReplyDeleteThis is spectacular. I love the details
ReplyDeleteWoW Emma! This is mind Blowing!! Loving all the details and layering. Thnx for sharing my lovely friend xxx
ReplyDeleteWow, your festive frame is delightful! I enjoyed seeing how it all came together with all the amazing detail that you created - so beautiful 😀. Wishing you a very happy Friday and weekend! Hugs, Jo x
ReplyDeleteGORGEOUS!!!
ReplyDeleteoh wow, this is just gorgeous! so many inspiring deatils!
ReplyDeleteJust saw this on Pinterest....so beautiful!
ReplyDeleteThis is such an awesome project, I just fell in love with it! I'm checking supplies and purchasing what I don't have. May I ask what colour PaperArtsy Chalk Paint you used? Thanks so much for inspiring all of us!
ReplyDeleteThank you so much for your lovely comment Shirley and the colour of the PaperArtsy Chalk Paint is called Heavy Cream and is available from Simon Says Stamp:
Deletehttps://www.simonsaysstamp.com/product/Paper-Artsy-Fresco-Finish-HEAVY-CREAM-Chalk-Acrylic-Paint-ff203-ff203pa?currency=USD
Hope that helps and once again…thanks so much for your kind words! xx
I am speechless…this is just ……speechless
ReplyDelete