Monday 26 October 2020

Together ~ It's A Wonderful Life...

Hello everyone...

Hope you all had a wonderful weekend and you're ready to join us for the brand new Simon Says Stamp Monday Challenge! This week our theme is all about being MOVIE INSPIRATION and whatever movie you choose as your inspiration, the DT can't wait to see what you make!

For my project I was in the mood for Christmas and when it comes to Christmas, I think we all know and most of us love, this movie classic ~ IT'S A WONDERFUL LIFE...a film that I watch every single year, curled up on the sofa with a hot chocolate and some of my favourite cookies!

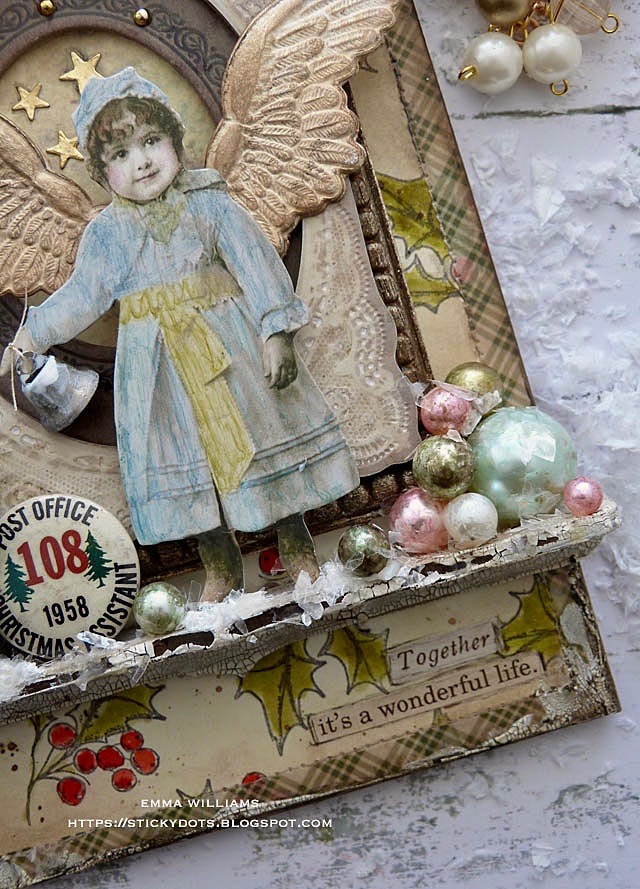
So with this in mind, I wanted to recreate the storyline of this film and I created an Etcetera Tag using Tim Holtz and Stampers Anonymous products inspired by the famous line from George's daughter, "every time a bell rings, an angel get's his wings".

...and here's how I created this movie inspired project!

To begin with I created the background for my Mini Etcetera Tag and decided to use the Sketch Greenery stamp set from Tim Holtz and Stampers Anonymous. I cut a panel of Heavystock Mixed Media Card using the tag as a template and then inked the holly stamp with Black Soot Archival Ink, stamping the image to create a random pattern over the entire panel of card.

Once I was happy, I watercolored the stamped images using Peeled Paint, Forest Moss and Festive Berries Distress Inks. I allowed for the panel to dry before inking the background with Old Paper and Pumice Stone Distress Inks before flicking some Ground Espresso Distress Paint across the surface.


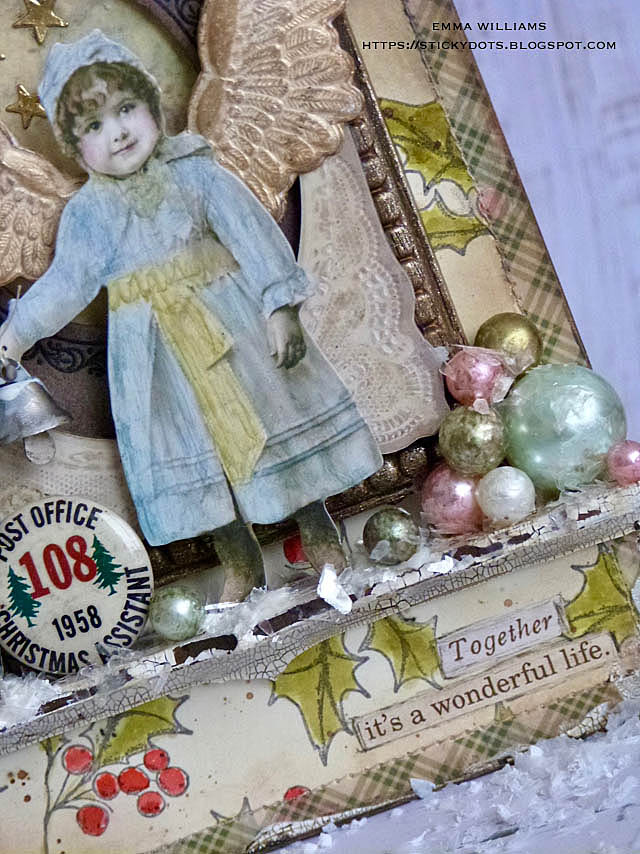
After applying the green Christmas Design Trim around the edge of the stamped panel, I machine stitched a border and then attached the panel onto my Etcetera Tag, using Matte Collage Medium. To complete the background I added some Grit Paste through the Sparkle Layering Stencil and set it to one side to dry. I also applied a small amount of Crackle Paste to the edges of the tag, and once it was dry, I applied some Walnut Stain Distress Crayon over the top.

Whilst that is happening, I moved onto my frame and used the second largest Vignette Frame, together with a Halloween Baseboard Frame that I had in my stash from last year and a final layer of a Lace Baseboard Frame. I painted the wooden vignette frame with a coat of Ground Espresso Distress Paint, allowed it to dry before dry brushing Antiqued Bronze over the top. Again I allowed for this to dry and then added a touch of Gilding Wax to the frame to accentuate the beading detail.

I layered and attached both Baseboard frames to the painted wooden frame and then adhered a piece of inked card behind the aperture section before attaching my layered frames onto the tag. 

I also placed some gold metallic droplets around the edge of the inner frame, together with three small gold stars in the top left hand corner of the aperture ~ these stars are die cuts that are left over from a previous project and I keep for these little embellishments.

Underneath the frames I added a ledge for the Christmas tree and my little girl to stand on and for this I used two of the medium sized Bracket Etcetera Trims, in various widths. I painted the trims with Picket Fence Distress Paint before adding a layer of Crackle Paste over the top.

Once the paste has done it's thing and the crackles appear I then attached the narrower trim directly onto the tag, placing it underneath the frame and then attaching the wider trim above it, placing it at a 90 degree angle so that it forms a ledge.

It's now time to have some fun and tell the story of the movie...

I started by using the image of the little girl which I took from Tim's Christmas Paper Doll set and coloured her with Distress Crayons in Faded Jeans, Peeled Paint, Gathered Twigs for her hair and boots and a touch of Aged Mahogany on her cheeks.

You'll notice that the little girl is carrying a bell and this is because in the movie, George's youngest daughter explains to him how every time a bell rings, an angel earns it's wings, so I decided this would be a sweet touch to my little girl and used one of the Tiny Bells, painted with a touch of Picket Fence Distress Paint. I then tied the bell to her hand by piercing a hole through the Paper Doll and attaching the bell with a strand of cotton which I threaded through the hole.

The next stage is the angel wings and I used the Winged 3D Impresslits Die to die cut Distress Watercolor Card. Once I'd cut the embossed wings, I then spritzed them with a light misting of water, followed by Antique Linen Distress Spray Stain.

Heat dry the inks and then to create the shimmer I dry brushed some gold watercolour paint over the top, just catching the detail of the embossing.

Using 3D foam, I attached the wings to the back of the paper doll and then stood her on the ledge, again using foam to support her.

You can see from the image below how much dimension is in this project and that's all thanks to 3D foam!

Now for the tree...

I used the medium sized tree from the Woodlands set and dyed it with Peeled Paint Distress Spray Stain, just misting the stain onto the tree, dabbing away the excess and then letting it dry before applying Matte Collage Medium to the branches and sprinkling Mica Flakes over the top. Tap away the excess.

I placed the tree inside a Thimble that I altered with a little Mushroom and Gilded Alloy Alcohol Ink and attached it to the ledge with Matte Collage Medium....

....before placing a Vintage Flair Badge next to it. These Flair badges are amazing and I've actually bought a couple of packets because I just love them so much and want to keep one just to look at...lol!

To complete the ledge, I added some Baubles, yes the famous baubles that I will admit to stockpiling for all year round because I love them so much ~ I coloured with Mushroom, Sherbet, Moss and Aqua Alcohol Inks. I then just piled and attached all those baubles onto the shelf, brushed a good coverage of Matte Collage Medium over the top and sprinkled Mica Flakes, allowing the flakes to just randomly fall like snow onto the ledge.

At the top of the frames, I attached a Special Delivery Snippets Ephemera piece, together with a Mini Hardware Pull that I altered with more of the Gilded Alloy and Mushroom Alcohol Inks. I wanted to add some more texture to the top of the frame and for this I used a few more of those baubles which I coloured with the same alcohol inks as before and then applied more collage medium and sprinkled some mica flakes over the top.

To complete the pull, I added two Hardware Heads on either side of the metal embellishment and I also painted two of the larger heads red and placed these in the top left and right hand corner of the tag.

We're nearly there and all that's left is to add the title...'Together, It's A Wonderful Life" and I took these tiny quotes from the Christmas Sticker Book and placed them in the bottom right hand corner, adding some black pen to shadow around each of them.


I hope you've loved this project and the film inspiration that I used to bring the story to life ~ it was so much fun to search through my stash finding all the elements that I could use and it all came together so well!

As always, if you use any of my ideas or projects as your inspiration, then I always love seeing your makes ~ so, just tag me on social media or leave me a message and I'll be sure to pop by as soon as I see it!

Don't forget that every week, one lucky random participant has the chance to win a $25 gift voucher from Simon Says Stamp and you can join in up to 5 times, which means you could have 5 chances to winYou have until Monday 8am Ohio time. 1pm UK time, 2 pm CET to join in and good luck....


Thank you so much for taking the time to stop by today ~ stay safe and well, and see you again soon, love Emma xxx

Recipe for project:

Monday 19 October 2020

A Taste Of Poison...

Hello friends and happy Monday!

It's time for the brand new Simon Says Stamp Monday Challenge to begin and this week we hope you'll join us because we're inviting you to create anything but NOT A CARD! So, whether you choose to create tags, gift bags, scrapbook layouts or home decor pieces, we can't wait to see what you'll be making and hope you'll play along!

For my project, I chose to make a home decor piece that will be ready to add to my Halloween display and for those of you who popped by last week, you might remember that I created a spooky apothecary box using bottles to bring the piece to life. So, with this in mind, and together with my current addiction of altering bottles, I decided to carry on and make what I think could be my final halloween project of 2020 (but never say never), using the same techniques as I used to create the larger bottles, but this time scaling down and using the process on the smaller corked vials to create a miniature display and this is the project I created....


It's time to get started and here's how I created my Vignette Coffin Apothecary Cabinet!

I started by creating a selection of corked vial bottles, apothecary bottles and tiny vials ~ 9 in total and all various sizes and shapes. If you click....HERE, you can read all about how I do this in my previous post but in this piece, I chose to use different colours of alcohol inks to the bottles.

On each bottle I added twine around the necks and some tiny labels that I collected from the Halloween Snippets Ephemera!

Moving on to the vignette coffin, which unfortunately has now sold out at SSS but if you can't find this, or you don't already have it in your collection, then you can still create this project ~ just use one of Tim's other Vignette Boxes, all of which can be found here!

Back to this and taking the coffin, I decided to turn it upside down so that the narrowest point would be at the top and the shelf nearer the bottom. I started by painting the outside of the coffin with Walnut Stain Distress Paint. Allow the paint to dry before adding the next layers, Antiqued Bronze and Black Soot, using the dry brushing technique and letting the paint dry between applications.

Once I was happy with the colour, I applied the neutral pinked edge tape trim, from the some Halloween set and added this to the raw edge around the front of the coffin...

...before covering the inside of the coffin using papers from the Departed Paper Stash, adhered into place with Matte Collage Medium. Whilst the papers were still damp from the medium, I made small tears, to look as if the paper is peeling on the inside of the box.

To complete the coffin, I added some Crackle Paste on the outside and also over the top of the tears before leaving this to dry and crackle. Once that's happened, I accentuated the texture with a little Walnut Stain Distress Crayon, applied directly over the crackle paste and then blending out the colour using a damp paint brush.

Where the shelf sits across the coffin, I added a Web Trim, adding some Translucent Grit Paste to the surface to create a more aged feel.

...and then, using the Pinked Etcetera Trim, I attached this directly along the edge of the shelf that is already inside the box, and this will extend the depth of the original shelf so that I can fit more bottles inside. I painted both of these pieces using the same colours of Distress Paint as I used on the outside of the box.

On the back wall of the upper section of the coffin, I used one of the Halloween Layers and attached this to the inside using foam pads.

Okay so, leaving the coffin to one side to dry so everything becomes securely attached, we can move onto the next stage....the Entomology beetle that sits in pride of place....

....and for this I used the base of a Corked Dome, an Entomology Adornment and a Vignette Finial piece, which once again was painted using the same colours as on the outside of the coffin.

I altered and coloured the Entomology piece using alcohol inks, choosing Envy and Mushroom and painting them directly onto the metal. I then attached the adornment onto a Memo Pin using Matte Collage Medium handset this to one side to dry ~ preferably overnight.

Once it is dry, I stuck the pin into the corked section of the dome and added some moss around the base before wrapping some twine around the corked base.

Now for the fun part and to add some lights and for this I actually used two sets ~ adding the purple lights from the Halloween set to the bottom section and the clear lights into the top section. I drilled two small holes in the back of the coffin, ensuring that the holes would be in the right place for each set of lights to illuminate the top and bottom sections.

I then threaded through the purple lights, and attached them underneath the shelf using hot glue.

The clear lights were threaded through the top section, and glued along the base of the shelf, so that these will sit behind the bottles once they are added.

So with all the lights in place, I adhered the battery compartments onto the back of the box and then, attached all the bottles and the corked dome onto the shelf using Matte Collage Medium. 

I also added a couple of Resin Skulls altered with Gilded Alcohol Ink to give them a metallic finish and inside one of the bottles, I placed some boneyard findings, spilling out of the corked vial.

To add some texture, I dyed a strip of Mummy Cloth using Pumice Stone and Frayed Burlap Distress Spray Stain and then placed the dried cloth in and around the base of each bottle, together with some floristry fibres. To complete the shelf, I added some moss.

In the bottom section, I used one of my favourite pieces from the halloween Baseboard set ~ the poison label. 

What is so cool about these pieces is that they are really thick and solid, so this means you won't need to back them to make them substantial when using them on these kind of project and all I did was add a small wooden block behind the piece and then use a line of Matte Collage Medium along the bottom before placing it inside the coffin, surrounding it with some more of the dyed Mummy Cloth.

I completed this section by adding a small label from the Field Notes snippets Ephemera set, which I slightly crumpled before inking around the edges and then attaching it with more collage medium. I also hammered a couple of nails into the base of the coffin, and these are from the Vignette Hardware set.

We're nearly there and just need to add the finishing details...

I placed a Hardware Knob on the top of the box, altered with a little Black Soot, Ground Espresso and Antiqued Bronze Distress Paint and attached the remaining Mummy cloth around the knob and the top of the box.

I hung a Halloween Word Token, altered with the same paint colours...

...and finally added some hinges and hardware heads to the sides of the coffin.

As my finishing touch, I added the Established 1876 sticker along the bottom edge of the coffin.

So, that completes this week's project and I really hope you love what I've made and might be inspired by some of my ideas to create some Halloween home decor pieces of your own and if you do share them on your social media platforms, don't forget to tag me so that I can pop by to take a look!

Don't forget that every week, one lucky random participant has the chance to win a $25 gift voucher from Simon Says Stamp and you can join in up to 5 times, which means you could have 5 chances to winYou have until Monday 8am Ohio time. 1pm UK time, 2 pm CET to join in and good luck....


Thank you so much for taking the time to stop by today ~ stay safe and well, and see you again soon, love Emma xxx

Recipe for project:

Stampers Anonymous: Web Trims, Pinked Etcetera Trims
Distress Paint: Black SootAntiqued Bronze, Walnut Stain, Ground Espresso
Moss and florist fibres from my own stash
Powered By Blogger

Total Pageviews