
I can't quite believe that we're already in June ~ where did those 6 months go?!?! It's crazy, isn't it? But we can't hold back time and as always the start of a new week, means it's time for the brand new Simon Says Stamp Monday Challenge and this week, we feel that love is in the air with our theme all about Weddings or Anniversary! The DT are also showcasing Prima Marketing products within their projects which is something you don't have to do but with so many lovely products to choose from, it might be hard not to get tempted. So, if you'd like to join us and play along with this fun challenge, then we would love to see how you interpret the theme and see what you create...
For my project, I decided that when it comes to an anniversary or a wedding, everyone needs a card and what better way to show someone the love that to give something that comes from the heart and is handmade. So, with this in mind and because summer and weddings are a match made in heaven, I made this elegant, vintage style card, perfect for the big day and a card that is full of layers and dimension and is all about die cutting!!

So, let's get started and here's how I created my project...

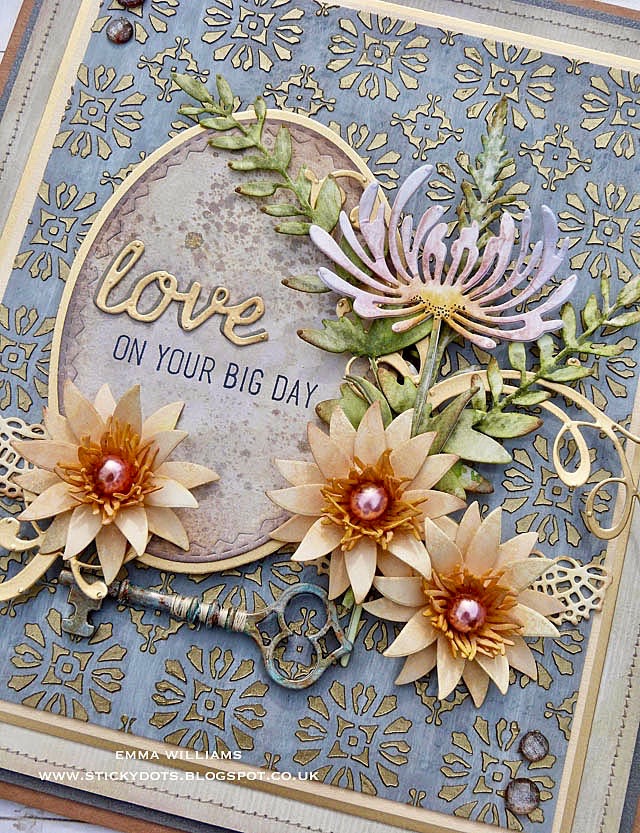
To begin with I chose a colour theme that I really love, grey and soft pastels, including pinks, peaches and green and I started by creating the background for the whole piece.
I cut a panel of Heavy Stock Mixed Media card, just because I know this card will take everything I throw at it and applied a layer of Hickory Smoke Distress Paint over the top. Once this layer was dry, I then added some Picket Fence Distress Paint, dry brushing the paint over the top of the previous layer but not adding too much white.
I dried the surface thoroughly and then placed the Rosette Layering Stencil onto my coloured card. This is a great stencil as I can repeat the pattern, across a larger area and create the perfect, seamless design. Starting with the stencil on the left hand side of my card, I then used a palette knife to apply some White Gold Icing Paste through the stencil. I have never used this medium before but I was really impressed with it, it creates the most gorgeous finish, dries quickly and is so easy to use ~ I'll definitely be buying some more colours!
Lift off the stencil and then lay it down to repeat the right hand side, lining it up so that you get that seamless design.

I allowed for the paste to dry before inking the edges with a little Walnut Stain Distress Ink.
I now matted the background onto a piece of cream card, followed by some gold metallic kraft stash, each time leaving a narrow border around the outside. To create my card base, I mounted the layers onto some stitched card that I coloured with Distress Paints and a layer of charcoal grey card, before adhering the FIVE layers onto a 20 x 17.5cm kraft card blank.

Now that I have my base, I can move onto the embellishments and make that gorgeous bouquet of flowers! I wanted to add a real touch of elegance to this card but also add dimension to this card and with this in mind, I used a combination of Wildflower Stems 1, Wildflower Stems 2, Funky Florals 3 and added some Adorned gold swirls into the mix.
I cut my selection of flowers from Distress Watercolour card, using various dies from the packs, and these all work together so well on the finished card. The longer stems that I used are all Wildflower Stems and the pink flower and foliage is all coloured with Distress Marker Pens and a touch of Peeled Paint and Mowed Lawn Oxide Inks.

The three layered flowers are cut from card using the spiky flower and stamen die in the Funky Florals 3 dies set. This is one of my favourite flower dies as it really does create some beautiful 3D blooms. For the base of the flower, I coloured this with Antique Linen Oxide Spray, just spritzed onto damp watercolour card and then dried with a heat gun. The centres are coloured with a combination of Fossilized Amber Oxide Spray, Fossilized Amber Distress Spray Stain and a hint of Wild Honey Spray Stain. I then layered my die cuts, slightly offsetting each layer as I attached them and shaped the petals and centres. For the centres, I added some Baubles that I coloured with Pink Sherbet and Mushroom Alcohol Ink before adhering onto my blooms with Matte Collage Medium.

I now have all my flowers to create the bouquet and setting these aside, I cut a Stitched Oval from Distress Watercolour Card, and lightly misted the card with water before spritzing the surface with Frayed Burlap Distress Spray Stain and Antique Linen and Pumice Stone Oxide Spray. Once happy, I splattered some of the ink left on my craft sheet across the oval, heat dried it, inked the edges and matted it onto some gold metallic kraft stash.

To create the sentiment, I cut the 'Love' wording from gold metallic kraft stash, using the Valentine Side Order and then cut it again from grey card before layering the gold word over the top of the grey die cut to create the perfect drop shadow. I then adhered the word above the stamped wording, 'on your big day' which is one of the stamps from the Glorious Bouquet stamp set.
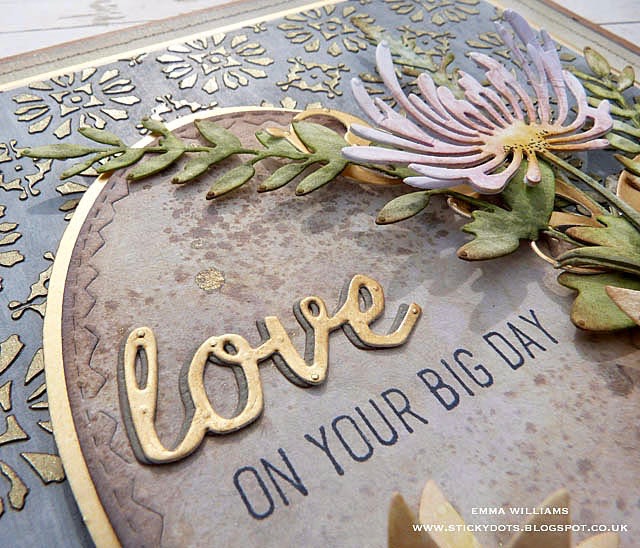
I attached the oval onto my card using foam pads, placing it over the top of a border of Crochet lace, which again is die cut, using the gorgeous Crochet die set that Tim and Sizzix released earlier this year. Now all that's left is to attach the floral bouquet around the oval die cut and to create a touch of opulence, I used the Adorned die to die cut gold metallic card and added some swirls into the bouquet.


To complete the arrangement, I added a key adornment, which I altered for a more vintage feel using Evergreen Bough, Picket Fence and Antiqued Bronze Distress Paint. I added some cotton thread which I wrapped around the key and then attached it at the bottom of my arrangement.

The finishing touch to this card was some crystals and I used the Amber Moon Say It With Crystals, from Prima and placed these in the opposite corners of the card.

So, that completes this week's project and I hope it's inspired you with some ideas of how you can use dies to create some gorgeous focal points on your cards!

Have fun creating your projects and don't forget, you can find more inspiration from my talented teamies over on the challenge blog and every week, one lucky random participant has the chance to win a $50 gift voucher from Simon Says Stamp. You have until Monday 8am Ohio time. 1pm UK time, 2 pm CET to join in and good luck....


I'm now off to enjoy some cake and bubbly because today is my birthday but before I go ~ thank you so much for taking the time to stop by today and really hope to see you again soon, love Emma xxx
Recipe for project:
Tim Holtz/Stampers Anonymous Layering Stencil: Rosette, Glorious Bouquet
Tim Holtz/Sizzix: Wildflower Stems 1, Wildflower Stems 2, Funky Florals 3, Crochet, Adorned, Valentine Side Order, Stitched Ovals
Distress Oxide Sprays: Fossilized Amber, Antique Linen, Pumice Stone
Distress Oxide Inks: Peeled Paint, Mowed Lawn, Frayed Burlap
Distress Ink: Walnut Stain
Distress Spray Stain: Fossilized Amber, Frayed Burlap, Wild Honey
Distress Paint: Hickory Smoke, Picket Fence, Evergreen Bough, Antiqued Bronze
Distress Marker Pens
alcohol Ink: Mushroom, Pink Sherbet
Distress Marker Pens
alcohol Ink: Mushroom, Pink Sherbet
Idea-ology: Key Adornments, Bauble Findings
Mediums: Matte Collage Medium, Black Soot Archival Ink
Surfaces: Distress Watercolor Card, Heavy Stock Mixed Media Card, Metallic Kraft Stash, Kraft Card, SSS Three Shades of Grey Card
Prima Marketing: White Gold Icing Paste, Amber Moon Crystals
Surfaces: Distress Watercolor Card, Heavy Stock Mixed Media Card, Metallic Kraft Stash, Kraft Card, SSS Three Shades of Grey Card
Prima Marketing: White Gold Icing Paste, Amber Moon Crystals


Emma! Oh my goodness! Where to start with the compliments. This is so stunningly gorgeous and well thought out and really just shear perfection! 5 layers of love and colors of hope!
ReplyDeleteI am speechless over this beautiful design and perfect color harmony! Love this Emma!
ReplyDeleteThe rosette design in the background is phenomenal. You have used the Prima White Gold Icing Paste so beautifully. It's a product I didn't know I needed, but thanks to you I do.
ReplyDeleteBreathtaking! I am new to mixed media and looking at this masterpiece I am so inspired to try new things. Thank you for that!
ReplyDeleteThis is an Amazing card Emma !! Love the layers, all the gorgeous details, and the lovely colours you have chosen! Congrats !
ReplyDeleteWish you a very nice Friday,
Big hugs, Caty
Beautiful and elegant, Emma! Your flowers are downright gorgeous! hugs, Maura
ReplyDeleteHi Emma, I have started work on my version of the High Voltage project that you posted for the 2019 Creativation Blog Hop and I have a couple of questions, please. I am trying to figure out the paper placement and also the spacing of items...did you cut the tag down to 11"? Also, did you paper-piece the paper for the background? And, I am thinking the largest piece of the layered paper stack for the words to set on is 1.5" tall, and the striped paper is 3/4" tall? Any help would be greatly appreciated, thanks...Sherry
ReplyDeleteHi Sherry... I haven't got the original project but I'm more than happy to help you out as much as I can and I hope from memory that all the measurements will be ok, lol! The original Etcetera tag wasn't cut down, it's exactly 12" in height ~ I used the 12' x 12" sheet of paper from the Dapper Paper Stash and then adhered this onto my tag, placing the paper so that it shows a hint of the design at the top! At this stage, you will probably have a slight gap at the bottom and that's where the striped paper is adhered, so that it hides it and fills in the gap. I think this is approx a 1.5cm to 2cm strip which is then attached along the bottom of the tag. In total the 3 layers that I used on the layered paper stack is approx. about 3cm (just over 1" in height) and the main gold panel that I've attached the letting to, is probably about 2cm! Hope that helps and I'd love to see the finished project, that would be fabulous! :) Happy Sunday... Emma x
DeleteGreat, thanks for the information...now as Paula says, I will "carry on"...LOL.
DeleteSuch a stunning card, Emma! love the amazing flowers and the texture paste is so lovely. Hugs, Sandra
ReplyDeleteAn absolutely gorgeous card, Emma . The colour palette, the beautfiul floral die cuts,the design and composiiton all come together in harmony to create a stunning result. Truly bespoke
ReplyDeletebig hugs x
Fantastic creation! So inspirational! Thanks
ReplyDeleteLovely !!!!
ReplyDeleteThis is a beautiful card. Could you tell me what size this card is an inches the finish size please
ReplyDeleteThank you so much for your kind words, and so happy you loved this card. The finished card measures 20 x 17.5cm and I hope this helps but if you have any further questions, please don’t hesitate to message me! Happy new year…
Delete