
This week our theme is called GOING AROUND IN CIRCLES and we hope you'll play along with us and join in with this fun challenge.
For my project I created a vintage style panel called Now Is The Time, packed full of Tim Holtz products and using a circular base with layer upon layer of dimension and details, which just so happen to all be....circular! This project also shows you how you can create this look by using nothing but card or chipboard, paint and alcohol inks!

So, let's get creating ~ it's time for this week's challenge to begin...

To begin with I used a 20cm circular MDF panel that I had in my stash, but if you haven't got one of these, chipboard or thick cardboard will do just as well.
I adhered a piece of script paper, (you know I love my script on backgrounds) from the Dapper Paper Stash and attached the paper to the board, using Matte Collage Medium. I also applied a layer of the medium over the top to seal the paper.


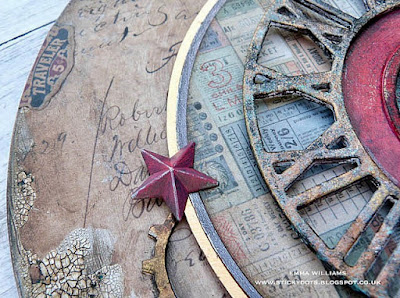
Once the surface was dry, I then applied Gathered Twigs Distress Crayon around the edge, smudging the colour with my fingertips to create areas of light and shade to the background.
To add some texture to my background, I smeared some Crackle Paste over the edges, allowed the paste to dry and work it's magic before applying some more Gathered Twigs Crayon, but this time using a water brush to spread the colour and allow it to sink into the crackles.

To create the smaller layered circles in the centre, I cut the ticket design paper from the Correspondence Paper Stash to measure, 14cm in diameter and matted this onto black card, followed by a layer of copper coloured Metallic Kraft Stash, each time leaving a border showing around the outside. I then mounted this panel onto foam pads and attached it to the centre of the covered board.
Setting the panel to one side, I moved onto the those layers and started with the clock which is a combination of three Tim Holtz dies, Timekeeper, Steampunk Parts and Industrial...
To begin with, I used the new clock die, Timekeeper and cut the clock face only ~ cutting it twice from chipboard that I then layered together to make one complete, thick substantial piece.
I then primed the surface of the clock using gesso and once the gesso was dry, I added the colour. I started by adding a layer of Black Soot Distress Paint and dried the surface. TOP TIP: Dry each paint layer between application as this allows each of the colours to show and not create a muddy mess!
Once the Black Soot layer is dry, start layering more colour starting with Antiqued Bronze, heat dry and then add, Evergreen Bough...heat dry and then add some more Black Soot, each time dipping your brush into the paint colour and then removing the excess paint onto a tissue before applying the paint to the clock face, using a stippling motion.
 Once I was happy with the paintwork, I moved onto the central section of the clock and remember when adding any paint to the die cuts, you can apply more colour of any one of the individual paints if you feel it needs it, just keep stippling but never overload the brush with paint ~ less is more!


To create the central section of the clock, I used the Steampunks Parts die and used the two circles and the smaller locking wheel fitting on this die. I cut the two circles, the large one and the smaller one ~ I also kept the negative circle form the centre of the die. I then placed the smaller inner circle onto the larger piece before priming the chipboard with gesso. After drying the gesso, I coloured the circle with Candied Apple Distress Paint, heat dried the surface and then dry brushed Black Soot over the top. Taking the negative circular piece of chipboard and the locking wheel fitting, I painted these pieces with the same colours as I used on the clock face. I also cut one of the tiny bolts from the Steampunk Parts die and again painted these in the same colours.

Once all my painted pieces were dry, I assembled the clock, adding the red circular layer behind the clock face. I then mounted my clock face to the centre of my covered board, placing it onto foam pads to add dimension and attaching it in the middle of the circular inner panels. I then popped the painted circle, the one that we kept from the centre of the die and painted the same colour as the clock and placed this into the middle of the clock.

Now to make all those cogs and for these, I used a combination of die cuts and wooden cogs by Kaisercraft. I painted the wooden cogs using Antiqued Bronze, Evergreen Bough and Black Soot Distress Paints and set them aside to dry.

With those to one side, I then covered some chipboard with a sheet of Metal Foil Tape and ran the covered chipboard through my machine using the Industrial die.
Taking a selection of various sized die cut cogs, I coloured them using alcohol inks and an alcohol ink applicator and applied Pitch Black, Rust and Patina to the surface before then attaching these to my panel. I arranged these together with the wooden cogs and some metal sprocket gears and placed them all around the bottom of the clock face, in the top right hand corner of the panel...
 ...and then, completed the clock by adding a final cog to the centre.
 You'll notice that I have attached the cogs at all varying heights to give more dimension and interest to the project.
 I then added some Tim Holtz Hardware Heads onto the cog in the centre of the clock before fixing the locking wheel fixture to the centre.
 I also added some Prima hardware accents to the centres of the cogs.


As a finishing touch to all my die cut pieces, I added some Vintage Gold Alchemy Wax by applying it over the top of the paintwork and the metal cogs to add some highlights and definition to each of the pieces.
We're nearly there and it's now about those final details and adding my paper doll. I chose this little boy for this project, he fit the piece perfectly and once I'd coloured him with Distress Marker Pens, I attached him with foam pads and placed him on the right hand side.


For the final finishing touches I added a Foundry label 'number 543', nestling it amongst the cogs at the bottom of the panel and then placed a clippings sticker to tell the story ~ now is the time.

Finally, I added a red star adornment to complete the panel...

I really hope you've loved how I created this piece ~ I honestly think it's one of my all time favourites that I've ever made and I've made a lot over my time but I was just so happy with the finished project!

Don't forget, you can find more inspiration from my talented teamies over on the challenge blog and every week, one lucky random participant has the chance to win a $50 gift voucher from Simon Says Stamp. You have until Monday 8am Ohio time. 1pm UK time, 2 pm CET to join in and good luck....
Also if you're looking for some more inspiration using circles, then check out one of my previous projects, Circle of Life, which I hope gives you some more ideas of how to incorporate shapes into your projects.


Thank you so much for taking the time to stop by today and hope to see you again soon, love Emma xxx
Recipe for project:
Distress Paint: Black Soot, Evergreen Bough, Antiqued Bronze, Candied Apple
Distress Crayons: Gathered Twigs
Distress Marker Pens
Alcohol Inks: Gold Mixative, Pitch Black, Rust and Patina
Distress Crayons: Gathered Twigs
Distress Marker Pens
Alcohol Inks: Gold Mixative, Pitch Black, Rust and Patina
Heat Gun
Palette Knife
Chipboard and circular panel from my own stash
Entered in Sandee and Amelie's Steampunk Challenge
Palette Knife
Chipboard and circular panel from my own stash
Entered in Sandee and Amelie's Steampunk Challenge


My lovely Emma, this is stunning!!! I love all the details, especially the clock xx
ReplyDeleteChristina
This project is gorgeous, Emma, especially the colors and details. I do believe it is one of my favorites, too. It is just so appealing in so many ways, the realistically "rusted" gears, the red color pops, and the clock face. Magnificent!
ReplyDeleteOh my goodness Emma, this is absolutely AMAZING!! I have spent ages admiring this work of art! what a stunning piece!!! *thudunk*
ReplyDeleteHope you have a great week!
luv
Lols XXX
I need to invent new words in order to be able to comment on your projects!
ReplyDeleteOh, I do love me some steampunk, Emma, and yours is magnificent!! LOVE IT!!! What can I say? - images, textures, all the cool gears, clock, metal, crackle - it is all fantastic!! One of my faves!! hugs, Maura
ReplyDeleteThis is stunning
ReplyDeleteHow cool to have this whole thing in a circular shape! It is stunning. I love how you used circles in so many different ways, too!
ReplyDeleteAn absolute Stunner , Emma . Esy to see why you were so hapy with the finished project . Love the focal feature built up of all those layers of various circles -really eyecatching. Art on the round at its absolute best!!
ReplyDeleteBig hugs and hope you are ok . xx
I love the gorgeous colour tones and textures you achieved on the circles, they are truly amazing. Fabulous work!! Many thanks for sharing with us SanDee's and Amelies Steampunk Challenge!
ReplyDeleteAnother amazing project of yours! Love the shape and the colors and all that you made on this panel. This is fantastic how everuthing works together perfectly in shapes and shades. I really adore this one!
ReplyDeleteAnother stunning project!! Your way to use Tim's products is absolutely fantastic! Every week you create a masterpiece! Chapeau!
ReplyDeleteBarbara
Oh, wow! So beautifully put together and with so much attention to detail! A fantastic make! Thank you so much for sharing it with us at SanDee&amelie's Steampunk Challenges!
ReplyDeleteClaudia x