I hope you all had a wonderful week and to all my friends in the USA, I hope you had a very happy Thanksgiving!
Today, we start a brand new challenge over on the Simon Says Stamp Monday Challenge Blog and this week the challenge is inspired by my talented teamie, Cheiron and the theme is ~ A Gentleman Caller! Will you be inspired by the elegant gentleman stamps by Tim Holtz or do you have any other ideas! Maybe a gift for a modern gentleman or a greeting card featuring a gentleman from ye olde days! Whatever you choose, we can't wait to see what you create!
For my project, I chose to alter a frame and make a piece of home decor inspired by a Festive Gent, rushing through the snow on his way home for Christmas!
...and here's how this project started life, as a boring old black frame that I picked up for £1.00 and which has been sitting in a box ever since, just waiting for the right project!
Originally, I thought I would create a shadowbox as the frame was quite deep and it was the obvious choice. I'd even made the background and everything but when I started to construct it, I just loved how the gentleman looked in the open recess, with an archway of metallic festive foliage above his head and that's what I decided to keep!So to begin with, I removed the backing and the glass from the frame and gave the front and back, a good coat of gesso! Once dry, I then painted the frame with a coat of London Night Fresco Finish Chalk Paint and let this layer dry thoroughly. I added a layer of Crackle Glaze over the top, again let it dry before adding a thick coat of Snowflake Fresco Finish Paint over the top and watched the crackles appear.
After sanding back some of the paint around the edges, I then added small amounts of Gold Mixative Alcohol Ink to create a worn, vintage look and my frame is now complete!
To protect the frame, I applied a coat of Multi Medium over the top of the paintwork.
For the next stage and the all important focal point I needed my gentleman and for this I used Tim Holtz's Festive Gent! If you don't own this die, then as an alternative, why not use the Festive Gent stamp from the Deco stamp set or maybe the Prancing Deer or the Angelic dies ~ these would work just as well with the techniques I've used.
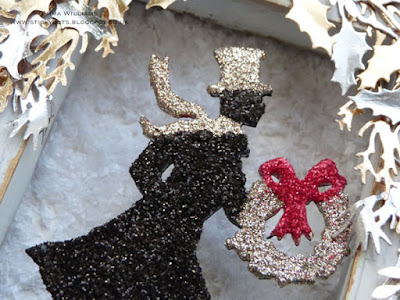
I die cut three pieces of thick chipboard, which I layered over the top of each other to create a dimensional figure that would be substantial enough to stand by itself. I then painted the figure with a coat of Gesso, let it dry and then painted over the top with Black Soot Distress Paint.
Once dry, I started to add the detail and to begin with, I added a layer of Glossy Accents over the entire surface of the figure and used my fingertip to smear the medium to create an even layer. I then sprinkled Black Soot over the top, tapped away the excess and left to dry. For the detail to the gentleman's hat, scarf and the wreath, I used the fine nozzle on the Glossy Accents bottle to add the medium and then sprinkled Distress Glitter Dust over the top and tapped away the excess. I would recommend that you dry each layer before moving onto the next, so that no stray glitter attaches itself to the previous layer.
For the final glitter layer, I added some Glossy Accents directly to the bow on the wreath before sprinkling Festive Berries Distress Glitter over the top. Set aside your sparkly gent whilst working on the next stage.
For the snow, I added a small amount of Texture Paste on the inside base of the frame and whilst it's still wet, sprinkled over some Shaved Ice, pressing down gently to make sure that it had all adhered to the paste.
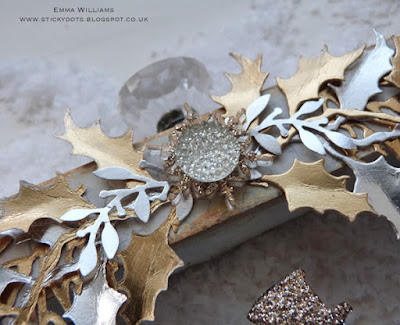
For the foliage that I attached to the frame, I used Metallic Kraft Core Card Stock, which I am LOVING at the moment. I wanted to create a perfectly symmetrical archway and to create this, you will need to die cut the first section of foliage for the right hand side, by placing the dies, cutting side uppermost, onto the plate, then place a piece of the card with the metallic side face down. Die cut your foliage and then, place the dies back onto the plate, cutting side uppermost and place the card with the kraft side facing down to create the foliage for the left hand side of the frame. This will create two sets of foliage which will mirror each other and form the perfect arch when attached to your frame.
Shape and attach your foliage around the top section of the frame and at this stage, I also used the laurel leaf punch and added these to the arrangement.Attach your sparkly gentleman using a glue gun and place him in the centre of the recess of the frame.
Remove a snowflake from the Frozen Alpha Parts, smear a small amount of Glossy Accents over the top, then apply some Distress Glitter Dust. Tap away the excess and attach the snowflake to the centre, where the foliage joins together. Add a Gumdrop to the centre of the snowflake.
Finally, I added a piece of ephemera from the Festive Ephemera pack, inked the edges with Vintage Photo and then matted this onto some more of the metallic card stock before mounting it along the base of my frame. As the finishing touch I attached a Curio Knob to the very top.
...and that completes my Festive Gent frame and I really hope you've loved the process behind this piece and the transformation from that black frame to what it finally became!
As always, if you need any further inspiration for this challenge, then you need look no further than our blog to see all the wonderful creations from all the very talented Design Team members and every week, one lucky random participant has the chance to win a $50 gift voucher from Simon Says Stamp. Good luck....
Just click on the link below to go shopping:
Thank you so much for all your visits today and hope you all have a great week ahead
See you again soon...love Emma xx
Products used:
Distress Ink: Vintage Photo
PaperArtsy Chalk Paint: Crackle Glaze, London Night, Snowflake
Distress Glitter: Black Soot, Festive Berries, Distress Glitter Dust
Chipboard and frame from my own stash


So amazing !
ReplyDeletebeautiful as always. love the interpretation you gave of this die. this is one stamp/die that never made much sense to me but now your idea is growing on me. thanks.
ReplyDeletegreat techniques that i might be borrowing, hugs xxxx
Love this Emma 😊 The festive gent is awesome and I love the glittery details, absolutely gorgeous
ReplyDeleteLuv
Lols x x x
Stunning project, Emma! Classy to the MAX! :)
ReplyDelete*mwah*
Steph
Simon Says Stamp!
Very nice! I love that gentlemen.
ReplyDeleteWONDERFUL project! LOVE the glittered gent on the glass!
ReplyDeleteGorgeous project! That foliage is stunning.
ReplyDeleteYour die-cut foliage is simply DIVINE (and the perfect spot for a gumdrop)!
ReplyDeleteWhat a great project, Emma! Love all the steps and how it turned out.
ReplyDeleteI love all the layers and that touch of sparkly snow at his feet is perfect!
ReplyDeleteOhh wow Emma. This is gorgeous and so elegant! Love this Christmas decor piece! The Festive Gent looks amazing with the different colors of glitter and the silver and gold foliage. Hugs, Sandra
ReplyDeleteStunning frame ! Love this project and your sparkling Festive Gent is absolutely fascinating! The foliage arrangement is AMAZING! Barbarayaya
ReplyDeleteLove how you framed him in the box! I think he looks awesome, and the gold leaves are wonderful. I tend to think of leaves for fall, and I am rethinking that, they are so pretty.
ReplyDeleteThis is so pretty Emma! What a great idea to place him in a frame and I too love the metallic kraft core cardstock.
ReplyDeleteYou had me with the gorgeous sprays of silver and gold draping down the sides and then the glittery handsome gent was the perfect image to lay into that frame. Beautiful!
ReplyDeleteHi Emma, this is just stunning, stylish and elegant. I'd forgotten about the Metallic Kraft Core card stock. I may have to track some down.x
ReplyDeleteWhat a great guy you've created here! You've created the perfect mix of manliness and elegance. I thought it was so clever of you to include the vintage ornament ephemera, too. Kudos to another job well done!
ReplyDeleteAnother Fabulous stylish creation! Emma. Wonderful crackled frame and both your sparkly gent and archway of foliage ( LOVE LOVE LOVE) exude elegance . Did I mention how much I love your foliage archway ? lol . Such a unique inspirational piece. Hugs xx
ReplyDelete