
Hello friends...
Hope you are all keeping safe and well in this crazy world that we're living in! Thank you for all the lovely comments that I received on last week's make, HOPE IS NEVER LOST ~ I think we're all thinking of our friends in the Ukraine at the moment and our hearts and much love is with them all.
This week, our theme for the Simon Says Stamp Monday Challenge is all about celebrating our FEMININE sides and with this in mind, I'm sharing a project inspired by my Nan, who was an amazing seamstress. The clothes she made were outstanding, and as a baby there are many photos of me sitting in my pram, dressed in her hand knitted jumpers and cardigans. I still have some of her beautiful pieces, including those baby clothes, and embroidered covers and cross stitch pieces, and I'm in awe of what she used to create! I had some very happy times, sitting with her for hours upon end, watching and learning and even though I used to be quite good at it, I'm not sure if I remember how to do it but maybe one day, I will try again and see.
But in the meantime, I translated her skills into paper craft and created a feminine project that is all about sewing and patchwork and used products from Tim Holtz and Sizzix to bring this piece to life, including those amazing Foundry Waxes that Tim shared with the world on Saturday! (REPLAY and Maker Inspiration HERE) If you haven't bought these yet....then go and get them whilst you can because they are soooo good!!!


Now some of you might be familiar with some of this make, as it began life as a project that I created using Tim's brand new Distress Archival Inks and Glazes. If you want to catch up with this release, then you can see the YouTube Live replay over on Tim's blog ~ HERE and below is what the make looked like at that point...

...but that was just the start and I took that make one stage further for this week's challenge and framed it in an embroidery hoop and then added a few more elements to the original piece.
To begin with I'm going to start with how I created the patchwork effect.
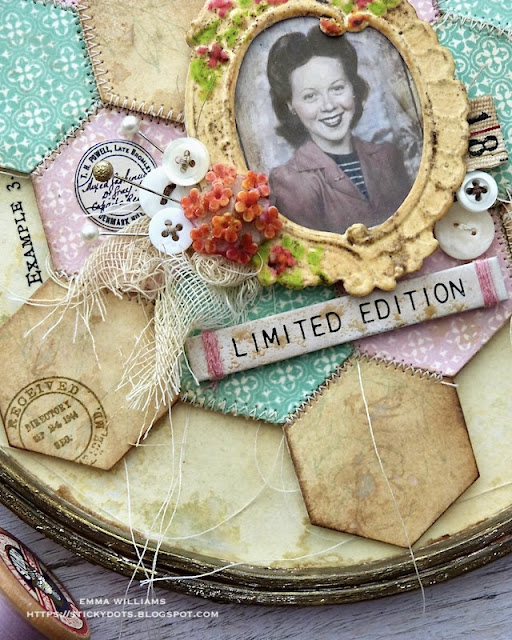
PATCHWORK
To create this I used one of the Stampers Anonymous Tiles and Mosaic stamps from the set by Tim Holtz and inked the stamp with Kitsch Flamingo from the Archival Set 4. I then stamped this directly onto Mixed Media Heavystock Card before repeating it a second time using Evergreen Bough ink, again from the same set.
For the final colour I used another piece of Mixed Media Heavystock card and inked this with a combination of Old Paper and Antique Linen Distress Spray Stains and Frayed Burlap Oxide Spray and after drying the card, I added some stamped layers using Speckled Egg and Frayed Burlap Archival Ink and the Floral Outline and Field Notes stamp sets.
I then cut a selection of patchwork pieces from all three colourways of cardstock, using the Sizzix Stacked Hexagon Thinlits Die Set by Tim.
After inking the edges of each piece, I arranged the tiles and adhered them to a piece of cardstock. I then cut around the edge of the tiles to form the outline of the patchwork piece.

Now for sewing all those tiles together to create the finished look and for this I used my sewing machine and used the zig zag stitch on each join.

You'll also notice that in the centre of this, I added two further hexagons that I stitched and then popped onto foam pads, before placing them directly onto the patchwork base. This just creates a little height in the centre.

The patchwork is now finished and ready to move onto the next stage.
EMBROIDERY HOOP
I used an 8" hoop and painted it with a layer of gesso to prime the surface. I then applied Walnut Stain and Ground Espresso Distress Paint, drying between layers before I added a layer of Antique Linen over the top, using the dry brushing technique and just allowing the brush to kiss the surface to create more of worn and natural feel to the wood.

Once the hoop is dry, I then added some of that amazing Foundry Wax that Tim bought to us on Saturday. I can't get enough of this stuff and I'm sure you'll be seeing a lot of makes over the coming months using it.
I just applied a light coverage of Gilded Foundry Wax onto the hoop and then heated the wax to set it.

For the background, I cut an 8" circle of card to fit the back of the hoop and inked the card with Antique Linen, Old Paper Distress Stains and Frayed Burlap Oxide Ink. I just wanted a very neutral background, that reminded me of parchment.

I then attached the card to the back of the hoop, adhering it with Matte Collage Medium before I mounted the patchwork in the centre, using foam pads to attach it and give it height.
DIE CUT FRAME
The frame is die cut using the Sizzix Floral Frame 3D Cut and Emboss folder by Tim and I cut two separate layers from the Mixed Media Heavystock card and then layered these together to form one frame which is more substantial in thickness.
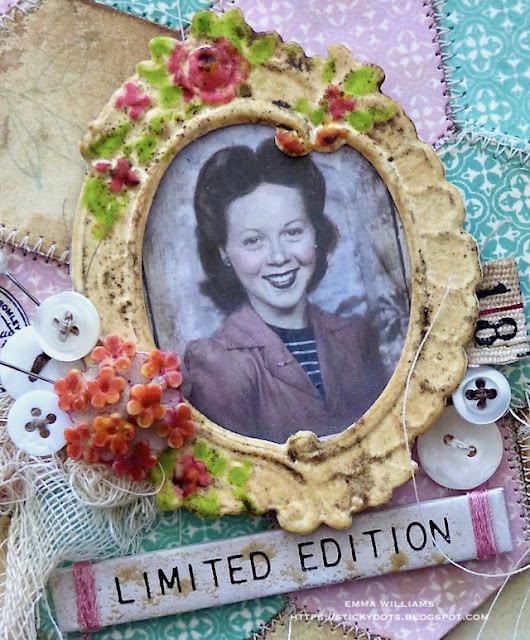
To colour the frame I used the Distress Glazes ~ Antique Linen, Picked Raspberry, and Twisted Citron.

After applying the Embossing dabber over the entire frame, I sprinkled Antique Linen over the top, tapped away the excess and then heat embossed the powder until molten.
To add the glazes to the flowers and leaves, I used the Embossing Pens directly onto the detail and then applied the individual colours to each section, heat embossing in between the layers.
To complete the frame, I used Walnut Stain Distress Crayon over the top, using my finger to get it into all those nooks and crannies of the embossing before I wiped away the excess.
I added a Photo Booth image behind the frame, water coloured with Distress Crayons and then attached the frame photo onto the centre of my patchwork.

EMBELLISHMENTS
Now for the all important details and embellishments.
First, I attached a Theories Quote Chip underneath the frame. I added a little Antique Linen Distress Glaze over the surface of the chip and once I'd heat embossed the glaze, I wrapped pink cotton thread around each end and then adhered the quote using foam pads.
I added some buttons, which I threaded and then attached around the frame together with some Mummy Cloth that I inked with Frayed Burlap and Antique Linen Sprays. I also tucked a tiny piece of ruler ribbon underneath the right hand side of the frame.
I tucked some pearl headed dressmaking pins into the buttons and adhered a Curator Snippets Ephemera piece into place, just left of the frame.
I also pinned a clippings sticker, Maggie Mae, which I attached onto a piece of calico and then added a Specimen Remnant Rub, 'Fig 12' underneath...

...before adding another remnant rub from the Labeled Set, "Example 3", on the left of the frame!

Finally, I took a Heirloom Floral and rubbed the Embossing Dabber over the top before sprinkling with Candied Apple and Wild Honey Distress Glaze, and then heat embossing.

I attached the floral to the bottom left of the frame.
To complete my hoop, I added seam binding ribbon at the top, coloured with Victorian Velvet and Antique Linen Distress Stains.

I hope you've loved today's make and enjoyed the techniques I've used to bring this all together.

As always, if you make anything, or if you've been inspired by anything that you've seen here on my blog ~ then please, let me know by tagging me on social media or leaving a comment here and I will be right over to take a look!
Don't forget that every week, one lucky random participant has the chance to win a $25 gift voucher from Simon Says Stamp and you can join in up to 5 times, which means you could have 5 chances to win. You have until next Monday at 8am Ohio time. 1pm UK time, 2 pm CET to join in and good luck....


Recipe for project:


Emma, this is spectacular! Your attention to details is outstanding! I love everything about this. What a wonderful tribe to your grandma!
ReplyDeletebeautiful work Emma! I love how you added the patchwork to the hoop! Its perfect!
ReplyDeleteWoW Emma! This is stunning. I love how you stitched the patchwork xxx
ReplyDeleteLove this project, Emma! The patchwork idea with the frame/photo and all the details wrapped up inside an embroidery hoop is just so stunning. Thank you so much for sharing this idea!
ReplyDelete