
Some of you might have noticed that I've been M.I.A. from the Simon Says Stamp Monday Challenge but don't worry, I will be back this coming Monday, I've just been absent because my Mum had a nasty accident and I've been looking after her! Unfortunately, she fell in the garden and after passing out from hitting her head badly, she was taken to the emergency department at our local hospital, and they found that not only had she hit her head, she was also pretty badly battered and bruised ~ her hip, neck and back all suffered injuries but it was her arm that came off worst and she'd suffered a severe break, displacing the bone and forcing it up into her shoulder! *wince* So, once they pushed, pulled and reset it, they applied the cast and we thought that with some gentle tlc she'd be on the road to recovery but no, nothing is that easy in our world, lol...she was rushed back into hospital a week later only to find, they hadn't set the bone properly the first time, and hadn't put a substantial cast onto the arm, which in turn caused the bone to become displaced once again and she had to have the plaster removed, the bone reset, and a second cast applied! She's definitely been through the wars but nurse Emma has come to the rescue but it did mean that I had to take a tiny break from my crafting duties!
But in the meantime, I thought I'd pop by to say hello and to share another of my Sizzix makes that I created for the Tim Holtz Chapter 3 Facebook Live!
So if you dare, I invite you to enter and take a look around Number 7891, the bat manor of the dark knight...
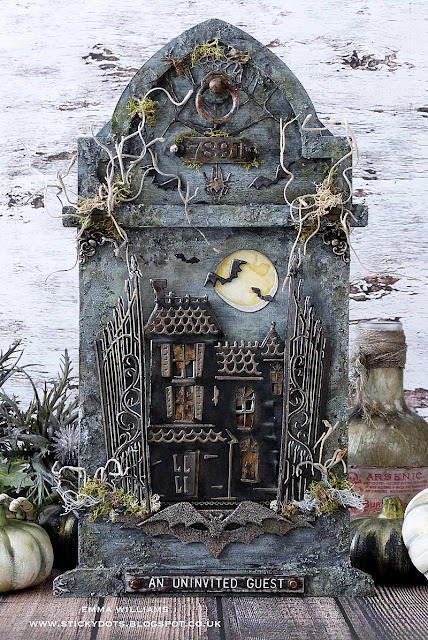 This project was actually inspired by the TV shows, Gotham and Batman ~ two shows that I love and I decided to create this gothic style piece, using the dies from the Chapter 3 release and combining them with some older dies, a Stampers Anonymous Tombstone and some Tim Holtz idea-ology.


So let's get started and I began with the base, which is the smallest sized Tombstone Etcetera Tag from Stampers Anonymous and I attached the separate pieces to my main tag before applying a coat of Black Gesso over the surface to prime it ready for the paint layers that I'll be adding. I decorated both the front and back of the tags so apply the gesso to both sides at this stage.
Once the medium was dry, I added some texture to the tag surface. I started by die cutting some webs using the Spider Web Thinlits Die by Sizzix and then attached them to the back of the tag using Matte Collage Medium....

...and also to the top section of the tag.

I then used Transluscent Grit Paste, concentrating on applying it around the edges but also bringing some in towards the centre. Once again, you'll need to allow for this to dry and once it is, then start layering the paint.

I used Pumice Stone, Hickory Smoke, Black Soot and Peeled Paint Distress Paints to create this finish and starting with the lightest colour, the Pumice Stone ~ I used a dry brush to apply each colour, pouncing the paint onto the surface with the brush to create a stippled effect and drying between each of the layers so that I don't create too much of a muddy texture. Don't forget when doing this, less is more...add small amounts and build upon the colour, you can always add but can't take it away as easy. Build up the colours one by one and then finally, I used the Peeled Paint to add the mossy texture ~ concentrating particularly on and around the pasted areas.
Once I was happy with the finish of the tag, I allowed the paint to dry completely before flipping it over to work on the back first, which has already got the webs attached to either side.

To begin with I wanted to accentuate the grit paste and the webs around the edges and took a small amount of White Fire Treasure Gold Wax which I have in my stash and applied it over the top of the paste to make it pop. If you can't find this brand of wax, any gilding wax will work and I can also recommend Finnabair's Alchemy Waxes from Prima Marketing.
To create the embossed motif in the centre, I used the Fanciful 3D Impresslits Folder to die cut, and then emboss a piece of Heavystock Mixed Media card. I then applied a coat of white gesso over the die cut before attaching the die cut to my tag using Matte Collage Medium and applying a coat over the top to seal it. I then took some more of the Translucent Grit Paste and using my finger, smeared the paste around the edge of the die cut to "bed it" into the tag.
Once dry, lightly dry brush the surface of the die cut and the pasted areas around using a touch of Pumice Stone and Black Soot Distress Paint. Remove any remaining paint with a soft cloth ~ you want the paint to sink into the recesses of the die cut but keep the motif mainly white in colour and by applying the coat of Matte Medium this will act as a resist, enabling you to do this technique!

For the wording, RIP, I used the Handmade Alphabet Die to die cut each letter, 4 times from thick black card. I then layered the die cut letters to form these thick substantial letter pieces which I attached to my tag. Once again, I smeared a small amount of the grit paste onto the letters and allowed it to dry. Together with a bat from the Bat Crazy die set, die cut the date 1310 - 1342 from black card using the Alphanumeric Label Dies and then attach these underneath the RIP. Apply a small amount of the wax over the lettering and the bat.

Flip the tag back over to start work on the front...

To create the top section of the tag, I added some moss around the edges using Matte Collage Medium to attach the pieces. I then took one of the Mini Hardware pieces and rusted the metal using Distress Paint ~ a combination of Evergreen Bough, Ground Espresso, Rusty Hinge, Black Soot and Vintage Photo. Attach the 'door knocker' to the centre of the top section. Add the same colours of paint to the Factory Tag and attach the tag, 7891 underneath placing two of the Vignette Hardware Findings into the holes of the tag.

I also added some die cut bats, die cut from black card using the Bat Crazy die and a spider hanging down. The spider was also cut from black card but to create the metal finish to the card, I used the embossing dabber over the surface, sprinkled with Liquid Platinum Embossing Powder, tapping away the excess and then heat embossed the powder to a molten liquid.

Attach the house to the tag using foam pads for height and dimension.

For the gates, I used the Gatekeeper die and cut all the pieces from black card and then a second layer from silver metallic kraft stash. I applied some Treasure Gold Gilding wax to the smaller pieces of the gate, and then attached them to the main gates before layering the finished gates over the top of the silver layer, slightly offsetting them to create a shadow.
Attach the gates to the tag by adding Matte Collage Medium down the outer edge of each piece. I clamped them onto the tag with a clip to make sure they were secure.

 Add some moss around the gates and then die cut the moon from Mixed Media Heavystock card coloured with Fossilized Amber Distress Ink and the small bats from the same die, from black card. Attach these pieces directly to the tag, above the rooftop of the house.

In the photo below, you can see what a clever design these gates are and how they bring so much dimension to this piece, leading you through them into the house behind.

We're now ready for the final die cut ...the bat emblem across the bottom and for this I used the Bat Crazy die set to die cut one bat and this is layered over the top of a Stampers Anonymous Web Trim. I cut four layers of the bat from black card and then layered them over the top of one another to create two separate bats. I then used the embossing dabber over the top of the bats, before applying embossing powders. I started Liquid Platinum, then once the powder was heated and cooled, I added the dabber over the top once again, before sprinkling a light dusting of black embossing powder. I then heat embossed this before a final triple layer of powder was added ~ first the embossing dabber and then a dusting of Seth Apter's Metalz Powders to create this hammered finish to each of the bat.
Set the die cut to one side and take the smallest sized web trim and repeat the process that was used on the die cut bat but this time apply it to the Web Trim. Once I was happy with the trim and the layers of embossing, I attached the smaller die cut bat over the top the trim, the trim is actually turned upside down so the decorative design is along the bottom, and then attach the border trim to the tombstone, placing them directly underneath the house.

Add some metal corner embellishments from the Vignette Accents idea-ology set, tucking them underneath the top section, together with some metal hardware.


I really hope you've enjoyed how I created this tag and the inspiration behind it ~ it was so much fun to make and bring to life and I hope my photos have done this piece justice as there is just so much texture and shimmer and shine to the project!
Thanks for all your visits and see you all again soon...Emma x
Recipe for project:
Tim Holtz/Sizzix: Haunted, Spider Webs, Bat Crazy, Gate Keeper, Fanciful 3D Impresslits, Alpha Label, Handmade Alphabet Bigz Die
Tim Holtz Idea-ology: Hardware Heads, Vignette Hardware Findings, Halloween Quote Chip, Factory Tags, Mini Hardware, Vignette Accents
Mediums: Matte Collage Medium, Translucent Distress Grit Paste, Crackle Paste, Bone Mixed Media Powder, Embossing Dabber
Alcohol inks: Mushroom, Sepia and Gold Mixative
Embossing Powder: Liquid Platinum, Black Embossing Powder, Seth Apter Metalz Trios


I love everything Halloween and Tim Holtz and your project showcases these beautifully. All the details on your tag is fantastic. Best wishes to your Mom for a full recovery.
ReplyDeleteI knew something was amiss when you were absent from SSS Monday Challenge. I’m really sorry to hear about your poor Mom. How scary (and painful) that must have been! You both will be in my prayers. This is an amazing piece! You are my favorite designer for all things Tim Holtz, and although I don’t regularly comment, I soak up each and every blog post and am continually inspired by your amazing talent. Sending hugs from across the pond. ❤️Katie in KY, USA
ReplyDeleteSo adorably spooky! Thanks for the tutorial.
ReplyDeleteYikes, hope your Mum heals fast. LOVE this and of course pinned.
ReplyDeleteSorry to hear about your Mum, with Nurse Emma there I am sure she is in good hands. Love this project, thank you so much for the detailed tutorial...I just need the Haunted die to have everything for this one...yippee!!! Crafty time!
ReplyDeleteOh my gosh girl, this is a MASTERPIECE!! Truly, awesome!
ReplyDeleteI appreciate your strength and compassion in caring for your mum and happy to hear she's on the mend. Experiences like this are humanizing and draw up emotions like no other. Sending warmest thoughts for a speedy recovery and your project is, as always, outstanding.
ReplyDeleteThis comment has been removed by the author.
ReplyDeleteEmma, this is one amazing project. I love every single detail, right down to the uneven nails in the metal number tag. Just genius.
ReplyDeleteEvery time look at this I see a new detail. It's the curtains that caught my eye this time. Thanks for the inspiration. Isn't Halloween the most fun of all?
ReplyDeleteSo sorry to hear about your mum's trials and tribulations... broken bones are no joke at any age (still have two plates and seven screws in my left ankle from nearly 20 years ago). Lovely that you were able to take some time to be there to support her.
ReplyDeleteOn a happier front, what a fabulous creation with the new Sizzix releases. The stony colours and textures are completely scrumptious - so realistic - and I love all the spooky creepers and moss clambering all over it. Fabulous work with the spooky house and those giant gates in the foreground too.
Really looking forward to seeing your Idea-ology pieces.
Alison x
First off, I am so sorry for your Mum's recent fall and series of events following her trauma. Thank goodness she has you to look after her and that she is otherwise staying healthy--being in a hospital or even near one these days scares me!
ReplyDeleteSpeaking of scary--wow, you have created so many wonderful spooky details on this tombstone vignette. I especially love the nails, and my cat , Roger, loves the black kitty in the window.
Wishing your Mum a speedy recovery!
Although I'm not big into Halloween, I absolutely love this piece. I read the posts because your explanation of how you made each piece inspires me and provides ideas to jump start my own creative projects using Tim's products. Thank you. You're right about the gates. I kept looking at the photos because it really does look like the gates are wide open!!!! I thought you did something magical and then read that it's the perspective of the die. A-mazing. Thank you so much for sharing how you did this project and I send best wishes to you mum for a speedy recovery.
ReplyDeleteEmma, I'm so sorry about your Mom :-( She will be in my prayers!
ReplyDeleteI have become a big fan of yours and have decided to jump in with both feet and make altered projects! I appreciate how you give us the tools to make similar !!
Hope your mom is doing better ! Sounds like it was really a bad fall. This haunted house project is amazing! Thank you for listing the supplies you used. I will certainly keep those handy so If I ever attempt this or something I want to make using some of your techniques I will have what I need. Once again, thank you for such great instructions!
ReplyDelete