Showing posts with label tonic studios. Show all posts

Tuesday, 21 March 2023

Tim Holtz Rotary Media Trimmer

Hello friends...

I was so excited to receive my Tim Holtz 12.5" Rotary Media Trimmer as the perfect addition to it's smaller friend, the Mini Guillotine! They now proudly sit on my craft desk, side by side ready for action.

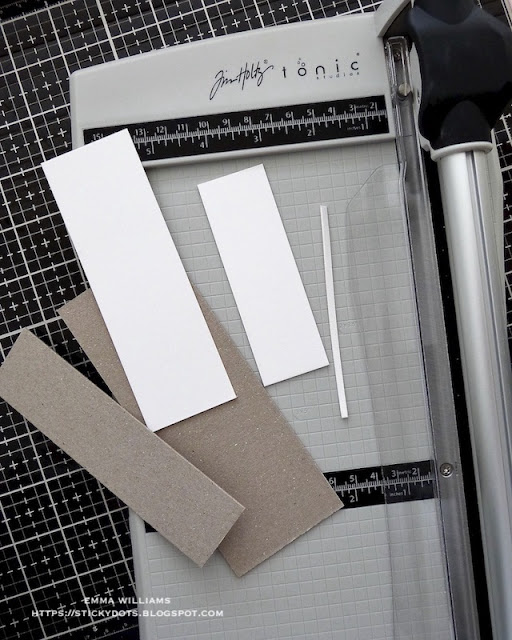
The Rotary Trimmer arrived in the morning and by lunchtime, I'd already put it to work and tested out exactly what it could do. I'd cut multiple surfaces and backgrounds of all different sizes and thicknesses to see how it would cope and yes, it definitely lived up to my expectations ~ it is amazing and here are 5 reasons that I love this trimmer!

1. During my crafting journey, I've owned a lot of trimmers and guillotines and I've also managed to write off quite a few when I push them too far ~ I can't tell you how many trimmers and guillotines I've managed to ruin with mountboard/chipboard!! 

But no more, that will be a thing of the past because this little beauty is a real workhorse and it did everything I asked of it ~ wherever you put that substrate, top or bottom, the geared, rotary blade just glided through a variety of substrates and media effortlessly including the mountboard ~ even that tiny strip was a perfect cut and all without any effort or pressure.

I also tried it out on yupo, vellum, Sizzix Texture Roll, cork, burlap and heavyweight acetate with no problem whatsoever and even managed to cut through 3 sheets of card at one time, each time creating a supersmooth, clean cut ~ no raggedy edges which is a pet hate of mine!

2. The trimmer is so lightweight and the size of the machine will fit comfortably in any craft space which is something that really appeals to me. As you can imagine there are times when I'm quite limited for crafting space, I can fill a table and a floor with work and end up crafting in a 5" square on my desk. It's also really solid when you place it on the desk, which is all down down to the placement of the pads on the base of the trimmer ~ this will not rock and roll when you try to cut!

3. I love the fact this has imperial and metric measurements. Here in the UK, we do tend to work in centimetres, so this is perfect for me as I no longer have to keep converting my measurements dependant on the trimmer I'm using.

4. On the majority of trimmers and guillotines that I've owned in the past, you will find that you get one extending ruler arm but this one has two, which makes life so easy when working with 12' x 12' papers.

5. If you've watched some of Tim's YouTube Lives, and seen some of my makes, then you might have heard that I do tend to make "Emma sized cards" and now I have a piece of machine that is perfect for cutting and making my own Emma sized cards with ease and here you can see card blanks that I've cut from Mixed Media Heavystock, White Heavystock and Kraft Heavystock, all measuring 20 x 15cm. 

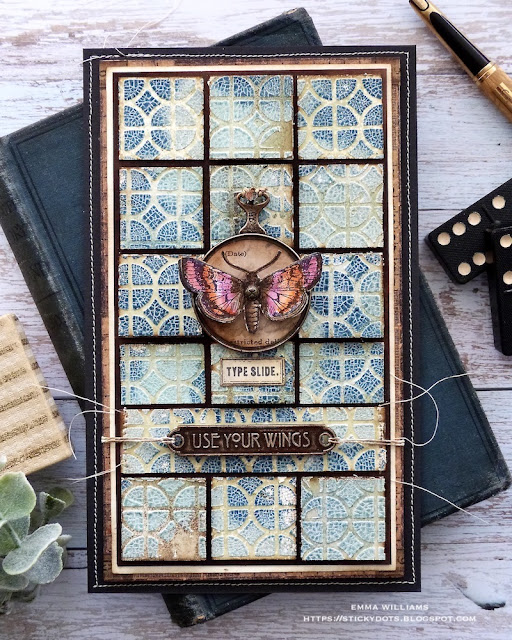
So with my trimmer ready to put to work, I made an "Emma sized card" and hope you love the results...

One thing I've found difficult in the past with my previous trimmers, is being able to cut through pasted surfaces. Usually when I make the cut, the paste will flake away, or the trimmer will pull it off the card, so I wanted to see how this trimmer coped...

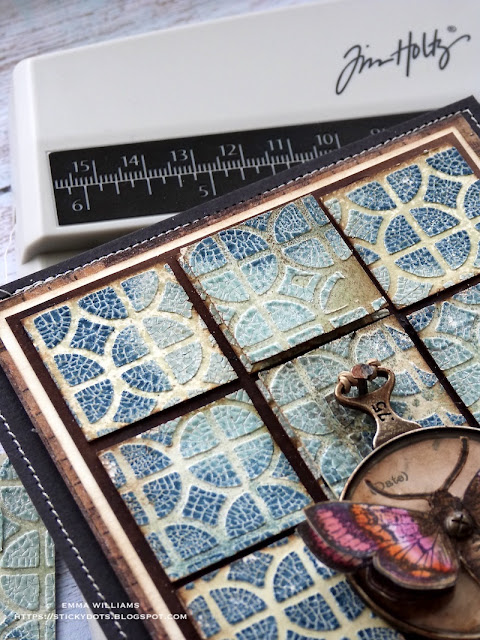
...and there were no surprises about the results, they speak for themselves ~ it did the job perfectly and it cut tiny 3cm square tiles with no effort, no flaking of the paste ~ just clean lines that I could use for my tiled effect card.


The background for this card is made by applying Crackle Paste through the Stampers Anonymous/Tim Holtz Focus Layering Stencil onto a panel of Mixed Media Heavystock. Whilst the paste was wet, I sprinkled a combination of Weathered Wood and Prize Ribbon Distress Glaze over the top. After allowing the paste to crackle and do its thing, I then gently heat embossed the glaze on the paste until shiny.
Now for some trimming and I cut the background into panels of various sizes. The majority are 3cm square and then there is a smaller line of 2 x 3cm and a strip that goes across the card.
I inked the edges of each tile with Walnut Stain Distress Ink and then layered them onto a panel of black card, cut with the trimmer.
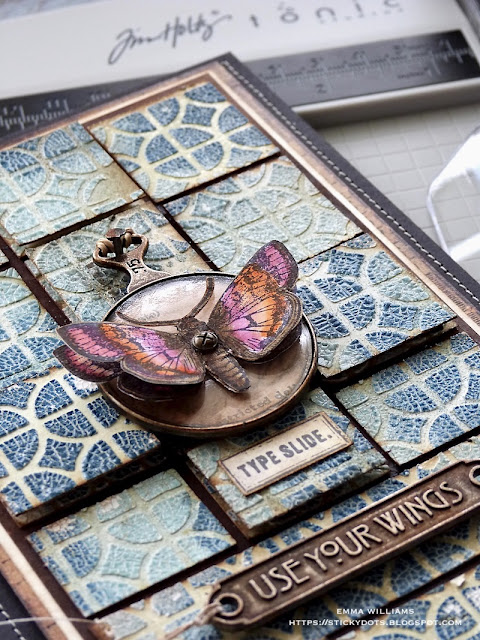
I also popped some of the tiles onto foam pads, layering them over the top of the first layer to add extra height and detail.
I layered the complete panel onto further mats of card before mounting it onto my card blank.
For the focal point of the card, I stamped a butterfly from the Entomology stamp set and coloured it with Distress Watercolour Pencils. I layered the butterfly onto a Optical Lens and attached it to my card front.
Finally, I added the "Use Your Wings" Word Plaque to my card and a tiny stamped 'type slide" label.

I hope you love the card I've made and found my findings with this trimmer useful! I can't recommend it enough but if you need more information about this trimmer, then head on over to Tim's blog where he talks you through all the details of what you can expect from this.

See you again soon and thanks for stopping by today...love Emma x


Monday, 8 November 2021

Give Thanks ~ Life Is Full of Beauty

Hello friends and Happy Monday!

Hope you all had a great weekend and you are all inspired by the brand new Tim Holtz Mini Trimmer by Tonic Studios that Tim launched on Saturday in his latest YouTube Live! I have to admit, this is just so cute, and a very welcome addition to my craft room...it's definitely a game changer for me, as it will sit on my desk for all those tiny projects and tiny pieces of paper that I need to cut but are really too small to cut in it's larger family member! If you haven't made your purchase yet, then you definitely need to add this to your stash!

But back to today and this week's Simon Says Stamp Monday Challenge! The theme is all about THANKS/THANKSGIVING and the DT have created some awesome projects to inspire you and we hope you'll come and join us and play along!

For my make, I created a tag and packed it full of woodland magic, including a familiar little feathered friend who you might remember from debut last week, and has now made his return and flown in to make an appearance on this project! I couldn't resist using Woody the Woodpecker one more time, he's just too adorable for words!


So let's get started and here's how I created this piece...

I'll start with the tag and using a Size 8 Mixed Media tag from Tim, I began by applying Opaque Grit Paste with a palette knife, through the Rosette Mini Layering Stencil from Set 30. After removing the stencil, I allowed for it to dry and set and once that magic has happened, I started to apply the colour.

For this I used Distress Spray Stains and Oxide Sprays: Prize Ribbon, Ground Espresso, Speckled Egg and Speckled Egg Oxide Spray and just spritzed these over the pasted tag, allowing the colours to blend by misting a little water over the top.

Once the sprays had completely dried, I machine stitched a border around the edge and then adhered it to a Size 8 Etcetera Tag using Matte Collage Medium.

Moving onto the next stage and the word plaque ~ I used the Sizzix Seal Dies and Switchlits Embossing Folder to cut metallic kraft card which will make my base. I dry brushed the metal seal with a little Black Soot Distress Paint and then wiped away the excess, allowing the paint to sit in the embossed areas and accentuate the beading around the edge. I then cut a smaller circle from Distress Woodgrain Cardstock and very lightly I brushed Speckled Egg Distress Paint over the surface before drying the paint, and then inking over the top with Walnut Stain Distress Ink, to bring out that gorgeous woodgrain texture.

I then cut my wording, "Give Thanks" using the Tiny Type Upper Thinlits Die set, cutting one set of lettering from gold metallic kraft card and a second set from Blackout Cardstock. I then layered the black lettering over the gold, slightly offsetting the darker lettering to create a shadow underneath before attaching each letter onto my seal.

Once completed, I attached my seal to my tag using foam pads before adding Hardware Heads around the outside of the seal, altering the metal with a little Crackling Campfire, Antiqued Bronze and Black Soot Distress Paint to create a rusty finish.

Moving onto the scene and for this I started by creating my leaves...

I used both the Oak Leaf, and the Leaf Impresslit Emboss and Cut 3D Dies to cut Mixed Media Card that I had coloured using Crackling Campfire, Walnut Stain, Aged Mahogany, Spiced Marmalade and Fired Brick Distress Spray Stains and this is where the brand new Mini Trimmer from Tim comes into play because it is perfect for cutting all those tiny panels of card that fit inside the folders ready to cut and emboss!


With a selection of the smaller leaves cut, I inked the edges of each of them before lightly spritzing some of Tim's gorgeous Jack O'Lantern and Flickering Candle Halloween Mica Sprays over the top. These are now sold out, so if you don't own them, it's not necessary to use these but it just creates a beautiful shimmer and sheen to the cardstock.

Once the leaves are dry, I prepped my toadstools which are part of the idea-ology range. I used the smallest and middle sized toadstools and painted the caps with Candied Apple Distress Paint.

Once this was dry, I then added the tiny white dots with Picket Fence Distress Paint.

The final part of the scene is Woody the Woodpecker and he comes from the Cozy Winter Thinlits Die set and you can see how I make him and colour him in my previous post, HERE.

Now all my bits and pieces are ready to make the scene which are all attached to an Etcetera Trim.

I used two of the smallest Scalloped Etcetera Trims and after applying some crackle paste to each trim, and allowing this to dry, I attached the trim to form a ledge. I then attached all my leaves, the woodpecker and the toadstools to the ledge, using hot glue to hold them securely in place and adding small clumps of moss between the leaves and around the base of the toadstools.

To complete the scene, I added some small pieces of curly moss that you can buy from any florists or good craft store and attached these and some die cut leafy foliage that I had left on my desk from a previous project. 

In the photo below you can see the dimension I've created in this make...

So all that's left is those little finishing touches and beneath the ledge I added a drawer pull, and placed a Clippings Sticker in the little window to read, Life Is Full of Beauty! I added the smaller sized Hardware Heads onto either side of the pull so it appears to me fixed onto the tag with screws.

Finally I attached a Machinery Head at the top of the tag, attaching it over the hole and again, I altered this with the same colours of Distress Paint as before to create more of a rusty look to the metal.

So that's it from me for today and I hope you've loved seeing Woody the Woodpecker in his little autumn habitat, I think he definitely looks as if he's settling into life amongst the woodland magic....

...as always, if you make anything, or been inspired by anything that you've seen here on my blog ~ then please, let me know by tagging me on social media or leaving a comment here and I will be right over to take a look!

Don't forget that every week, one lucky random participant has the chance to win a $25 gift voucher from Simon Says Stamp and you can join in up to 5 times, which means you could have 5 chances to winYou have until Monday 8am Ohio time. 1pm UK time, 2 pm CET to join in and good luck....


Thank you so much for taking the time to stop by today ~ stay safe and keep well.
Love Emma xxx

Recipe for project:

Distress Ink: Walnut Stain
Distress Spray StainPrize Ribbon, Ground Espresso, Speckled Egg, Crackling Campfire, Walnut Stain, Aged Mahogany, Spiced Marmalade and Fired Brick
Oxide Spray: Speckled Egg
Distress Paint: Black Soot, Crackling Campfire, Antiqued Bronze, Candied Apple, Picket Fence, Speckled Egg

Saturday, 27 February 2021

Simon Says Stamp Hello Beautiful Blog Hop

Hello friends and welcome to Day 2 of the Simon Says Stamp Hello Beautiful Blog Hop...

I'm so happy to be joining so many talented designers as one of the stops on this hop and if you'd like to see this fabulous new release in full, then just pop over to Simon Says Stamp.

You might have arrived here from Bobbi Lemanski's blog, but if you've just popped by and would like to join us for this fun hop, then don't worry because you can head back to the beginning over on Simon Says Stamp's Blog. Also, if you make anything using any of the awesome new products from this release, then we would love for you to share your creations with us in the Hello Beautiful gallery.

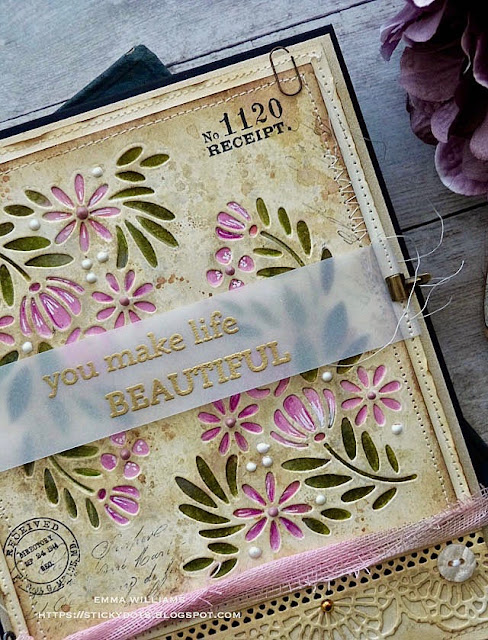
For my card, I combined a couple of the new products, the Spring Blooms Corner Die and the Slimline Beautiful You stamp set and I combined these to create a vintage style card which I hope you love!


To begin with I created my tent style card base, 15 x 20cm from black card and added a layer of gold pearl card, slightly smaller in size to create a black border around the edge.

Moving onto the background and the decorative die cut panel.

I cut a panel of Mixed Media Heavystock card, 13 x 14cm and inked it with a combination of Antique Linen, Pumice Stone, Frayed Burlap Tim Holtz Distress Spray Stains and Frayed Burlap Oxide Spray. Once I misted the cardstock with a light spray of water I spritzed the stains to directly onto the card panel.

Taking the Spring Blooms Corner die, I placed this in the top left hand corner, and ran it through my die cutting machine. I then flipped the die to the bottom right hand corner and again ran through my machine.

I added some stamping to the background using Jet Black Archival Ink and the script stamp from Stampers Anonymous The Poinsettia and the postmark and receipt number stamps from the Field Notes stamp set. Both sets are by Tim Holtz.


After inking the edges with Walnut Stain Distress Ink, I machine stitched a border all around the outside of the die cut panel.

After cutting a second panel of the Heavystock card, 14 x 15cm, I used the corner die to cut a stencil from Sizzix Stencil Film sheets. This will mean that I can ink through the stencil to obtain the correct placement of ink when I place the die cut card panel over the top.

Placing the die cut stencil film onto the second card panel, I inked the flowers and leaves through the stencil using Kitsch Flamingo Oxide Ink for the flowers and Peeled Paint and Forest Moss Oxide Inks for the leaves. Repeat to ink the flowers and leaves in the opposite corner.

Machine stitch a border around the inked panel and then mount the die cut and stamped panel over the top, aligning the die cutting with the inking on the second panel, so that it lines up perfectly.

Cut a strip of vellum, 3cm wide and ink up the 'You Make Life, Beautiful' stamps from the Beautiful You stamp set using clear embossing ink. Sprinkle gold embossing powder over the top and heat emboss until molten.

Wrap the vellum sentiment strip around the decorative card panel, securing it by machine stitching down each side and adding Tiny Clips to hold it securely in place.

I mounted the matted card panels onto the top section of my card using foam pads for dimension and a little height.

Underneath the decorative panel, I used the Crochet Die Set by Tim Holtz to die cut a strip of Mixed Media card stock inked with the same colours as I used on the background panel. After inking the edges of the die cut with a little Frayed Burlap ink, I then adhered it onto another strip of inked card stock and mounted this underneath the decorative panel, again using foam pads.

To complete the strip, I attached two gold metallic droplets and a couple of buttons from my own stash.

We're nearly there and all that's left to do are the finishing touches...

...and the first of those is the tie of Mummy Cloth, (taken from the Tim Holtz Halloween Trimmings set) that I coloured using Antique Linen and Kitsch Flamingo Distress Spray Stains. I just spritzed the cloth with the stains and then dried it throughly before wrapping it around my card and securing it with a Mini Pin and an Antiqued Gem.

Finally, I added small dots of Tonic Nuvo Chalk Stick Vintage Drops to the decorative die cut panel.

HOP ORDER

Simon Says Stamp Blog 

Laura Bassen

Debby Hughes

Amanda Korotkova

Bibi Cameron

Heather Hoffman

Yoonsun Hur

Bobbi Lemanski

Emma Williams (you are here)

Vicky Papaioannou

Dilay Nacar

Kim Hamilton

Natasha Vacca

Kath Stewart

Mandy Stacey


Simon Says Stamp is giving away a $25 coupon to every stop on the blog hop! This means you can leave a comment here and on every stop along the way to increase your chances. Winners will be posted on the Simon Says Stamp blog on Wednesday, 3rd March and all winners will need to contact/email Simon Says Stamp to claim their prize. 

Also, last but by no means least ~ we are also running a special surprise promotion in conjunction with this hop and you can claim one free gift of your choice, the gorges Rose Trio stencil! The offer is valid until 28th February at 11:59 EST, or while supplies last and the code you need to use to claim your gift, is: RSE542

Thanks so much for hopping by today, hope to see you again soon!
Emma xx


RECIPE FOR CARD:

Simon Says Stamp HELLO BEAUTIFUL Release: Spring Blooms Corner Die, Slimline Beautiful You
Tim Holtz Stamps: Field Notes, The Poinsettia
Tim Holtz/Sizzix Dies: Crochet Thinlits
Distress Ink: Walnut StainFrayed Burlap
Distress Oxide Inks: Kitsch Flamingo, Peeled Paint, Forest Moss
Distress Spray Stain: Pumice Stone, Frayed Burlap, Antique Linen, Kitsch Flamingo
Distress Oxide Spray: Frayed Burlap
Surfaces: Tim Holtz Mixed Media Heavystock Card, Simon Says Stamp Vellum, Black and gold pearl card from my own stash
Foam Pads
Big Shot
Buttons from my own stash
Powered By Blogger

Total Pageviews