Showing posts with label thanksgiving. Show all posts

Monday, 14 November 2022

Grateful...

Hello friends...

Hope you've all had a wonderful weekend and you're ready for another week of inspiration on the Simon Says Stamp Monday Challenge Blog. This week our challenge theme is; THANKS/THANKSGIVING and we would love for you to join us and play along.

With Thanksgiving just around the corner, I chose to not to go down the traditional route of the occasion but to create a card that is from the heart, a make to show how grateful I am for all the people that I have in my life, my family, my friends, and of course, everyone who visits my blog and social media profiles ~ you are all truly appreciated and I'm so very grateful for you all!

So let's get started, and I hope you enjoy how I created this card...

BASE LAYERS

To begin with I made a card blank from brown cardstock measuring 13.5 x 18.5cm.

For the base layers of this card, I used a piece of plain white card, and added one of the tape designs from the Butterfly Design Tape set around each of the four sides. I then machine stitched a border around the outside edge and matted the tape trim layer onto silver metallic kraft card before mounting it onto my card blank. My base layer is ready...

Now we move onto the next layer and the embossed background for my hearts.

For this I used the Tree Rings 3D Texture Fade, which is one of the new Christmas releases from Tim Holtz and Sizzix. I embossed a piece of Heavystock Kraft card and then inked the raised areas with Ground Espresso and Gathered Twigs to accentuate the embossing.

To form the gnarly edges around the panel, I used Crackle Paste which I applied with a palette knife. I allowed the paste to dry and the crackles to appear before lightly rubbing Gathered Twigs Distress Crayon over the top, blending the colour with a semi damp baby wipe, or you can use a damp finger.

I matted the embossed panel onto a piece of silver metallic kraft stash, followed by black kraft stash, both of which are sanded around the edges to create more of a rustic feel to the card.

HEARTS and ARROW

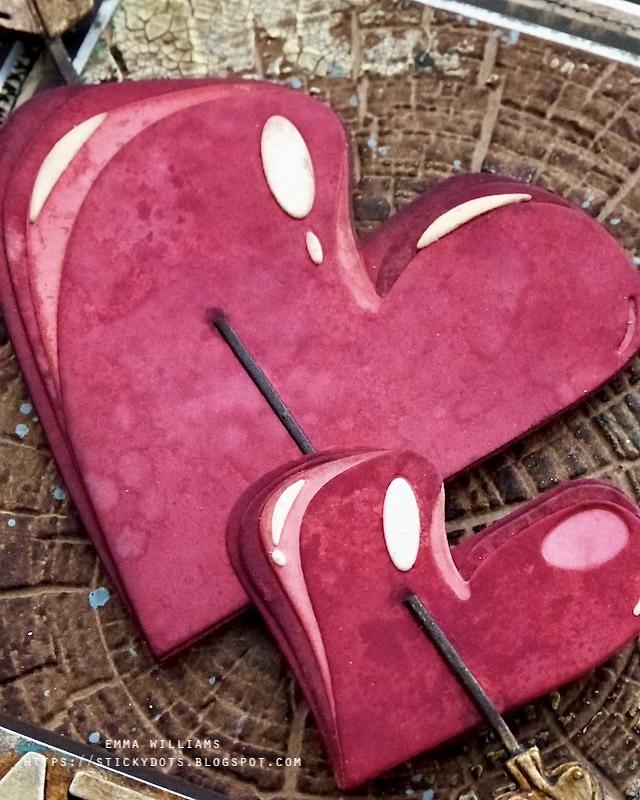
I used the Sizzix Lovestruck Colorize die by Tim Holtz to create my two hearts which form the focal point of this card.

To begin with I coloured my cardstock using the beautiful new colour member to the Distress family, Lumberjack Plaid.

I sprayed Distress Spray Stain onto four panels of cardstock, controlling the amount and applying various amounts of colour to each panel. This will create the shading needed to build your die cuts.

I then used the shades of Lumberjack Plaid coloured card and cut each piece to make the two hearts. Cut the small highlights that are layered over the tops of each heart from cream card, and ink each die cut piece around the edges with Antique Linen Distress Ink.

I inked the edges of each die cut piece using a combination of the Lumberjack Plaid, Black Soot Distress Ink and Walnut Stain Distress Ink, using less ink on each layer.

With all the dies cuts in front of me, I layered each piece over the top of the previous one to form my two hearts and finally added the cream coloured highlights on top.

Set the hearts to one side and moving onto the arrow. I cut the main piece, the shaft from black card, the arrow head from gold metallic card...

...and the feathery end, (there is a technical term for that section but it's easier to call it a feather, lol) from bronze metallic cardstock.

I assembled the arrow pieces and then attached them to my hearts, aligning them so that they look as if they're pierced through each one.

I attached the hearts and arrow to the card front, using foam pads and you can see the dimension this creates in the photo below.

WORD PLAQUE

Now for the wording plaque that sits beneath the hearts and for this I wanted to create a plaque that would look like tarnished metal.

I began by cutting the letters using the Sizzix Alphanumeric Bold Thinlits Dies from Tim Holtz. I cut one layer from silver metallic kraft card, and three layers from black card. I then layered each letter to form thicker letters that once attached, would stand proud from the plaque, finishing with the metallic one on top.

Attach the letters to a strip of gold metallic kraft stash and then I used Distress Paints to add the tarnish. I used a combination of Burnt Sienna Alchemy Paint from Prima and Black Soot Distress Paint.

Apply the paint in two separate layers, drying in between each and then before drying the finishing layer, I lightly wiped away the paint from the lettering. You will get some residue left, you don't want to wipe away all the paint.

Matt the plaque onto silver metallic kraft card, followed by a layer of the brown cardstock, each time leaving a border around the outside, and then using foam pads, I attached the plaque to my card.

HARDWARE HEADS

Finally, I painted six hardware heads with Lumberjack Plaid Distress Paint and once dry, I attached them to the corners of my card.

So, that's my card finished for this week's challenge. I hope you've enjoyed how I created it and all the techniques I've use, which can be used as inspiration for so many different occasions ~ Valentines, Birthday, Anniversary or just to say thank you ~ it's such a great set of products that I think combine so well.

As always, if you make anything, or if you've been inspired by anything that you've seen here on my blog ~ then please, let me know by tagging me on social media or leaving a comment here and I will be right over to take a look and if sometimes I miss it ~ just keep nudging me!

Don't forget that every week, one lucky random participant has the chance to win a $25 gift voucher from Simon Says Stamp and you can join in up to 5 times, which means you could have 5 chances to winYou have until next Monday at 8am Ohio time. 1pm UK time, 2 pm CET to join in and good luck....


Thank you so much for taking the time to stop by today ~ stay safe and keep well.
Love Emma xxx

Monday, 5 September 2022

Autumn Serenade

Hello everyone and Happy STAMPtember...

We have a brand new Simon Says Stamp Monday Challenge starting today and this week we want you to STAMP IT and join in with our fun theme and to celebrate the month of STAMPtember, the DT are showcasing the products of Simon Says Stamp within their makes!

So let's begin and here's how I created my autumnal/fall tag that is full of dimension that I created using dies by Sizzix layered onto a stamped background.

BACKGROUND TAG

We'll start with my background tag and I used a size 8 mixed media heavy stock tag which I spritzed with a combination of Vintage Photo, Crackling Campfire, Barn Door Antique Linen and Old Paper Distress Spray Stains and Frayed Burlap Oxide Spray.

To blend the colours, I misted water over the top and then heat dried the tag before stitching a border around the outside and inking the edges with Walnut Stain Distress Ink.

I adhered the tag to a Size 8 Etcetera tag because I'll be adding quite a bit of weight and wanted the base to be substantial.

STAMPED LAYER

The next layer uses the floral and script stamps from the Stampers Anonymous Exquisite stamp set by Tim Holtz. Using Black Soot Archival Ink, I stamped the floral pattern onto a panel of inked Mixed Media Heavystock Card ~ I used Antique Linen, Frayed Burlap and Old Paper Distress Spray Stains for this layer. To stamp different parts of the stamp onto this small panel, I just turned the floral stamp around.

After inking the edges with Walnut Stain Distress Ink, I machine stitched a border and then matted it onto a panel of gold kraft card before mounting the panel with foam pads onto the tag.

In the bottom right hand corner, I stamped my 'happy thanksgiving' sentiment, which is from the SSS Sassy Thankful stamp set. I stamped this in Barn Door Archival Ink.

AUTUMN FOLIAGE

To create my arrangement of Autumn foliage, I used one of my favourite seasonal dies from Tim Holtz and Sizzix, Fall Foliage. This is an older die but I LOVE it!

I used various sized dies to cut different sizes of leaves, and the twigs from Mixed Media Heavystock and then inked them with Simon Says Stamp Positively Saturated Ink Pads ~ Mocha, Citrine, Cherry, Good Luck Charm and Sherbet. I used SSS blending brushes to blend the inks over the die cuts to create the perfect fall colours, inking the edges with Walnut Stain Distress Ink.

Now to create that slightly darker, gnarled look to the leaves and for this, I placed them all in my splatter box and spritzed Decayed and Burning Embers Distress Mica Stain over the top, allowing the tiny splatters to fall onto the leaves.

To complete the leaves, I wanted some veins running through them and used the smallest stamp in Tim's Left Print 2 stamp set and stamped each leaf using the Mocha ink pad.

ASSEMBLING

We're now ready to assemble the tag and I arranged the leaves on the left hand side, attaching them with a hot glue gun, which will allow me to add height and dimension to the leaves which I've individually shaped.

Once, I was happy with the arrangement, I added some Spanish Moss from my stash and tucked this in behind the leaves.

In the centre, I placed a tiny clump of moss and then added some Baubles for berries. I used three and coloured them with Cranberry Alcohol Ink. I then adhered them into position with Matte Collage Medium.

Finally I added the finishing touches...

I dyed some seam binding ribbon from my stash with the Burning Embers and Harvest Moon Mica Stains and then threaded it through the hole reinforcer...

...and to complete the tag, I added a numbers snippet in the top right hand corner.

I hope you love today's make and it's given you some inspiration for all those autumnal fall projects.

As always, if you make anything, or if you've been inspired by anything that you've seen here on my blog ~ then please, let me know by tagging me on social media or leaving a comment here and I will be right over to take a look and if sometimes I miss it ~ just keep nudging me!

Don't forget that every week, one lucky random participant has the chance to win a $25 gift voucher from Simon Says Stamp and you can join in up to 5 times, which means you could have 5 chances to winYou have until next Monday at 8am Ohio time. 1pm UK time, 2 pm CET to join in and good luck....


Thank you so much for taking the time to stop by today...Love Emma xxx

Recipe for project:

Simon Says Stamp Positively Saturated Ink Pads: Mocha, Citrine, Pucker, Cherry, Lucky Charm and Sherbet
Distress Ink: Walnut Stain
Mica Spray Stains: Set 3Set 4
Alcohol Ink: Cranberry
Oxide Spray: Frayed Burlap
Distress Spray StainsVintage Photo, Crackling Campfire, Barn Door, Antique Linen, Frayed Burlap and Old Paper
Crinkle Ribbon and moss from my own stash

Monday, 8 November 2021

Give Thanks ~ Life Is Full of Beauty

Hello friends and Happy Monday!

Hope you all had a great weekend and you are all inspired by the brand new Tim Holtz Mini Trimmer by Tonic Studios that Tim launched on Saturday in his latest YouTube Live! I have to admit, this is just so cute, and a very welcome addition to my craft room...it's definitely a game changer for me, as it will sit on my desk for all those tiny projects and tiny pieces of paper that I need to cut but are really too small to cut in it's larger family member! If you haven't made your purchase yet, then you definitely need to add this to your stash!

But back to today and this week's Simon Says Stamp Monday Challenge! The theme is all about THANKS/THANKSGIVING and the DT have created some awesome projects to inspire you and we hope you'll come and join us and play along!

For my make, I created a tag and packed it full of woodland magic, including a familiar little feathered friend who you might remember from debut last week, and has now made his return and flown in to make an appearance on this project! I couldn't resist using Woody the Woodpecker one more time, he's just too adorable for words!


So let's get started and here's how I created this piece...

I'll start with the tag and using a Size 8 Mixed Media tag from Tim, I began by applying Opaque Grit Paste with a palette knife, through the Rosette Mini Layering Stencil from Set 30. After removing the stencil, I allowed for it to dry and set and once that magic has happened, I started to apply the colour.

For this I used Distress Spray Stains and Oxide Sprays: Prize Ribbon, Ground Espresso, Speckled Egg and Speckled Egg Oxide Spray and just spritzed these over the pasted tag, allowing the colours to blend by misting a little water over the top.

Once the sprays had completely dried, I machine stitched a border around the edge and then adhered it to a Size 8 Etcetera Tag using Matte Collage Medium.

Moving onto the next stage and the word plaque ~ I used the Sizzix Seal Dies and Switchlits Embossing Folder to cut metallic kraft card which will make my base. I dry brushed the metal seal with a little Black Soot Distress Paint and then wiped away the excess, allowing the paint to sit in the embossed areas and accentuate the beading around the edge. I then cut a smaller circle from Distress Woodgrain Cardstock and very lightly I brushed Speckled Egg Distress Paint over the surface before drying the paint, and then inking over the top with Walnut Stain Distress Ink, to bring out that gorgeous woodgrain texture.

I then cut my wording, "Give Thanks" using the Tiny Type Upper Thinlits Die set, cutting one set of lettering from gold metallic kraft card and a second set from Blackout Cardstock. I then layered the black lettering over the gold, slightly offsetting the darker lettering to create a shadow underneath before attaching each letter onto my seal.

Once completed, I attached my seal to my tag using foam pads before adding Hardware Heads around the outside of the seal, altering the metal with a little Crackling Campfire, Antiqued Bronze and Black Soot Distress Paint to create a rusty finish.

Moving onto the scene and for this I started by creating my leaves...

I used both the Oak Leaf, and the Leaf Impresslit Emboss and Cut 3D Dies to cut Mixed Media Card that I had coloured using Crackling Campfire, Walnut Stain, Aged Mahogany, Spiced Marmalade and Fired Brick Distress Spray Stains and this is where the brand new Mini Trimmer from Tim comes into play because it is perfect for cutting all those tiny panels of card that fit inside the folders ready to cut and emboss!


With a selection of the smaller leaves cut, I inked the edges of each of them before lightly spritzing some of Tim's gorgeous Jack O'Lantern and Flickering Candle Halloween Mica Sprays over the top. These are now sold out, so if you don't own them, it's not necessary to use these but it just creates a beautiful shimmer and sheen to the cardstock.

Once the leaves are dry, I prepped my toadstools which are part of the idea-ology range. I used the smallest and middle sized toadstools and painted the caps with Candied Apple Distress Paint.

Once this was dry, I then added the tiny white dots with Picket Fence Distress Paint.

The final part of the scene is Woody the Woodpecker and he comes from the Cozy Winter Thinlits Die set and you can see how I make him and colour him in my previous post, HERE.

Now all my bits and pieces are ready to make the scene which are all attached to an Etcetera Trim.

I used two of the smallest Scalloped Etcetera Trims and after applying some crackle paste to each trim, and allowing this to dry, I attached the trim to form a ledge. I then attached all my leaves, the woodpecker and the toadstools to the ledge, using hot glue to hold them securely in place and adding small clumps of moss between the leaves and around the base of the toadstools.

To complete the scene, I added some small pieces of curly moss that you can buy from any florists or good craft store and attached these and some die cut leafy foliage that I had left on my desk from a previous project. 

In the photo below you can see the dimension I've created in this make...

So all that's left is those little finishing touches and beneath the ledge I added a drawer pull, and placed a Clippings Sticker in the little window to read, Life Is Full of Beauty! I added the smaller sized Hardware Heads onto either side of the pull so it appears to me fixed onto the tag with screws.

Finally I attached a Machinery Head at the top of the tag, attaching it over the hole and again, I altered this with the same colours of Distress Paint as before to create more of a rusty look to the metal.

So that's it from me for today and I hope you've loved seeing Woody the Woodpecker in his little autumn habitat, I think he definitely looks as if he's settling into life amongst the woodland magic....

...as always, if you make anything, or been inspired by anything that you've seen here on my blog ~ then please, let me know by tagging me on social media or leaving a comment here and I will be right over to take a look!

Don't forget that every week, one lucky random participant has the chance to win a $25 gift voucher from Simon Says Stamp and you can join in up to 5 times, which means you could have 5 chances to winYou have until Monday 8am Ohio time. 1pm UK time, 2 pm CET to join in and good luck....


Thank you so much for taking the time to stop by today ~ stay safe and keep well.
Love Emma xxx

Recipe for project:

Distress Ink: Walnut Stain
Distress Spray StainPrize Ribbon, Ground Espresso, Speckled Egg, Crackling Campfire, Walnut Stain, Aged Mahogany, Spiced Marmalade and Fired Brick
Oxide Spray: Speckled Egg
Distress Paint: Black Soot, Crackling Campfire, Antiqued Bronze, Candied Apple, Picket Fence, Speckled Egg
Powered By Blogger

Total Pageviews