Showing posts with label Sizzix Chapter 3 2021. Show all posts

Monday, 8 November 2021

Give Thanks ~ Life Is Full of Beauty

Hello friends and Happy Monday!

Hope you all had a great weekend and you are all inspired by the brand new Tim Holtz Mini Trimmer by Tonic Studios that Tim launched on Saturday in his latest YouTube Live! I have to admit, this is just so cute, and a very welcome addition to my craft room...it's definitely a game changer for me, as it will sit on my desk for all those tiny projects and tiny pieces of paper that I need to cut but are really too small to cut in it's larger family member! If you haven't made your purchase yet, then you definitely need to add this to your stash!

But back to today and this week's Simon Says Stamp Monday Challenge! The theme is all about THANKS/THANKSGIVING and the DT have created some awesome projects to inspire you and we hope you'll come and join us and play along!

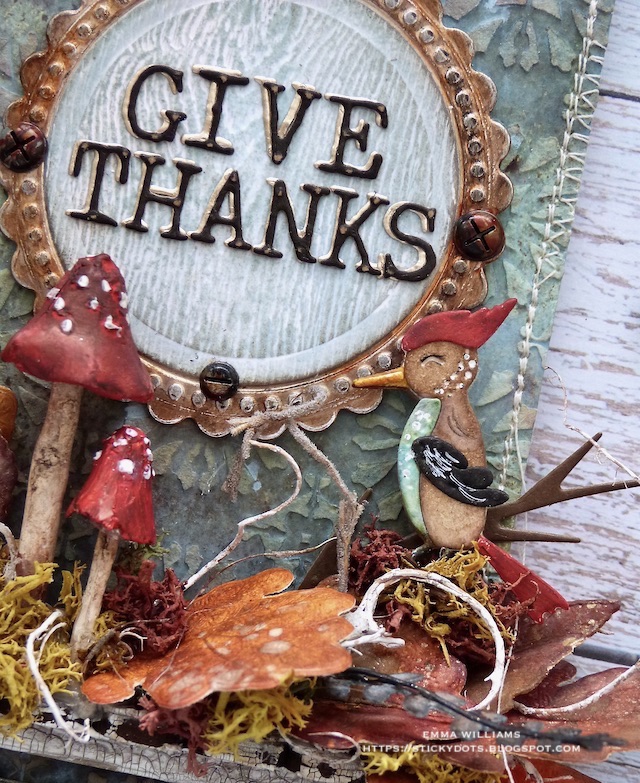
For my make, I created a tag and packed it full of woodland magic, including a familiar little feathered friend who you might remember from debut last week, and has now made his return and flown in to make an appearance on this project! I couldn't resist using Woody the Woodpecker one more time, he's just too adorable for words!


So let's get started and here's how I created this piece...

I'll start with the tag and using a Size 8 Mixed Media tag from Tim, I began by applying Opaque Grit Paste with a palette knife, through the Rosette Mini Layering Stencil from Set 30. After removing the stencil, I allowed for it to dry and set and once that magic has happened, I started to apply the colour.

For this I used Distress Spray Stains and Oxide Sprays: Prize Ribbon, Ground Espresso, Speckled Egg and Speckled Egg Oxide Spray and just spritzed these over the pasted tag, allowing the colours to blend by misting a little water over the top.

Once the sprays had completely dried, I machine stitched a border around the edge and then adhered it to a Size 8 Etcetera Tag using Matte Collage Medium.

Moving onto the next stage and the word plaque ~ I used the Sizzix Seal Dies and Switchlits Embossing Folder to cut metallic kraft card which will make my base. I dry brushed the metal seal with a little Black Soot Distress Paint and then wiped away the excess, allowing the paint to sit in the embossed areas and accentuate the beading around the edge. I then cut a smaller circle from Distress Woodgrain Cardstock and very lightly I brushed Speckled Egg Distress Paint over the surface before drying the paint, and then inking over the top with Walnut Stain Distress Ink, to bring out that gorgeous woodgrain texture.

I then cut my wording, "Give Thanks" using the Tiny Type Upper Thinlits Die set, cutting one set of lettering from gold metallic kraft card and a second set from Blackout Cardstock. I then layered the black lettering over the gold, slightly offsetting the darker lettering to create a shadow underneath before attaching each letter onto my seal.

Once completed, I attached my seal to my tag using foam pads before adding Hardware Heads around the outside of the seal, altering the metal with a little Crackling Campfire, Antiqued Bronze and Black Soot Distress Paint to create a rusty finish.

Moving onto the scene and for this I started by creating my leaves...

I used both the Oak Leaf, and the Leaf Impresslit Emboss and Cut 3D Dies to cut Mixed Media Card that I had coloured using Crackling Campfire, Walnut Stain, Aged Mahogany, Spiced Marmalade and Fired Brick Distress Spray Stains and this is where the brand new Mini Trimmer from Tim comes into play because it is perfect for cutting all those tiny panels of card that fit inside the folders ready to cut and emboss!


With a selection of the smaller leaves cut, I inked the edges of each of them before lightly spritzing some of Tim's gorgeous Jack O'Lantern and Flickering Candle Halloween Mica Sprays over the top. These are now sold out, so if you don't own them, it's not necessary to use these but it just creates a beautiful shimmer and sheen to the cardstock.

Once the leaves are dry, I prepped my toadstools which are part of the idea-ology range. I used the smallest and middle sized toadstools and painted the caps with Candied Apple Distress Paint.

Once this was dry, I then added the tiny white dots with Picket Fence Distress Paint.

The final part of the scene is Woody the Woodpecker and he comes from the Cozy Winter Thinlits Die set and you can see how I make him and colour him in my previous post, HERE.

Now all my bits and pieces are ready to make the scene which are all attached to an Etcetera Trim.

I used two of the smallest Scalloped Etcetera Trims and after applying some crackle paste to each trim, and allowing this to dry, I attached the trim to form a ledge. I then attached all my leaves, the woodpecker and the toadstools to the ledge, using hot glue to hold them securely in place and adding small clumps of moss between the leaves and around the base of the toadstools.

To complete the scene, I added some small pieces of curly moss that you can buy from any florists or good craft store and attached these and some die cut leafy foliage that I had left on my desk from a previous project. 

In the photo below you can see the dimension I've created in this make...

So all that's left is those little finishing touches and beneath the ledge I added a drawer pull, and placed a Clippings Sticker in the little window to read, Life Is Full of Beauty! I added the smaller sized Hardware Heads onto either side of the pull so it appears to me fixed onto the tag with screws.

Finally I attached a Machinery Head at the top of the tag, attaching it over the hole and again, I altered this with the same colours of Distress Paint as before to create more of a rusty look to the metal.

So that's it from me for today and I hope you've loved seeing Woody the Woodpecker in his little autumn habitat, I think he definitely looks as if he's settling into life amongst the woodland magic....

...as always, if you make anything, or been inspired by anything that you've seen here on my blog ~ then please, let me know by tagging me on social media or leaving a comment here and I will be right over to take a look!

Don't forget that every week, one lucky random participant has the chance to win a $25 gift voucher from Simon Says Stamp and you can join in up to 5 times, which means you could have 5 chances to winYou have until Monday 8am Ohio time. 1pm UK time, 2 pm CET to join in and good luck....


Thank you so much for taking the time to stop by today ~ stay safe and keep well.
Love Emma xxx

Recipe for project:

Distress Ink: Walnut Stain
Distress Spray StainPrize Ribbon, Ground Espresso, Speckled Egg, Crackling Campfire, Walnut Stain, Aged Mahogany, Spiced Marmalade and Fired Brick
Oxide Spray: Speckled Egg
Distress Paint: Black Soot, Crackling Campfire, Antiqued Bronze, Candied Apple, Picket Fence, Speckled Egg

Monday, 9 August 2021

Life is all about perspective...

Hello friends...

Hope you've all had a good weekend and ready for a brand new week of creativity because if you are, then the brand new Simon Says Stamp Monday Challenge has just begun and this week our theme is all about HEAT EMBOSSING!

This is a technique that always gives me such satisfaction, I always love how you can transform a piece with the magic of powder and heat and I decided to use this technique to create the texture on the Perspective Moth which I added to an inky background to create my card packed full of layers.

So let's get started ~ it's time for me to share my card project and here's how I made this piece...

To begin with I started with my moth and cut this once from Mixed Media Heavystock and once from Kraft Heavystock. I inked the edges of the kraft die cut with Walnut Stain Distress Ink before I started to add the embossing powders to the second die cut.

I used the Embossing Dabber to apply ink to my die cut and then started to add layers of powder beginning with Antique Linen Embossing Glaze. After heat embossing the glaze, I then moved onto the next layer, adding the embossing dabber down the body of the moth and applying some Walnut Stain Embossing Glaze over the top. Again heat emboss the glaze until molten. Apply some Rusty Hinge Embossing Glaze to random areas of the body and heat emboss. 

The next layer of embossing is on the wings and after I applied the Embossing Dabber to the surface, I sprinkled the layers of Embossing Glaze over the top, adding them individually and building up the layers one by one. Top Tip: When adding the powders, start with the palest colour first, then build up the layers but reduce the powder with each application, allowing the previous colour to show beneath.

I started with Speckled Egg, heat embossed the glaze, then added Prize Ribbon. Heat emboss and repeat this process using Salvaged Patina, Hickory Smoke and then a final sprinkling of Walnut Stain.

Finally, I wanted some texture on the body, and where the wings join ~ and for this I used a small amount of Emerald Creek Embossing Powder over the top of the ink and heat embossed this until molten.

I now have my gorgeous moth ready and layered the embossed piece over the top of the kraft die cut, leaving the wings free! I then shaped the wings to create a little more dimension and in the photo below, you can see the width of the wingspan on this beauty ~ it's amazing!!

Now for the background and for this I cut a panel of mixed media heavystock, 12 x 15.5cm.

I began by applying Distress Spray Stains and Oxide Sprays ~ Antique Linen, Ground Espresso, Salvaged Patina, Speckled Egg and a touch of Frayed Burlap Distress Stains and Salvaged Patina and Speckled Egg Oxide Sprays. I built up the colour towards the top of the panel, allowing it to fade towards the bottom.

After adding some stencilling directly onto the panel using Frayed Burlap Oxide Ink, through the Mini Layering Script Stencil from Set 49...

...I then started to add some stamped layers, and for this I used a combination of stamps ~ Entomology Script stamped directly onto the background with Black Soot Archival Ink. Some stamped imagery added to the right hand side using stamps from the Field Notes set and the Mini Glitch, in Barn Door and Black Soot Archival Ink....

...and also adding some stamping in the bottom left hand corner using the same stamp sets and same colours. I always use my stamp platform for this as it creates a really beautiful, clear impression. In this corner, I also added a Remnant Rub, Exhibit A., which I applied above the stamping.

To complete the background, I added some crosses from the Mini Glitch stamp set, and stamped these in the top left hand corner, stamped with Salvaged Patina Oxide Ink.

I inked the edges of the panel with Walnut Stain Distress Ink and then machine stitched a border before matting this panel onto silver metallic kraft stash card, followed by a layer of blue kraft card taken from Tim's Cool Kraft Stock.

I then mounted my layers using foam pads, onto a background of script paper which I think was from one of Tim's older paper pads and a layer of blackout card before mounting these layers onto my card blank. Each time I left a border around the outside to create the layers.

Now for the tiny finishing details and in the top right hand corner, I added an offcuts of silver metallic kraft stash, which I had on my desk. This was embossed using the Foundry 3D Texture Fade and is literally a small piece cut that I keep and never throw away but is perfect for wrapping around the edges of  background panels to create more interest. I then attached a rolled up Stitched Scrap, complete with Mini Pin before I adhered a Field Notes Ephemera piece into place.

Finally, I added some Index Clips ~ I placed three clips around the edges of the inked background panel and altered these with Distress Paints for a more rusty, crusty look. I used Rusty Hinge, Crackling Campfire, Ground Espresso, and Black Soot.

To complete the clips, I adhered some Hardware Heads over the top, again altered with the same colours of Distress Paints and attached with Matte Collage Medium.

So, that completes my project for this week and I hope you've loved the card I've made...

...as always, if you make anything, or been inspired by anything that you've seen here on my blog ~ then please, let me know by tagging me on social media or leaving a comment here and I will be right over to take a look!

Don't forget that every week, one lucky random participant has the chance to win a $25 gift voucher from Simon Says Stamp and you can join in up to 5 times, which means you could have 5 chances to winYou have until Monday 8am Ohio time. 1pm UK time, 2 pm CET to join in and good luck....


Thank you so much for taking the time to stop by today ~ stay safe and keep well.
Love Emma xxx

Recipe for project:


Distress Ink: Walnut Stain
Distress Oxide Ink: Frayed Burlap, Salvaged Patina
Distress PaintsCrackling Campfire, Rusty Hinge, Black Soot and Ground Espresso 
Distress Spray StainGround Espresso, Speckled Egg, Frayed Burlap and Antique Linen
Oxide Spray: Salvaged Patina and Speckled Egg
Embossing GlazesSpeckled Egg, Walnut Stain, Antique Linen, Prize Ribbon, Hickory Smoke, Salvaged Patina

Sunday, 8 August 2021

Enjoy Today...

 Hello friends and Happy Sunday!

Today, I'm so happy to be back on the Simon Says Stamp Store blog to share my latest project with you all and if you love the sneak peek below, and want to see more of this piece, then you can head over to their blog, CLICK HERE to check out the step by step process of how I created this piece!

Hope you love what I've made and as always, I can't wait to see if you've been inspired by this make and if you are, then please tag me on social media or here on the blog and I will pop by to see your gorgeous pieces!

Thanks so much for stopping by and see you tomorrow for my Monday post!
Love Emma x


Monday, 19 July 2021

Black Coffee...

Hi everyone and welcome to a brand new week at the Simon Says Stamp Monday Challenge Blog!

This week our theme is all about "FOOD AND DRINK" and the DT are hoping to inspire you with some gourmet delights and if you would like to join us and play along, then all the details of how you can do this are below! We're looking forward to seeing your makes...

For my project, I created a tag all about one of my favourite cities in the world...Paris, and the wonderful café society. So with this in mind, I wanted to create a vintage style piece that was inspired by the frontages of the cafés and created these using Tim Holtz and Sizzix dies. Also, how could I resist the temptation of not using the brand new Distress colour that Tim launched on his YouTube Live on Saturday! If you haven't checked it out yet, then what are you waiting for because it is the most gorgeous shade of blue called Prize Ribbon and I combined this with other Distress Spray Stains including Ground Espresso which had the food/drink link!

So let's get started ~ it's time for me to share this project and here's how I made this piece...

To begin with I used a Size 8 Etcetera Tag, but I didn't create my background directly onto the surface! Instead I used the same sized Mixed Media Heavystock tag for this.

I then cut a panel of Mixed Media Heavystock card using the Bubbling Thinlits Die.

I started by adding colour to my tag and the die cut and chose a combination of Prize Ribbon, Ground Espresso, Speckled Egg Distress Spray Stains, together with Salvaged Patina and Speckled Egg Oxide Sprays.

I sprayed the Distress Spray Stains and Oxide Sprays directly onto a tag and the panel, both of which had already been lightly misted water. I allowed for the inks to blend and create the colour I wanted, which was a rich, indigo denim blue.

I then adhered the die cut bubbles over the tag to create the textured layer and also added a layer of Matte Collage Medium over the surface to seal the inks.

I allowed for the tag to dry before rubbing Walnut Stain Distress Crayon over the top, blending out any of the harsh lines with a semi dry baby wipe.

Finally, I spritzed a very light misting of Speckled Egg over the tag and just allowed this to dry on it's own.

Once the tag was thoroughly dry, I then added some rusty colours around the edges and for this I used Crackling Campfire, Antiqued Bronze, Black Soot and Ground Espresso Distress Paints which I applied one at a time, drying in between layers to build the colour and create the rust finish.

With the tag ready, I machine stitched a border around the edge and then attached it to my Etcetera Tag with Matte Collage Medium.

Now for the embellishments and I used the Cafe Colorize Thinlits Die Set for my 'coffee cup'. I cut each individual piece from Mixed Media heavystock card and coloured them with a combination of brown Distress Inks to build up the layers. The only colour I used was Tumbled Glass for the band. I applied the inks directly to the card with a blending tool. To add a bit more intensity of colour, I added shading with Polychromos Pencils before I assembled the cup and the plume of steam.

I wanted to sit my cup on a ledge and used two Etcetera pieces to create an 'L' shape. I used the smallest and narrowest Pinked Etcetera Trim and added a straight edged trim which is in the Webs Trims.

On the pinked trim, I used a strip of paper from the Backdrops Volume 2 and chose this piece because of it's restaurant/cafe theme and using the Decorative Trims Thinlits Die set, I cut the specific section that I wanted to use.

I attached my die cut trim to the Etcetera Trim and cut away the excess before applying a layer of Matte Collage Medium to seal it.

I then added some rusty crusty layers to each end of the trim using Translucent Grit Paste and placed a Hardware Head onto either end, sinking it into the paste. I only applied a small amount of the paste as I don't want it to become to heavy, it's just to add texture to the smooth paper.

Once the paste was dry, I used the same colours of Distress Paint as I used around the edges of the tag and then applied a light touch of Gilding Wax over the top. This is from my own stash...

I attached the trim across my tag and then attached the cup using foam pads and placed this onto a small piece of Mummy Cloth that I dyed with Frayed Burlap and Antique Linen Sprays.

To complete the coffee cup, I added three metallic droplets around the die cut plume of steam.

All that's left to do is the wording. I cut the word CAFE using the Alphanumeric Bold and the word Paris using the Stretch Lower Thinlits Die set. All the letters are cut four separate times and layered over one another to resemble the thickness of chipboard.

I wanted to create a worn look to the lettering but also create an enamelled finish and so I used Embossing Glazes and gold embossing powder.

CAFE: Speckled Egg, Walnut Stain and Gold Embossing Powder

PARIS: Antique Linen, Walnut Stain and Gold Embossing Powder

I applied Tim's Embossing Dabber over the surface of the lettering and then applied each layer of the Glazes one at a time, reapplying the dabber between layers. I recommend to always start with a solid layer of the palest colour of glaze to begin with and then a sprinkle of the Walnut Stain over the top. I heat embossed the powders until molten. This will build up the thickness of the glaze and create a beautiful enamelled effect. I then finished with a sprinkling of gold embossing powder over the top which I heat embossed.

With the letters ready, I added the CAFE lettering onto gold metallic kraft stash to add a shadow and attached it to the left of the cup, running vertically down the side.

I attached the Paris lettering beneath my ledge, allowing it to slightly overhang the bottom.

Finally, I added a hinge clip, altered with Distress Paints, Speckled Egg, Picket Fence and Crackling Campfire, hung a Hook Clasp from it and added a Thought Token on the end, which I altered with Picket Fence Distress Crayon to accentuate the wording.

...as always, if you make anything, or been inspired by anything that you've seen here on my blog ~ then please, let me know by tagging me on social media or leaving a comment here and I will be right over to take a look!

Don't forget that every week, one lucky random participant has the chance to win a $25 gift voucher from Simon Says Stamp and you can join in up to 5 times, which means you could have 5 chances to winYou have until Monday 8am Ohio time. 1pm UK time, 2 pm CET to join in and good luck....


Thank you so much for taking the time to stop by today ~ stay safe and keep well.
Love Emma xxx

Recipe for project:


Distress Paints: Crackling Campfire, Antiqued Bronze, Picket Fence, Black Soot and Ground Espresso 
Distress Spray StainPrize Ribbon, Ground Espresso, Speckled Egg, Frayed Burlap and Antique Linen
Oxide Spray: Salvaged Patina and Speckled Egg
Embossing GlazesSpeckled Egg, Walnut Stain, Antique Linen
Powered By Blogger

Total Pageviews