Showing posts with label Tonic. Show all posts

Wednesday, 1 November 2023

The New Tim Holtz Tonic Precision Trimmer

Hello everyone....how are you?

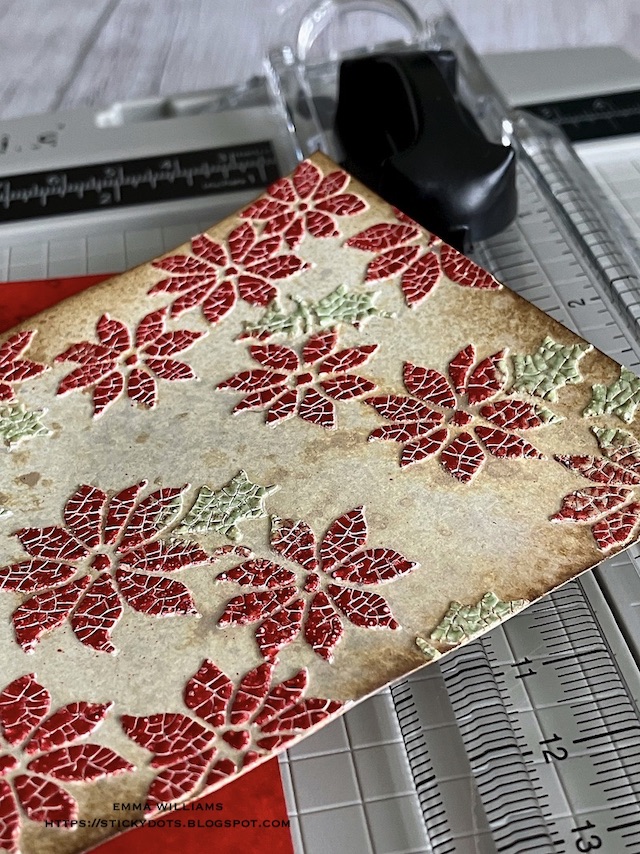
Have you heard that there's a brand new shiny tool just been released? The Tim Holtz Tonic Precision Trimmer is the latest addition to the Tonic range and I've been putting it through it's paces and road testing it for a couple of weeks, making backgrounds and card blanks ready for my Christmas makes, and today, I wanted to share some of the things that I LOVE about this new addition to my craft room!

You might ask yourself, why do I need another trimmer and what’s different about this one? Well, I’ve had a lot of trimmers over the years but this post explores the 5 reasons as to why this tool stands head and shoulders above them all!

1. To begin with, this is by Tim and Tonic ~ two wonderful names, with so much experience in the crafting industry and because Tim is a maker himself, he knows what a crafter needs and what is important to them and as soon as you take this trimmer out the box, you will realise this works alongside the other pieces in his range ~ the Mixed Media Rotary Trimmer, the three sizes of Guillotines and the Deckle Torn Edge Trimmer.

2. The trimmer itself is lightweight, easy to use and when placed on your desk, the silicone feet will grip tight, and there will be no slip and slide once it's in position.

When you receive your trimmer, it comes with two black cutting blades and a grey scoring blade, which are easily interchangeable and will cut and score card and paper. You can buy spare blades separately.

My first test was to see if this trimmer would cut through Mixed Media Heavystock card with paste applied over the top ~ so, I tried it out and yes, the blade just glided through the pasted card with a clean cut and no snags or flaking of any of the paste. THIS TRIMMER CUTS LIKE A DREAM!

3. There is a spring lift blade track, complete with measurements and with the help of two small springy pads at the top and bottom of the blade track, this will allow you to easily slide your card or paper in and out of the trimmer. Then, once you start to cut, you just press down on the plastic bar that will hold and grip the card securely in place.

4. The measurements are in metric and inches, which I personally find so useful as I do tend to work more in centimetres but as a maker, there are times that I do need to also work in inches. Now, I have the best of both worlds!  The locking extendable rulers, at the top, and the bottom will give you the ability to cut and score card and paper up to 12.5'/31.5cm in size and there is also the addition of a ruler in the central grid area which helps you to align your card perfectly. No squiffy edges!!!

5. The size of this trimmer, with all these wonderful details, is just perfect for making my "Emma sized cards" and what I was really impressed with is the score line ~ it creates a beautiful, crisp fold, with none of that annoying cracking along the edge ~ a huge personal hate of mine and something I've experienced with all the other trimmers and score boards I've tried in the past. I'm already thinking of all the different folds that I can now create on cards and boxes for my Christmas makes.

If you have stopped by to check out my review, then I hope this will help you decide on whether the product will be perfect for you and for your needs!

In the meantime, thanks to Tim and Tonic, I now have plenty of backgrounds and card blanks ready to begin my Christmas crafting and all of them so easily achievable with such a fabulous cutting tool.

If you're interested in finding out more about this wonderful trimmer, then don't forget you can watch the Tim Holtz LIVE replay!

Thanks for stopping by today...love Emma xx

Monday, 26 June 2023

Here Comes Summer...

Hello friends...

Hope you all had a wonderful weekend, and Happy Monday! As always, the start of a brand new week means that we have a brand new Simon Says Stamp Monday Challenge and this week, our theme is all about VACATION and however you choose to interpret this challenge, we hope you'll join us and play along!

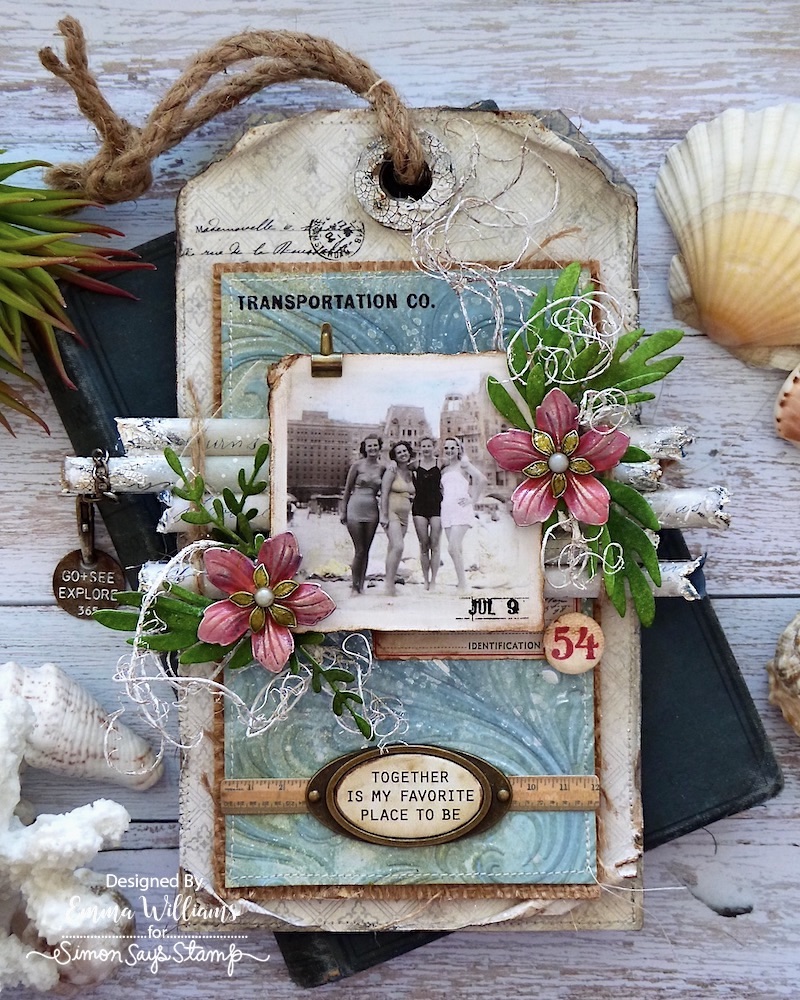
For my make, I chose to create a vintage style tag all about friendship, sea and sand and was inspired by a photo from Tim Holtz's Snapshots pack and I just thought it incapsulated everything about going on vacation and creating wonderful, happy memories that can be treasured for many years to come.

So, it's time to fasten your seatbelts, we're going on vacation and here's how I created this project....

For this make, I used a Mini Etcetera Tag as my base...

COVERING THE TAG SURFACE

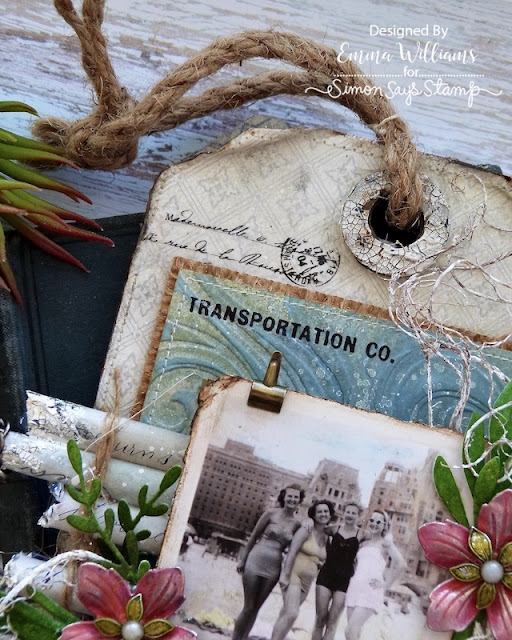
I began by applying Design Tape around the edge of my tag before cutting a panel of paper from the Backdrops Vol 2 that measures the same size as the tag itself, and then inked the edges with Walnut Stain Distress Ink.

I then ripped and tore the edges of the paper, scrunching up the corners to create folds before I machine stitched a border around the edge.

I adhered the paper in place using Matte Collage Medium, applying a coat of the medium over the surface to seal the paper.

I then ran the Walnut Stain Distress Crayon around the edges to add the 'oldy worldy' vintage finish to this piece.

To complete the tag, I applied some crackle paste to the hole reinforcer piece and once the paste was dry, I accentuated the crackle with Walnut Stain Distress Crayon, and then fixed it into position.

The final detail was to add some script to the top left hand corner and I used a torn piece of Photographic Collage Paper, and just adhered it into position using Matte Collage Medium before I threaded some rope through the hole itself.
EMBOSSED PANEL

For the next layer, I used the Swirls Embossing Folder to emboss a panel of Mixed Media Heavystock card. I always spritz the card with a light mist of water before running it through the machine as this will break down the fibres of the paper causing less cracking to the surface.

Once embossed, I added the colour and used the following Distress Spray Stains and Oxide Sprays:

Spray Stains: Bundled Sage, Tumbled Glass, Evergreen Bough, Faded Jeans

Oxide Sprays: Speckled Egg

I spritzed the cardstock with the sprays before adding a mist of water to blend them and create the colours of the ocean.

I cut the panel down to size to fit onto my tag, and mounted it onto burlap before attaching it to the tag using foam pads and then added a Remnant Rub from the Labeled set, placing it in the top left hand corner.

PAPER ROLLS

Now to start bringing the scene to life and we'll begin with the paper rolls.

These rolls are various lengths and are all made using offcuts of papers from the Backdrops Packs and I just selected a few that would be the perfect colour match.

I took each piece of paper, and tightly rolled them around a pencil, securing them with a line of red line tape to hold them in position. I ripped and distressed the ends of each paper roll, before I applied some crackle paste to add texture. Once the paste was dry, I just ran the Hickory Smoke Distress Crayon over the surface, blending out the medium with a damp brush.

I then placed each roll side by side, attaching them with Matte Collage Medium before wrapping string around either side.

I attached the rolls across the embossed panel on my tag.

PHOTO

There was never a doubt which photo I would use for this make, I just love this one but wanted to create more of a vintage vibe. So to do this, I began by applying a coat of Matte Collage Medium over the surface to seal the photo and then cut the edges using Tim's Deckle Edge paper trimmer. I then added small tears before inking the edges with Walnut Stain Distress Ink.

The photo itself was colour tinted using Distress Crayons, applied directly to the image with a waterbrush.

Once I was happy, I mounted the photo onto some mountboard to create more stability before I added a small Remnant Rub, 'Jul 9', in the bottom right hand corner. I attached the photo over a piece of Mica Tile and then adhered it over the top of the paper rolls and added a Tiny Clip to the top left hand corner.

FLOWERS AND FOLIAGE

For the flowers, I used a selection of Floral Adornments and to create the enamelled effect, I applied the Embossing Dabber to each flower and then sprinkled Distress Glazes over the top to add the colour. I used Kitsch Flamingo for the larger flowers and Fossilized Amber for the smaller ones and heat embossed each piece until the glaze became molten and shiny.

Be careful when heat embossing metal as it will become very hot!

I layered the smaller flowers in the centres of the large ones and then added a pearl to each before setting them to one side so the adhesive would set.

The leaves and foliage are all cut from Mixed Media Heavystock card using dies from the Large Funky Florals dies set. The card panels are coloured with Rustic Wilderness and Peeled Paint Spray Stains, and once dry, I cut each leaf before blending Forest Moss around the edges. I shaped each leaf and then arranged them together with the flowers, placing them onto the paper rolls and around the photo.

To add some more texture, I placed curly moss into the arrangement. This moss is from my stash but can be bought from many craft stores.

To complete this arrangement, I added a small ephemera piece underneath the photo and then placed a Mini Flair Pin, '54' onto the right hand side.

FINISHING DETAILS

Underneath the photo arrangement, I added a quote. I place a quote chip label inside a label frame and attached it over the top of a ruler ephemera piece, taken from the Memoir Ephemera set.

Finally, I attached a Hook Clasp complete with a Thought Token to the left hand side of the tag by looping the chain around the tag and attaching the ring fastener through the chain to secure it into position.

The thought token is coloured with Black Soot, Antiqued Bronze, Ground Espresso, Crackling Campfire Distress Paints and then I applied Picket Fence Distress Crayon to accentuate the wording.
So that's my project complete for this week and I hope I've inspired you with this make and you've enjoyed your time by the beach...

As always, if you are inspired by anything you see on my blog, don't hesitate to message me or tag me on any social media platforms or leave me a message here and I'll pop by to take a look ~ I'm always so humbled and honoured to see what you've been making after visiting my blog.

Don't forget that every week, one lucky random participant has the chance to win a $25 gift voucher from Simon Says Stamp and you can join in up to 5 times, which means you could have 5 chances to winYou have until next Monday at 8am Ohio time. 1pm UK time, 2 pm CET to join in and good luck....


Thank you so much for taking the time to stop by today ~ stay safe and keep well.
Love Emma xxx


RECIPE FOR PROJECT

Tim Holtz for Stampers Anonymous: Mini Etcetera Tag
Distress Spray StainBundled Sage, Tumbled Glass, Evergreen Bough, Faded Jeans, Rustic Wilderness and Peeled Paint
Distress Crayons: Walnut Stain, Hickory Smoke
Distress Inks: Walnut Stain
Distress Glaze: Kitsch Flamingo, Fossilized Amber
Distress Paint: Black Soot, Antiqued Bronze, Ground Espresso, Crackling Campfire
Rope and moss from my own stash

Monday, 3 April 2023

Free As A Bird....

Hello friends and welcome to the brand new Simon Says Stamp Monday Challenge which this week is all about ADDING TEXTURE. The DT are also showcasing the products of Tonic within their makes, something that you don't have to do if you would like to join us.

This week, as we get nearer to Easter and a visit from the Easter Bunny, my thoughts turned to my Mum who can't eat chocolate, (don't worry, I always make up for her as I'm a chocoholic). I didn't want her to feel left out, so thought it would be nice to treat her to a gift card but because the card on it's own is pretty boring, I decided to make a little gift pocket envelope and used dies from Tim Holtz and Sizzix, which I layered over a textured background coloured with Tonic Shimmer Powders.

So let's get started and here's how I made this gift card envelope...


To begin with I cut my pocket envelope from Mixed Media Heavystock Cardstock using the Sizzix Collector Die from Tim Holtz and I just inked the card using a light misting of Antique Linen and Frayed Burlap Distress Spray Stain. I folded the envelope along the score lines and then added Design Tape Trim around the edges on the front to create a border.

Now to start adding those layers...

BACKGROUND LAYERS

I began by making that textured background and applied Grit Paste through the Roses Layering Stencil onto a panel of cardstock. After allowing the paste to dry, I then added the colour using the Tonic Shimmer Powder. I chose Atlantis which I will admit was slightly brighter in colour than I expected ~ I thought it might be more of a Duck Egg blue, but no problem ~ I just adapted and this was perfect for this make.

I shook a tiny amount of the powder onto my stenciled card and then misted water over the top. If you've used PaperArtsy Infusions, then these powders work in exactly the same way but have a slight shimmer effect to them once dry.

You can either leave the card to dry, or if you're like me and can't wait ~ then use a heat gun, being very careful not to overheat the paste or bubble it.

Once it was dry, I then used my new Rotary Trimmer to cut through that pasted background, with very little effort and not one raggedy edge in sight. I cut panels to fit the front and the flap and inked the edges of each piece before I machine stitched a border around the front panel. I attached each inked panel to my pocket envelope.

FEATHERED FRIEND

Now to make that little birdie. I actually had one of these leftover sitting in my stash that I didn't use on a previous project, and to create the bird, I used the smaller size from the Feathered Friends Die Set which I cut watercolour card, before I inked and coloured the individual pieces of the die cut bird with Distress Inks, blending the ink over the surface.

INKS; Tumbled Glass, Rusty Hinge, Vintage Photo, Gathered Twigs, Broken China, Old Paper

I assembled the bird and added white pen highlights before moving onto the nest.

NEST

To create the nest, I coloured some more of the Mixed Media Heavystock card using Rustic Wilderness and Peeled Paint spray stains and then cut the foliage using dies from the Festive Bouquet Thinlits Die Set. Once I'd cut enough pieces, I started to assemble the nest, arranging the foliage with moss to build it up. I then placed my little feathered friend in the nest.

Now for the tiny speckled eggs and for this I used some of Tim's Tiny Eggs and painted them with Speckled Egg Distress Paint. Once dry, I loaded up the Splatter Brush and splattered Ground Espresso Distress Paint across the surface of each egg before drying them again and then adding them to the nest.
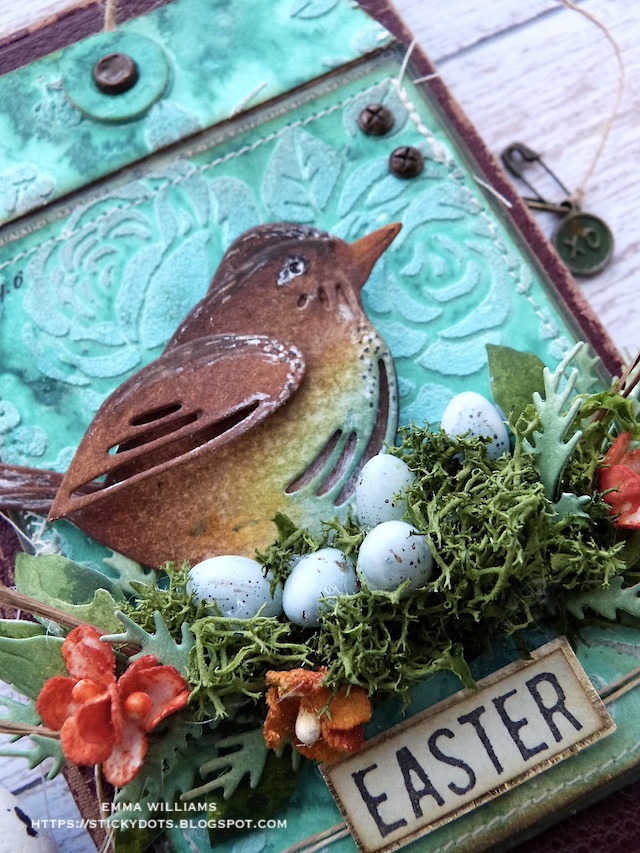
Finally, I added some tiny little flowers and for these I used the Bouquet Findings which I coloured with Crackling Campfire Distress Spray Stain and added to the nest.

SENTIMENT

We're nearly there and all that's left is the finishing details and the sentiment. I stamped the Easter message in Black Archival Ink using the stamp from the Spring Shadows set. I cut away the Happy part of the message and then layered the "Easter" sentiment onto some gold metallic kraft card.

I then wrapped twine around the bottom section of my envelope, securing it with a knot before attaching the wording using foam pads.

FINAL DETAILS

For the final details, I added some Hardware Heads to the top right hand corner of the envelope....

...and a tiny remnant rub in the corner.

To complete the envelope, I tied a piece of twine around the washer that I attached with a Large Fastener which has a slightly battered and worn look thanks to the Texture Hammer.

On the end of the twine, I attached a Word Tag, that I painted with Rustic Wilderness Paint. Once the paint was dry, I then applied a light coverage of Statue Foundry Wax over the raised areas and heat embossed the wax to set it.

So that's my make finished and I hope you love what I've created and it will inspire you with some Easter gift ideas.

As always, if you make anything, or if you've been inspired by anything that you've seen here on my blog ~ then please, let me know by tagging me on social media or leaving a comment here and I will be right over to take a look!

Don't forget that every week, one lucky random participant has the chance to win a $25 gift voucher from Simon Says Stamp and you can join in up to 5 times, which means you could have 5 chances to winYou have until next Monday at 8am Ohio time. 1pm UK time, 2 pm CET to join in and good luck....


Thank you so much for taking the time to stop by today...see you all again very soon!

Love Emma xx


Recipe for project:

Tim Holtz for Stampers Anonymous: Roses Layering Stencil, Spring Shadows
Distress Spray Stain: Crackling Campfire, Rustic Wilderness, Peeled Paint, Antique Linen, Frayed Burlap
Distress Inks: Walnut Stain, Tumbled Glass, Rusty Hinge, Vintage Photo, Gathered Twigs, Broken China, Old Paper
Distress Paint: Speckled Egg, Ground Espresso
Powered By Blogger

Total Pageviews