Showing posts with label Tim Holtz Media Team. Show all posts

Wednesday, 19 November 2014

Winter Wonderland ~ Tim Holtz Media Team Tutorial

Hello everyone!

Today, is going to be a busy day on my blog because I have not one but two posts to share with you all and for the first of those posts, I am thrilled to be sharing my tutorial for the Tim Holtz Media Team over on Tim's blog. I hope you will enjoy my winter wonderland step by step tutorial where I show you how to create an ornamental plaque using die cutting to create 3D elements.
As always, I hope you enjoy my tutorial and love what I've created. I'll see you later today with a sneaky peek of a tutorial I've created for Simon Says Stamp!
Thank you for stopping by today...Emma x

Thursday, 6 November 2014

'Tis The Season Gift Card Holder Tutorial

Hello everyone!

Today, I'm sharing the first of my November tutorials for the Tim Holtz Media Team and as we put away all our Halloween crafting items, it's now that time of the year when we start thinking about Christmas! It's always lovely to make and send handmade gifts to loved ones but sometimes, there are those difficult people in our lives that have just about everything and no matter how hard you try to think of something that they might like ~ you just can't and you resort to a gift card. So for today's project I wanted to show you how to turn that gift card into something a little extra special and I have created a step by step tutorial showing how to make a gift card holder.

To begin with, cut three pieces of kraft card to measure:
23.5 x 18.5cm ~ Card Folder
8.5 x 12.5cm ~ Tag Pocket
10.5 x 7.5cm ~ Gift Card Pocket
Take the card folder and with the longest edge horizontal in front of you and measuring from the left hand side, score two lines vertically at 11cm and 12cm. Fold along scorelines to create your folder.

Place the tag pocket in front of you and score the panel of card at 1cm, 2cm, 10.5cm and 11.5cm. Score at 1cm and 2cm along the bottom edge of the card. Fold along the scorelines

Measure and score 1cm from the edge around three sides of the gift card pocket. Fold along scorelines.
To form the tag pocket, cut away the bottom left and right hand corner sections, 2 x 2cm on each side of the card. See below.
To form the gift card pocket, cut away an angled corner section on the bottom left and right hand corners.
Attach double sided tape along the flaps on the back of both pockets.
Apply some Picket Fence Distress Paint around the edges of each section of card.
Cut pieces of paper of the music score paper from the Merriment Paper Stash to measure 10 x 17.5cm. Ink around the edges of each piece of paper using Frayed Burlap Distress Ink and matt onto a piece of cream card, leaving a narrow border around the edge.
Mount the matted layers of card onto each of the inside panels. Cut two further pieces of the paper from the Merriment paper stash, ink around the edges and mount onto the front of each of the pockets. Attach the pockets onto the inside of your gift card folder.
Add the Special Delivery Ephemera piece onto the tag pocket.
Apply small amounts of Aged Mahogany and Festive Berries Distress Ink to a craft sheet, mist with water and then dye a length of crinkle ribbon by mopping up the stains. Heat dry the ribbon.
Wrap the dyed ribbon around the centre of your wallet, taking it around the back and tying the ribbon into a bow on the left hand spine of the folder. Place the folder to one side, whilst you start working on the decorative panel for the front of your wallet.
For the decorative panel, begin by cutting a piece of Manila card, 8 x 15.5cm. Below, I'm showing you two ways to ink the Manila card ~ in the following photo, I inked the card by blending Distress Inks over the surface using a blending tool and then misting the ink with water before heat setting the ink onto the card. As you can see, this technique gives a slightly softer, diffused appearance to your card.
For the second piece of card, I used exactly the same colours of Distress Stain as I did Distress Inks in the photo above. I applied the stain to a craft sheet, misted them with water and then swiped the card through the inks to pick up the colour. This gives a more mottled effect to your card and a slightly more shabby appearance. 

I chose to use the Distress Stained card but either piece of card will work for this project, it's entirely up to you and of course, it depends on the products that you own.

Once the inked card is dry, I distressed the edges and inked them with Walnut Stain Distress Ink before inking up the starburst stamp from the Christmas Nostalgia stamp set with Antique Linen Distress Ink and stamping over the background of the inked card to give a very soft pattern.
 Machine stitch around the edge of the card.
Stamp the 'Tis The Season message onto the stitched card using Jet Black Archival Ink. 
Cut a piece of decorative paper from the Merriment paper stash, distress the edges of the paper by ripping and tearing them and then matt onto black card. Matt the stitched card onto the centre of the matts and then attach the mounts onto the front of your gift card wallet. Distress the edges of the wallet even further using Black Soot and Antiqued Bronze Distress Paint.
We're nearly there now and all that's left is to decorate this panel and for this, I used the Candlelight die to die cut all my pieces from Grungeboard. I then painted the body of the candles with Picket Fence and Antique Linen Distress Paint and the flame using Scattered Straw and Wild Honey Distress Paint.
Ink the edges of each individual die piece with Black Soot Distress Ink and then layer all the pieces to create the dimensional candles. Add highlights of glitter to the candles by sprinkling Clear Rock Candy Distress Glitter over a layer of Glossy Accents.
Die cut some foliage using the Holiday Greens die and ink the die cut leaves with Peeled Paint and Iced Spruce. 
To give a frosty, snow covered appearance to the foliage, lightly spritz some Picket Fence Distress Spray Stain over the top of the inked die cuts and heat dry. Shape the leaves to give a more realistic look to the foliage.
Layer up all your die cuts onto the front panel of your wallet.
 I also added some Mirrored Stars and some ephemera pieces to the arrangement, together with cheesecloth from my own stash.
 
Apply some Picket Fence Distress Paint over the top of a Word Band, let the paint sink into the wording and then, wipe away the excess. Attach some Paper String to each side of the word band and position it on the front of your arrangement.
Finally, I created a tag to fit into the pocket inside and if you choose, you can add a written message onto this tag. Ink up the tag by applying the Distress Stains to your craft sheet and picking up all the ink. Emboss the tag using the Snowflakes Texture Fade from the Beaded Garland and Snowflakes set, add some Frayed Burlap Distress Ink to the raised embossing before spritzing the tag with Picket Fence Distress Spray Stain.
Tie some of the previously dyed crinkle ribbon at the top of your tag and add a piece from the Christmas Ephemera Pack together with a Flashcard.

Now, all that's left is to place your gift card in the one pocket and the tag in the other...
...tie the ribbon into a bow...
...and that completes your gift card wallet.

I really hope you've been inspired by today's tutorial and that you've enjoyed the process of making one of these wallets!

Thank you so much for stopping by and I'll see you again very soon!
Emma x

Supply List:
Surfaces: Ranger Manila Card, Ranger Kraft Card, Ranger Black Card, Merriment Paper Stash, Ranger Size 8 Manila Tag

Dies: Candlelight Bigz Die, Holiday Greens Thinlits Die

Texture Fade: Beaded Garland and Snowflakes

Stamps: Christmas Nostalgia, Handwritten Holidays 2

Stain: Brushed Corduroy, Old Paper, Pumice Stone, Aged Mahogany, Festive Berries. Picket Fence Distress Spray Stain

Ink: Black Soot, Peeled Paint, Iced Spruce, Walnut Stain, Frayed Burlap, Antique Linen. Jet Black Archival Ink

Paint: Picket Fence, Antique Linen, Antiqued Bronze, Black Soot, Scattered Straw, Wild Honey

Embellishments: Christmas Word Band, Christmas Ephemera Pack, Flashcards, Merriment Tissue Tape, Crinkle Ribbon, Mirrored Stars, Paper String Stripes

Glitter: Clear Rock Candy Distress Glitter

Mediums: Glossy Accents, Adhesive Tape

Tools: Vagabond, Blending Tool, Craft Sheet, Scoreboard, Scoring Tool

Friday, 24 October 2014

Trick....or Treat? ~ Tim Holtz Media Team Tutorial

Hello everyone!

Hope you've all had a great week and looking forward to the weekend!

Today, I'm thrilled to be sharing my latest tutorial for the Tim Holtz Media Team over on Tim's blog. I really hope you'll pop over to see how I made my Trick Or Treat Candy Box and that you will be inspired to create one of your own ready for Halloween, next week. I had so much fun creating this and I even managed to not eat any of the chocolates that I've packed into the little secret compartment, which is very good for me!!


Thank you so much for your visit today and I'll see you soon!
Love Emma xx


Tuesday, 7 October 2014

You're Invited ~ Halloween Party Invitation Tutorial

Hello everyone!

Today, I'm sharing a fun Halloween project that I've created for the Tim Holtz Media Team. Halloween has to be one of my favourite times of the year and when I started thinking about what I wanted to create for today's post, I thought about all those Halloween parties and when it comes to parties, we all need invitations. So today, I'm sharing my invitation with a twist and I hope you love it, just as much as I loved creating it!!

I want to share the basic concept of how to create the card, after that it's up to you how much you want to decorate it and how elaborate you want to make it! You can make it as simple as you like, or you can go to town but whatever you choose, this basic card shape is wonderful for so many projects!

To begin with, and to create the frame, cut a piece of black cardstock, 6" x 8" in size and with the card placed in front of you and the longest side facing you, score the frame at 0.5", 1", 7" and 7.5" and fold along the scorelines.

To create the aperture in the centre, measure 1", 1.5", 4.5" and 5" from the second score line on the left hand side and score. Turn the card around 90˚ and then score again at 1", 1.5", 4.5" and 5" to create a square in the middle of your frame section of card. Cut diagonally from corner to corner of the scored square to create four triangular flaps in the centre. Create a mountain fold, followed by a valley fold along each of the scorelines to create your inset to your frame.
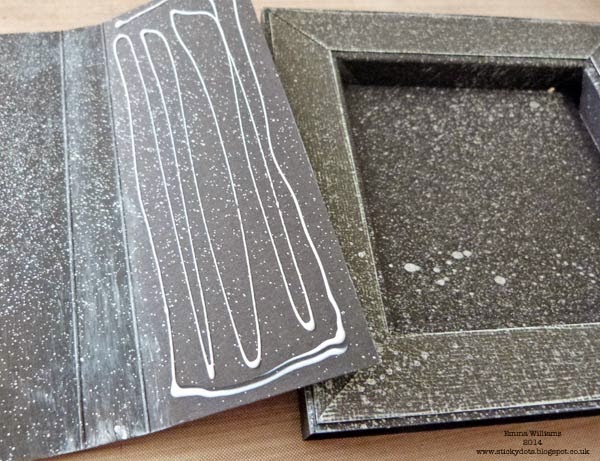
Mount the frame onto a piece of 6" square black card by applying tape onto the end tabs of the scored card to form a box.
Add adhesive to each of the flaps on your frame and attach them to the backing card.
Cut a further piece of black card, 10cm square and place the card in the centre of the box frame and attach with glue. You now have your basic frame. 
To create the cover for your card, cut a further piece of black card, 9" x 6" and score vertically at 2.25" and 2.75".
Cut four strips of textured cardstock, 0.75" x 5.75" and on two of the pieces cut away the corner section. Attach the cardstock to the front of your frame, sticking the uncut pieces onto the sides of your box and then attaching the cut strips to the top and bottom sections of your frame, layering them over the sides sections to give the appearance of a mitred corner.
Spritz the back and front of your cover and the front of your box with Brushed Pewter Distress Stain Spray and leave to dry.
Attach the cover by applying glue to the back section of card only and wrapping it around your shadowbox frame card.
For the front of the card, I cut a piece of Manila card, 5" square and swiped it through some Distress Stains that I had applied to my craft sheet and misted with water.
I then stamped the image of the witch and the message, both from the Carved Halloween stamp set directly onto the card and coloured it with Distress Marker pens.  
I matted the stamped image onto purple cardstock and machine stitched around the edge before attaching it onto the cover of my frame, using foam pads to create dimension.
For the inside of the cover, I used another piece of Manila cardstock, 5" square and used the same colours of Distress Stain applied to my craft sheet as I used for the background for the witch image. I then layered the Halloween Layering Stencil over the top and spritzed through the stencil using the Distress Marker Spritzer and Pumice Stone Distress Marker Pen. 
I matted the inked card onto grey cardstock and mounted it onto my inside cover. To decorate this section, I used the Candlelight Fright die and die cut the spider from Grungeboard and painted it with Black Soot and Brushed Pewter Distress Paint. At this point, I also added some machine stitching to my background.
Once the paint is dry, I added a layer of Glossy Accents over the top and applied Black Soot Distress Glitter to the spider.
Using the Cobweb Sizzlits Decorative die, die cut some black Core'dinations card and cut into sections.
Attach the webs to the background card on the inside cover, by applying small amounts of glue to just the very corner sections, leaving the rest of the cobweb free. Add the die cut glittered spider.
Ink up the Happy Halloween and event tickets from the Odds and Ends stamp set and stamp a few of these tickets onto inked cardstock. Cut out each of the tickets as these will act as the invite for your invitation. What's great is that you can add the name of the recipient, the event and where the party will be held onto the ticket.
 Tuck the tickets inside one of the die cut webs.
...and now, to decorate the shadowbox section of the frame.
To begin with, I used the gorgeous clock as my background and added Game Spinners to the dial, which I coloured with Peeled Paint Distress Paint and added the remaining cobweb die cuts. I then crackled some Corked Vials, which Tim explains how to do, on page 54 of Compendium of Curiosities Vol III and added alcohol ink and Vial Labels to each little bottle.
I placed the bottles along the shelf, together with some cheesecloth, die cut bats and some wishbones, which I cut up and placed on a bed of Antique Linen Distress Glitter sprinkled over the top of Glossy Accents to create a mound.
I even added a couple of bottles to the top of the box and attached another die cut bat to a piece of wire and wrapped it around the bottle to give the appearance of it flying.
Finally, and we're nearly there...I hand dyed some Crinkle Ribbon with Dusty Concord and Peeled Paint Distress Stains, attached this down the side of my invite. I attached an Enameled Tag to the bow, which I coloured using Seedless Preserves Distress Paint, added a Remnant Rub over the dried paint and attached it with a Ephemera piece to the bow, using a wire pin.
...and that's my party invite for Halloween!


Thank you so much for looking and for stopping by today ~ I really hope you've enjoyed this tutorial!
See you soon, Emma x

Supplies:

Surfaces: Ranger: Black Card, Manila Card. Black Soot Core'Dinations Card, Grungeboard, Grungepaper. Purple and Grey Cardstock.

Dies: Sizzix Alterations Candlelight Fright Bigz Die, Mini Bat and Skull Movers & Shapers, Cobwebs Sizzlits Decorative Strip Die

Stamps: Carved Halloween, Odds and Ends

Ink: Dusty Concord, Peeled Paint, Old Paper, Antiqued Bronze, Picket Fence and Pumice Stone Distress Stains. Pumice Stone Distress Ink. Brushed Pewter Distress Stain Spray. Various colours of Distress Marker Pens. Jet Black Archival Ink

Alcohol Ink: Red Pepper and Pitch Black

Mediums: Multi Medium, Glossy Accents

Glitter: Black Soot Distress Glitter, Antique Linen Distress Glitter

Paint: Rock Candy Distress Crackle Paint, Black Soot Distress Paint, Peeled Paint, Seedless Preserves and Brushed Pewter

Embellishments: Halloween Apothecary Remnant Rubs, Wire Pins, Corked Vials, Wishbones, Game Spinners, Crinkle Ribbon, Expedition Ephemera Pack, Enameled Tag

Layering Stencil: Halloween

Tools: Vagabond, Ranger Craft Sheet, Watercolour Brush, Distress Marker Spritzer, Sanding Tool


Powered By Blogger

Total Pageviews