Showing posts with label DCWV. Show all posts

Monday, 7 February 2022

A Kiss From A Rose....

Hello friends...

How is everyone today? I hope you all had a great weekend and ready for the week ahead! As always on a Monday, it's time for the brand new Simon Says Stamp Monday Challenge and this week, as valentine's Day fast approaches, we are celebrating the fact that LOVE IS IN THE AIR with our fun challenge theme and the DT are also showcasing our very own Simon products within their makes.

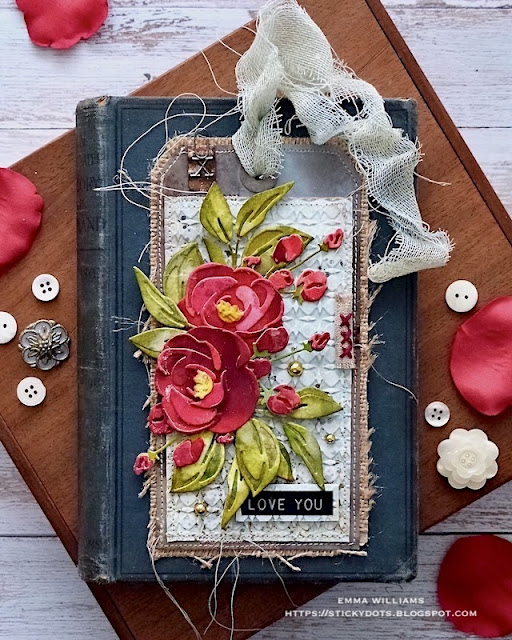
For my project, I wanted to create something that really says it all with a simple, "I love you", and I combined a SSS embossing folder, with some Tim Holtz products, which included the Sizzix Bloom Colorize Thinlits Die to make an abundance of red roses and buds that cascade down the project.


So let's get started and here's how I created my vintage style valentine's tag...

To begin with I made my background and as mentioned, I used the SSS Circle Rings Embossing Folder to emboss a piece of card Mixed Media Heavystock card that I had spritzed with Speckled Egg, Antique Linen and a touch of Frayed Burlap Distress Spray Stains. I allowed the colours to blend together before I then heat dried the card surface, placed it in the folder and then ran it through my machine.

I will never tire of how you can get such a wonderful deep impression with these folders and how you can create instant texture for a project.

I cut the card panel so it would fit on a Size 8 tag and then inked the edges of the card panel, before machine stitching a border around the outside.

Setting the panel to one side, I inked my tag and again using Distress Spray Stains, but this time combined with Oxide Sprays, I added the colour to my tag.
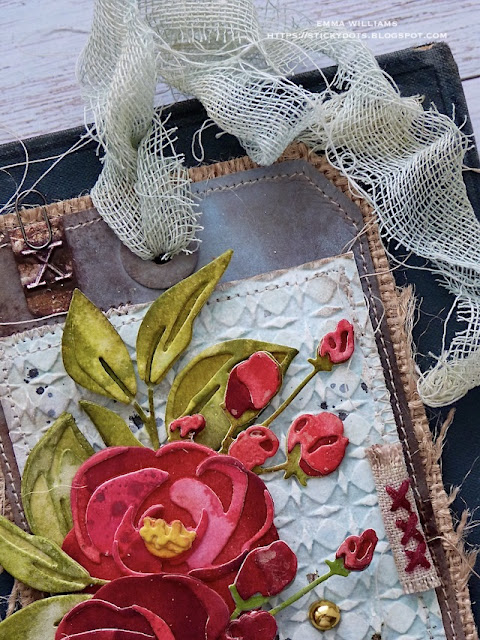
I used Ground Espresso, Antique Linen, Speckled Egg Sprays and Speckled Egg Oxide Sprays blended with water to create the background colour.

After heat drying the tag, I cut a panel of DCWV burlap paper, that was slightly larger in size and would give me a border and machine stitched the tag to the burlap.
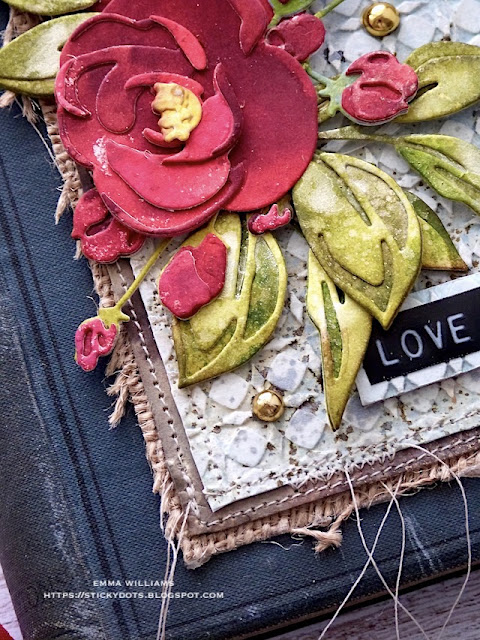
With the tag in place, I frayed the edges of the burlap and then attached the embossed panel to the tag itself using Matte Collage Medium.

Now for the cascading flowers and foliage....

...and for these I used cardstock that I spritzed with Aged Mahogany, Picked Raspberry and Barn Door Distress Spray Stains, and for the centres I chose Mustard Seed and Wild Honey. For the foliage, I used Peeled Paint, Shabby Shutters and Rustic Wilderness. Once the card was dry, I then cut the various pieces using the Bloom Colorize Die Set and assembled them to form the glorious blooms.

After inking the edges of all my die cuts with Walnut Stain Distress Ink, I attached the blooms, the buds and the foliage down the left hand side of my tag. You can see the various heights that I've created on this tag and to do this, I added some foam pads to the back of some of the die cuts, to create different dimensions.

I then needed my sentiment and this is one of Tim's Sentiment Label stickers and simply attached this to an offcut of the embossed background which I had adhered to a piece of mount board for stability.

I then adhered the mounted sentiment in the bottom right hand corner using foam pads for added height.

In the top left corner, I added a letter 'x' Type Chip, which I cut in half and attached to my tag with Collage Medium, adding the mini clip to complete this section.
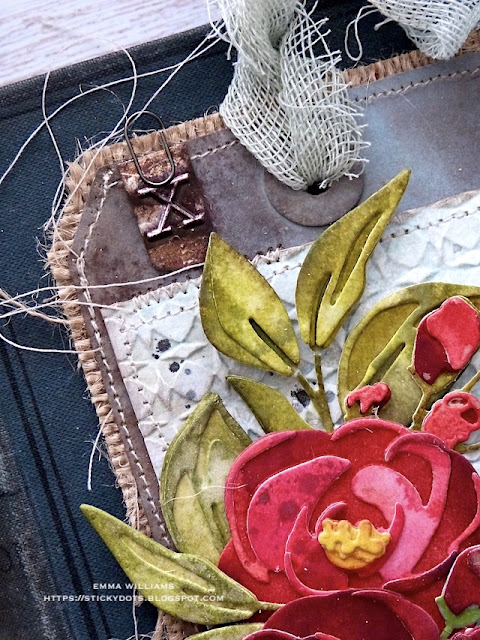
I also took a Stitched Scrap, the one that has 3 cross stitch on, but I thought they worked well as kisses, and rolled this up, before I attached it to the right hand side of the tag.

To complete the tag, I attached some gold Metallic Droplets around the floral arrangment...

...and finished with a swathe of Mummy Cloth, dyed with a combination of Speckled Egg and Antique Linen Distress Spray Stains and once the cloth was dry, I threaded it through the hole in the top of the tag.

So, that completes my make for this week and hope you love what I've made and enjoyed the techniques I've used to bring it to life!
As always, if you make anything, or if you've been inspired by anything that you've seen here on my blog ~ then please, let me know by tagging me on social media or leaving a comment here and I will be right over to take a look!

Don't forget that every week, one lucky random participant has the chance to win a $25 gift voucher from Simon Says Stamp and you can join in up to 5 times, which means you could have 5 chances to winYou have until next Monday at 8am Ohio time. 1pm UK time, 2 pm CET to join in and good luck....


Thank you so much for taking the time to stop by today ~ stay safe and keep well.
Love Emma xxx

Recipe for project:

Distress Ink: Walnut Stain
Distress Spray StainFrayed Burlap, Ground Espresso, Antique Linen, Speckled Egg
Foliage: Peeled Paint, Shabby Shutters and Rustic Wilderness
Blooms and buds: Mustard Seed, Wild Honey, Aged Mahogany, Picked Raspberry and Barn Door 
Distress Oxide Spray: Speckled Egg

Saturday, 24 July 2021

Make Magic - Simon Says Stamp Blog Hop Day 2

Hello friends and welcome to Day 2 of the Simon Says Stamp Make Magic Blog Hop...
Today, I'm really happy to be joining so many talented designers as one of the stops on this hop, (you can catch up with Day 1, HERE) and if you'd like to see this fabulous new release in full, then just pop over to Simon Says Stamp.

You might have arrived here from the extremely talented Keisha's blog, but if not and you've just popped by and would love to join us for this fun hop, then don't worry because you can head back to the beginning over on Simon Says Stamp blog.

There are so many gorgeous new products in this release, and I can guarantee you'll be spoilt for choice and feel so happy and uplifted by every single one of them.

For my card, I chose to create a project inspired by the vintage farm and agricultural posters and for this I used the Sunburst Wafer Die and Sunshine and Rainbows Sentiment Strips.
So let's get started and here's how I created this card...
I cut a panel of White Mixed Media Heavystock to measure 14.5 x 11.5cm and inked the background with Tumbled Glass and Speckled Egg Distress Inks, using a blending tool.

I then spritzed the inked panel with a light misting of water before heat drying it thoroughly.

After machine stitching a border around the outside, I mounted it onto a piece of burlap, slightly larger than the panel to create a border and adhered it with Matte Collage Medium. I followed with a panel of yellow kraft card taken from Tim Holtz's Warm Kraft Stack, adhered with SSS Tape Runner Pens before matting these layers, using foam pads, onto a panel of patterned paper from the Memoranda Paper Stash, which I then mounted onto a black card blank.
Moving onto the next stage and that glorious Sunburst Die. I used the die to cut Mixed Media Heavystock card which I then inked with Scattered Straw and Mustard Seed Distress Inks. I also blended a small amount of Crackling Campfire at the bottom of the sunburst, blending it upwards for an ombre effect and also around the edges.
With the panel inked, I then splattered water over the surface, dabbing away the excess with a paper towel and heat dried to set the ink and dry the card.
I mounted the sunburst over the top of my blue panel using foam pads to add height and dimension.
With the sunburst in place, I added the embellishment and for this I used a Tim Holtz idea-ology Milk Cap  and sanded the edges before inking them with Walnut Stain Distress Ink. I attached the milk cap in the centre of the semi circle at the bottom of the sunburst, slightly overlapping the edge. In the centre of the milk cap, I attached an Entomology Adornment from Tim Holtz's idea-ology range.

To add colour to the metal, I used Alcohol Inks ~ Gilded Alloy on the body and Aqua on the wings. I added a small amount of Mushroom over the surface to knock back the ink and add more of a vintage feel.
For the sentiment, I used one of the new Sunshine and Rainbows Sentiment Strips ~ "Sending a Little Sunshine To Brighten Your Day". I cut the strip to size and mounted it on a piece of Gold Metallic Kraft Stash card, leaving a very narrow border showing around the outside.
I attached the sentiment strip to my sunburst panel with foam pads.
To complete the card, I added some gold Metallic Droplets around the semi circle of the Sunburst Die.
...and that's my card finished! I hope you love this piece and feel inspired by the wonderful new products in the release.
Simon Says Stamp is giving away a $25 coupon to every stop on the blog hop! This means you can leave a comment here and on every stop along the way to increase your chances. Winners will be posted on the Simon Says Stamp blog on Wednesday, 28th July and all winners will need to contact/email Simon Says Stamp to claim their prize. 

Also, last but by no means least ~ if you shop during the MAKE MAGIC blog hop release, then you  can get yourself a super fun Arts Supply die for FREE, with every purchase $40 or moreThe offer is valid until 25th July at 11:59 ET, or while supplies last and the code you need to use to claim your gift, is: ARTMAGIC

Thanks so much for hopping by today, hope to see you again soon and next stop on the hop is the talented Vicky Papaioannou!

Emma xx


BLOG HOP ORDER

Emma Williams (you are here)

RECIPE FOR CARD:

Tim Holtz Ranger Ink Alcohol Inks: Aqua, Mushroom and Gilded Alloy

Monday, 18 August 2014

Discover Beauty ~ Simon Says Stamp Monday Challenge (Anything Goes)

Hello everyone...

Another busy week has flown by and another weekend is over but that means it's the start of a new week, new adventures and a brand new challenge over on the Simon Says Stamp Monday Challenge Blog, and this week ~ ANYTHING GOES!!

Yes, you can create anything you want and we can't wait to see what you make!

For my project, I created a little mini album inspired by my love of my garden. I absolutely adore making these little albums as keepsakes and as soon as I saw the new Layered Bee from Tim Holtz, I just knew that it would be perfect for this project and for once, it turned out exactly how I envisaged it in my head!!
So, here's how I made it...

To begin with, I took a couple of chipboard covers from We R Memory Keepers and covered both of these with some gorgeous burlap paper from DCWV. I gave the front cover a coat of Gesso and dried it with a heat tool before layering a piece of Tissue Wrap over the top, attaching it with Multi Medium. Once this layer was dry, I added a wash of Distress Paints and inked the edges with Walnut Stain Distress Ink. I loved how the edges frayed a little to give that really shabby look to the cover. To complete the basic cover, I then added some Idea-Ology Mini Corners to the front cover.

Now it's time to decorate and for this, I started by using the Honeycomb Framework die and die cut a piece of Grungeboard. I painted the Grungeboard with Distress Paints to give the look of verdigris and then threaded a piece of hand dyed crinkle ribbon through and attached it to my cover, using the mini attacher. I added a bow and then then hung a monocle from a wire pin, which you will see that I added a little Remnant Rub too, then attached the monocle to the centre of the bow and added some decorative pins.
The next step was to create the bee, which is die cut from Grungeboard, then embossed with the Texture Fade. 
I used Distress Paints to colour the bee and then used Black Soot Distress Ink to highlight the embossed areas of the die cut.
I then added the bee to my album cover, slightly shaped the wings to give dimension.
The final touch for the cover was to add some Alpha Parts, Remnant Rubs and a Idea-Ology word band, which I added some colour to using Antique Bronze Distress Paint and attached using Prima Mini Brads.
For the inside, I used some of the papers from the Wallflower Paper Stash and distressed them around the edge using a sanding tool. 
To complete the album, I used DCWV woven paper cardstock to create my pages, kraft tags for me to journal on and added a Stencil Mark Clip to bookmark my pages. I then punched holes into the covers and added eyelets before holding the album together with book rings, aged with Antique Bronze Distress Paint.
So now, all I need to do is fill the album with my precious garden photos and I'm going to have such a wonderful time choosing which ones to feature.
I really hope you've enjoyed this week's tutorial and I've inspired you with my mini album. As always, if you're looking for some more great ideas and inspiration, then you need to look no further than the blog to see all the wonderful creations from my very talented Design Team members and every week, one lucky random participant has the chance to win a $50 gift voucher from Simon Says Stamp. Good luck....

Thank you so much for all your visits today, I really do appreciate them all and love reading all your comments!!
See you again soon...love Emma xx


Products used:
Distress Ink ~ Walnut Stain and Black Soot
Distress Stain ~ Shabby Shutters, Tumbled GlassAntique Linen used to hand dye the ribbon
Ranger Size 8 Manila Tags


Monday, 21 February 2011

Playtime...

Just dropping by to say hello, at the start of a new week! The weekend just seemed to fly by and between guests coming over on Saturday, cooking and cleaning, it's all a bit of a blur...I'm not actually sure where this weekend went but I know it was a good one, just busy, busy, busy!

Anyway, it's Monday and that means one thing and one thing only...it's blog time! And here, is the first of my posts for the coming week and it's definitely in stark contrast to my previous post.

I was actually asked to make this card for my neighbour. They wanted a 90th birthday card for a friend who loves penguins and here it is...what could be better than these adorable penguins from Lili of the Valley!
The hardest part of this card, was to make sure it didn't look "Christmassy" but still trying to maintain the icy cold feel of winter and I thought these designer papers from DCWV, worked perfectly to capture the look I wanted!


Hope you all have a very enjoyable evening...mine is another busy one, catching up after a day spent crafting, then it will be time to collapse onto the sofa, with a glass of wine and watch Glee!
See you soon and thanks for stopping by to look at my lil creation.
Love Emma
xxx

Tuesday, 1 February 2011

The Look Of Love!

Hope everyone is having a wonderful Tuesday...and where did January go? I can't believe that we're already in February...

Today, for me, is one of those days when I seem to be procrastinating more than doing!! I have a list as long as my arm but at the moment, I'm wondering which job to start first.

But I have had some good news...all going to plan, I've got a card project which is going to be featured in the April issue of Making Cards Magazine!! I can't wait for you all to see the project that I made and I'm so excited to be a contributor to the magazine.

In the meantime, I have got to get in the mood for...L.O.V.E.!! And here's another Valentines card that I've made...hope you like it!
Once again, I chose to use black, white and red as the colour theme for this card and I think it works so well. The die cut hearts are part of a Nesties set from Spellbinders and the leaf frond is from Marianne Design Creatables, which I've used for the very first time and I'm quite impressed by them. A few matts, layers, ribbon and message tag later...and VOILA ~ the perfect card for the person you love!


Right, my favourite music is playing and I'd better go and start my jobs...sometimes, I wish I was an octopus! I really do need those extra 3 pairs of hands!!
See you soon and love to all....
Emma
xxx
Powered By Blogger

Total Pageviews