Showing posts with label Ranger. Show all posts

Monday, 27 March 2017

Let It Fly Away...

Hello friends and welcome to the brand new Simon Says Stamp Monday Challenge! This week our theme is called "Things With Wings" and whether you choose to use butterflies, birds, dragonflies, angel wings or even a plane...there are just so many interpretations of this challenge theme and we can't wait to see what you decide!

For my project, I chose butterflies...mainly because I just couldn't resist using the gorgeous new Flutter stamp set from Tim Holtz. I packed this Etcetera tag full of detail, so it's time to show you how I created this piece...

 
...it's time for a new challenge!

To begin with I took one of the smallest Etcetera tags complete with reinforcer ring that is supplied in the pack. These tags are just amazing and definitely what I've been waiting for as they are a solid surface that you can paint, decorate and do almost anything to and they withstand it all! I primed the surface with a couple of coats of gesso and heat dried it before adding my paint layers.

I started with a layer of Antique Linen Distress Paint and then whilst the paint was still wet, blended in some Pumice Stone Distress Paint. Once I was happy with the colour, I blasted the paint with some heat and then started to add more layers by scraping a further layer of gesso over the top, again drying it thoroughly before using Distress Crayons in Pumice Stone and Victorian Velvet to add some depth. I also added some Black Soot around the edges.
I blended the crayons using a semi dry baby wipe before adding my next layer...tissue tape. I ripped pieces of the tape and added them to the tag, mainly focusing on the section that would be behind my teacups. I then added some Grit Paste through the Speckles and Industrial stencils, allowed it to dry before adding more crayon and paint splatters over the top to complete my background.
Now for the teacups and these are die cut from chipboard, primed with gesso before I then painted them with Bundled Sage and Tumbled Glass Distress Paints. I added a little more texture by scraping some gesso over the top, heat drying the surface and then adding shadows and highlights with the Pumice Stone Distress Crayon. Fix the one cup inside the other and then using foam pads, I adhered it to the tag.

I then used the Garden Greens Thinlits dies to die cut some foliage that would spray out from my cup. I used a combination of card, some Mixed Media card that I coloured with Peeled Paint Distress Spray, and some Kraft Core card in contrasting colour ~ I then die cut the pieces I needed. Add the foliage to the top cup and arrange it to fall and cascade over the rim.

To complete the cups, I added a mini plaquette and a metal spoon!
Now for those gorgeous butterflies... I stamped six butterflies onto watercolour card and then coloured them with Distress Marker Pens.
I then added a touch of Wink Of Stella over the top of some areas to create a little shimmery highlight ~ I'm not a huge fan of sparkle or glitter but this creates just a subtle shimmer that catches the light perfectly.

I fussy cut around each butterfly, shaped the wings and then attached them to my tag.
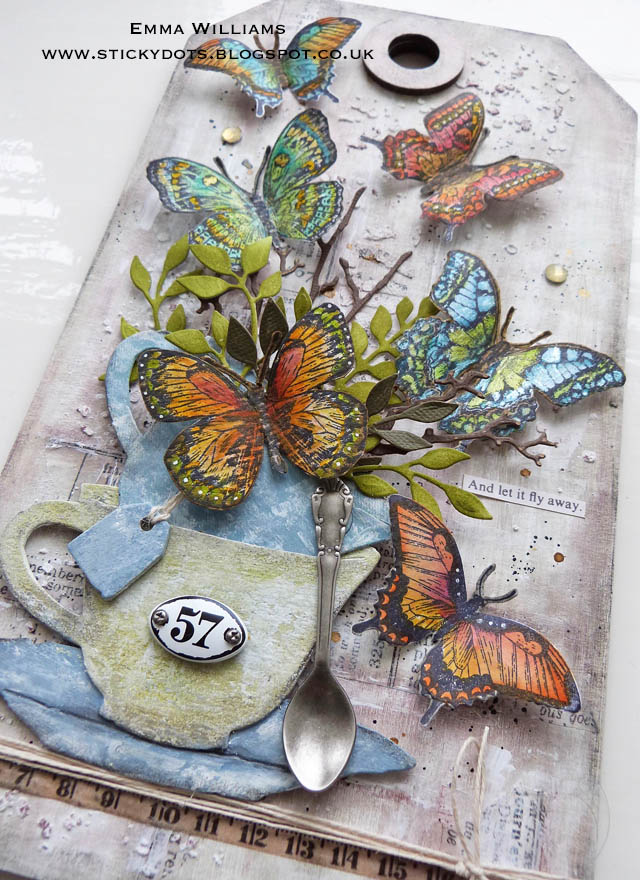
To complete the tag, I added some crystal gems and a little quote Clippings Sticker..."and let it fly away".
Finally, to ground my teacup, I added a strip of Designer Tape and then wrapped some twine around the tag, secured with a small bow.
This is one of those pieces that for me, just turned out perfectly and I am so happy with it...and I hope you love it too!
As always, if you do need any further inspiration, then you need look no further than our blog to see all the wonderful creations from all the very talented Design Team members and every week, one lucky random participant has the chance to win a $50 gift voucher from Simon Says StampYou have until Monday 8am Ohio time. 1pm UK time, 2 pm CET to join in and good luck....


Thank you so much for stopping by today and see you again very soon!
Love Emma xxx


Monday, 6 June 2016

Summertime And The Living Is Easy...

Hello everyone and if you hadn't already noticed then...yay, I'm back!!

Firstly I just wanted to say a huge thank you to Lorraine and all my teamies for their support...you are the best and to each and everyone of you who have taken the time to leave me such lovely get well messages. It really was a horrendous experience and one I NEVER want to repeat but on a good note, even though I don't recommend this diet, lol...I did lose the few extra pounds that I had gained over the winter!

Anyway, back to the day job and to this week's Simon Says Stamp Monday Blog Challenge where we have a brand new challenge starting today which is all about a Summer Garden. The team are also showcasing PaperArtsy products this week and I hope you love how I used Fresco Finish paints to create a shabby background for my vintage summer garden canvas!


and here's how I created this piece...
To begin with I took an 8" square pre-gessoed canvas. I wanted to create the look of worn wood on my background so started by applying a layer of French Roast Fresco Finish Paint over the entire surface of the panel.

Once the paint was dry, I then applied the Crackle Glaze using a palette knife and adding it over the top of the darker layer, applying it to random areas of my canvas ~ I didn't want an all over crackle, just subtle hints! Once this is dry, (and it can be gently dried with a heat gun to speed up the process if you're a bit impatient like me), I added a coat of Snowflake Fresco Finish, which I mixed with a small amount of Taupe Fresco Finish. Apply the paint all over the canvas and then sit back and watch the crackle appear!
I thoroughly dried the paint before moving onto the next stage of building up those background layers. For this, I began by adding some torn Tissue Wrap to random areas of the painted panel, attaching them with Collage Medium. I then dry brushed a small amount of paint over the top, using my fingers to blend the paint seamlessly into the background.  Once I was happy, I then went in with my Distress Crayons from Set 3 and also a touch of Peeled Paint, building up layers of colour to create the shabby feel I wanted. I added some Black Soot Crayon around the edge, again blending them out with my fingers before using an old credit card to create paint scratches with gesso.

After a few flicks of Distress Paint and wrapping some twine around the centre, my background was complete!

Now to create the centrepiece...
...and for this I began by die cutting two panels of chipboard using the Crosshatch die, which I LOVE!! I gessoed the chipboard before applying a coat of Antiqued Bronze Distress Paint over the top. Once the paint layer was dry, I added some highlights of colour using the Distress Crayons and also added flecks of shimmer using the gold foil sheets from the Vintage Foil Transfer set.
For the panel that is set in the middle, I used the largest of the Stitched Rectangle dies to cut a panel of manila card, inked around the edges with Distress Ink and then mounted it onto a panel of kraft card. I then used the slightly smaller Stitched Rectangle die to die cut a piece of canvas paper. I painted the paper using the same Fresco Finish colours as I did for the background, Snowflake White and Taupe and allowed the paper to dry before adding more depth using Distress Crayons. Once I was happy, I flicked Black Soot and Tarnished Brass Distress Paint over the paper and then mounted it onto my larger panel, adding some Dapper Design Tape to create a frame around the small inset.
I then attached my Crosshatch panels to the back of the matted rectangles and used foam pads to mount the panel onto the centre of my canvas.
For the roses, I used both stamps from the Lady Rose stamp set which I stamped onto watercolour card, watercoloured with Distress Marker Pens and then fussy cut. I also stamped the roses a second time, coloured each of them before cutting them out to layer over the top to create dimension.
I attached each of the rose pieces onto my central panel, attaching them to cascade down the lefthand side.
To complete the panel, I punched three butterflies from the Wallflower Vellum stash ~ you can see that I punched three separate pieces for each butterfly and then layered them to create a soft, floaty feel.
As a finishing touch, I added an Occasions Small Talk sticker ~ I just thought this quote was perfect for this piece and a few sparkly 28 Lilac Lane sequins from the Neutral set!!
I love how this project turned out and hope you enjoyed the creative process...
As always, if you need any further inspiration for this challenge, then you need look no further than our blog to see all the wonderful creations from all the very talented Design Team members and every week, one lucky random participant has the chance to win a $50 gift voucher from Simon Says StampYou have until Monday 8am Ohio time. 1pm UK time, 2 pm CET to join in and good luck....


Thank you so much for all your visits today and hope you all have a great week ahead
See you again soon...love Emma xx


Products used:
Tim Holtz Sizzix Dies: Crosshatch Frame, Stitched Rectangles
Tim Holtz Stamps: Lady Rose
Tim Holtz Sizzix Punches: Large Butterfly
Distress Ink: Walnut Stain, Frayed Burlap
Distress Crayons: Set 3 and Peeled Paint
PaperArtsy Fresco Finish Paints: Snowflake White, French Roast, TaupeCrackle Glaze
28 Lilac Lane: Neutral Sequins Tin


Monday, 26 January 2015

The Sky's The Limit ~ Simon Says Stamp Monday Challenge

Hey everyone!

Hope you've had a fabulous weekend and you're ready for the week ahead! Of course, a brand new week means the start of a brand new challenge over at the Simon Says Stamp Monday Challenge blog and this week is called ~ "From Up In The Clouds". Whether you are inspired to create a light and fluffy piece, use sky blue, create an art journal or quote about clouds, or if you have your own interpretation of our challenge ~ we invite you to go soaring among the clouds with us this week!

For my project, I decided to do some journaling and made a two page layout using the theme of the sky's the limit! I wanted to make the sky the feature of this piece and chose to keep the rest of the layout in tones of black, grey and brown.
To begin with, I took my Dylusions journal and painted the surface of two pages with a coat of gesso. I then applied a layer of Distress Paints over the top, using a blended combination of Broken China, Salty Ocean and Tumbled Glass.

The next stage was to add some layers and for this, I used some Tissue Wrap and stuck torn pieces to the corners of the page. I then applied some more paint over the top of the Tissue Wrap to blend the edges of the tissue into the background.
Once I was happy with the background, I then needed to start creating the sky and for this, I used a scalloped edge circle punch and punched the shape from scrap paper. I then used this punch to create the appearance of clouds by using the Mini Blending Tool and sponging small amounts of Picket Fence Distress Paint around the top edge of the scalloped edge.
To complete the background and add layers of interest, I applied some Texture Paste through the Faded Dot Stencil and added flicks of Black Soot Distress Paint before stamping directly onto the background using the alphabet stamp from the Tim Holtz Alpha Type stamp inked with Watering Can Archival Ink.
Finally, using the Black Soot Distress Marker Pen and adding it to the Distress Marker Spritzer, I spritzed the ink through the Latticework stencil, directly onto random areas of the pages and that's the background finished!
For the next stage, I stamped the Bird in Flight stamp using Jet Black Archival Ink onto the background on the left hand page and coloured it with a wash of Gathered Twigs Distress Paint.
I used the Industrious Stickers and Chit Chat Stickers to add the wording to the right hand side and added Remnant Rubs to various sections of the pages.
I added some Tissue Tape, Sprocket Gears painted with Distress Paints to give a rusty appearance, sequins and enamel dots to complete the pages...
...before attaching a Prima Cartographer Typewriter Key to the top of the page.
Don't forget that if you're looking for some more great ideas and inspiration for this challenge, then you need to look no further than the blog to see all the wonderful creations from all the very talented Design Team members and every week, one lucky random participant has the chance to win a $50 gift voucher from Simon Says Stamp. Good luck....


Thank you so much for all your visits today and hope you all have a great week ahead
See you again soon...love Emma xx


Products used:

Stamps: Tim Holtz Stampers Anonymous Alpha Type, Flying Bird
Layering Stencils: Latticework, Dot Fade
Distress Marker Pen: Black Soot
Corrugated card, antique button and acetate from my own collection


Monday, 19 January 2015

Winter Stamping ~ Simon Says Stamp Monday Challenge

Hi everyone and welcome to another week and a new Simon Says Stamp Monday Challenge! Can you believe how fast the past week has flown? It seems only a minute ago I was writing up last week's blog post ~ crazy!!

Anyway, this week's challenge is all about Winter Stamping! With the holidays well behind us and spring seeming so far away, let's focus on the season at hand. Will you stamp a snowy scene? Try a new use for a snowflake stamp? Perhaps be inspired by the colours of winter in your ink choice ~ however you decide to get stamping, we can't wait for you to share and join us!

For my project, I was inspired by the movie, Frozen! I watched it for the first time over the Christmas period, (yes, I know I'm a little behind and that is very remiss of me being such a huge Disney fan) ~ and I loved it but was most inspired by the beautiful soft blue colour palette, the icy, frosty feel of the movie and of course, Olaf and that's why I created this tag! As always, I hope you love it!

To begin with, I created the tag background and for this I used a Giant Manila tag and applied Picket Fence Distress Paint over the entire surface, heat dried it and then spritzed the tag with Brushed Pewter and Faded Jeans Distress Spray Stain to give a marbled effect.

After having a think about the design, I decided to turn the tag upside down and die cut the bottom edge (which is now the top) using the Torn Notebook On The Edge Die before mounting it onto white corrugated card stock.

I then started work on the background for my scene and began by using a piece of white stamping card and stamping the entire card with the Holiday Knits stamp by Tim Holtz inked with clear embossing ink. I then applied white embossing powder over the top and heat embossed to create a resist for the next stage. I then used Stormy Sky and Faded Jeans Distress Ink over the top of the embossed surface and gently buffed up the white embossed area with a dry cloth to remove any stray ink.
After mounting the background onto a piece of blue Gauze Paper, I distressed the edges and then layered it over some cheesecloth and attached it to my tag background.

Now to create the scene and for this I stamped the Blueprint Snowman, stamped onto white card and coloured the image with Distress Marker Pens before cutting around the snowman.
For the snowman's eyes, I used small black pearls.
I then added the stamped image to a backdrop of Holiday Greens die cut from card coloured with Iced Spruce and Brushed Pewter Distress Spray Stains.
The snowflakes are die cut from acetate covered with Frosted Film, which I then coloured by blending the surfaces with Cornflower Archival Ink. I set the ink with a heat gun and then add small amounts of Picket Fence Distress Paint to give a snowy appearance and a sequin in the centre of each.
I attached the snowflakes to my scene, together with some more torn cheesecloth and some Seasonal Chit Chat Stickers before adding a Flash Card attached to a Memo Pin.
Finally, I coloured some Crinkle Ribbon with Tumbled Glass and Broken China Distress Stain and tied it into a big bow at the bottom of my tag, adding two small skates and an antique button, both stained with Picket Fence Distress Paint to complete the project.
I really hope you've been inspired by my winter stamping project and can't wait to see what you create!
Don't forget that if you're looking for some more great ideas and inspiration for this challenge, then you need to look no further than the blog to see all the wonderful creations from all the very talented Design Team members and every week, one lucky random participant has the chance to win a $50 gift voucher from Simon Says Stamp. Good luck....


Thank you so much for all your visits today and hope you all have a great week ahead
See you again soon...love Emma xx


Products used:

Distress Paint: Picket Fence
Distress Stain: Broken China, Tumbled Glass
Distress Spray Stains: Iced SpruceBrushed Pewter, Faded Jeans
Corrugated card, antique button and acetate from my own collection


Powered By Blogger

Total Pageviews