Showing posts with label Bloom. Show all posts

Monday, 7 February 2022

A Kiss From A Rose....

Hello friends...

How is everyone today? I hope you all had a great weekend and ready for the week ahead! As always on a Monday, it's time for the brand new Simon Says Stamp Monday Challenge and this week, as valentine's Day fast approaches, we are celebrating the fact that LOVE IS IN THE AIR with our fun challenge theme and the DT are also showcasing our very own Simon products within their makes.

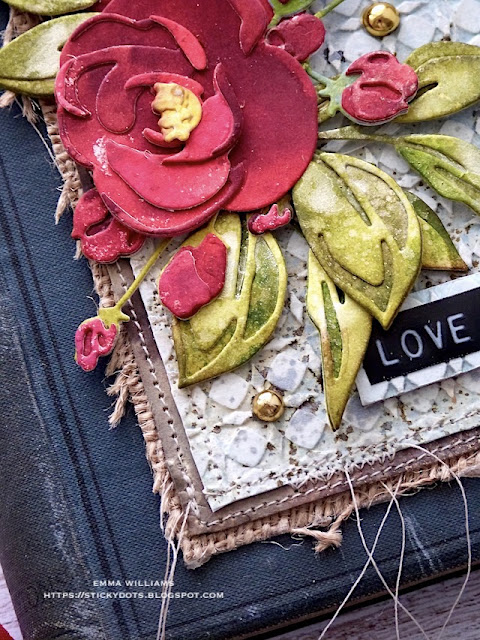
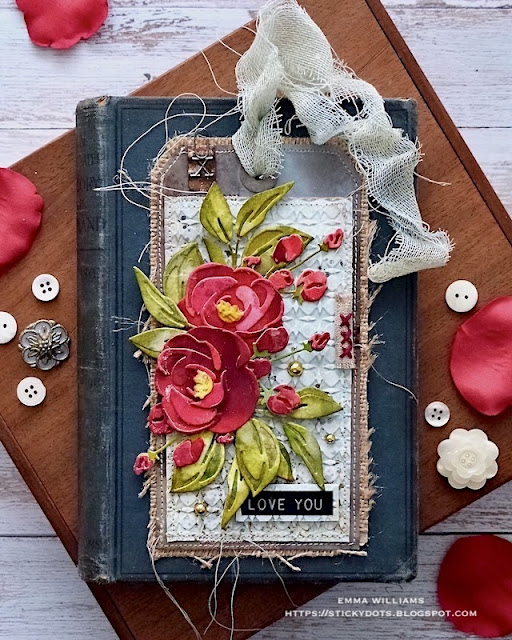
For my project, I wanted to create something that really says it all with a simple, "I love you", and I combined a SSS embossing folder, with some Tim Holtz products, which included the Sizzix Bloom Colorize Thinlits Die to make an abundance of red roses and buds that cascade down the project.


So let's get started and here's how I created my vintage style valentine's tag...

To begin with I made my background and as mentioned, I used the SSS Circle Rings Embossing Folder to emboss a piece of card Mixed Media Heavystock card that I had spritzed with Speckled Egg, Antique Linen and a touch of Frayed Burlap Distress Spray Stains. I allowed the colours to blend together before I then heat dried the card surface, placed it in the folder and then ran it through my machine.

I will never tire of how you can get such a wonderful deep impression with these folders and how you can create instant texture for a project.

I cut the card panel so it would fit on a Size 8 tag and then inked the edges of the card panel, before machine stitching a border around the outside.

Setting the panel to one side, I inked my tag and again using Distress Spray Stains, but this time combined with Oxide Sprays, I added the colour to my tag.

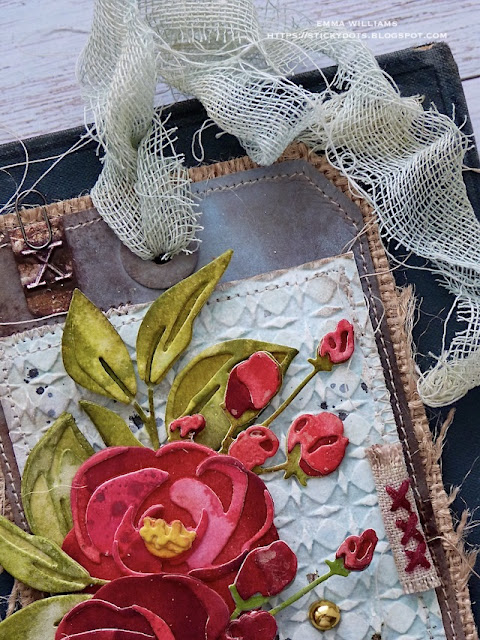
I used Ground Espresso, Antique Linen, Speckled Egg Sprays and Speckled Egg Oxide Sprays blended with water to create the background colour.

After heat drying the tag, I cut a panel of DCWV burlap paper, that was slightly larger in size and would give me a border and machine stitched the tag to the burlap.

With the tag in place, I frayed the edges of the burlap and then attached the embossed panel to the tag itself using Matte Collage Medium.

Now for the cascading flowers and foliage....

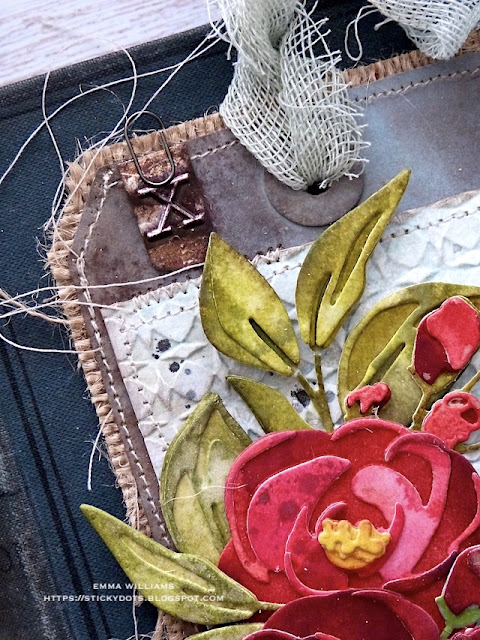
...and for these I used cardstock that I spritzed with Aged Mahogany, Picked Raspberry and Barn Door Distress Spray Stains, and for the centres I chose Mustard Seed and Wild Honey. For the foliage, I used Peeled Paint, Shabby Shutters and Rustic Wilderness. Once the card was dry, I then cut the various pieces using the Bloom Colorize Die Set and assembled them to form the glorious blooms.

After inking the edges of all my die cuts with Walnut Stain Distress Ink, I attached the blooms, the buds and the foliage down the left hand side of my tag. You can see the various heights that I've created on this tag and to do this, I added some foam pads to the back of some of the die cuts, to create different dimensions.

I then needed my sentiment and this is one of Tim's Sentiment Label stickers and simply attached this to an offcut of the embossed background which I had adhered to a piece of mount board for stability.

I then adhered the mounted sentiment in the bottom right hand corner using foam pads for added height.

In the top left corner, I added a letter 'x' Type Chip, which I cut in half and attached to my tag with Collage Medium, adding the mini clip to complete this section.

I also took a Stitched Scrap, the one that has 3 cross stitch on, but I thought they worked well as kisses, and rolled this up, before I attached it to the right hand side of the tag.

To complete the tag, I attached some gold Metallic Droplets around the floral arrangment...

...and finished with a swathe of Mummy Cloth, dyed with a combination of Speckled Egg and Antique Linen Distress Spray Stains and once the cloth was dry, I threaded it through the hole in the top of the tag.

So, that completes my make for this week and hope you love what I've made and enjoyed the techniques I've used to bring it to life!

As always, if you make anything, or if you've been inspired by anything that you've seen here on my blog ~ then please, let me know by tagging me on social media or leaving a comment here and I will be right over to take a look!

Don't forget that every week, one lucky random participant has the chance to win a $25 gift voucher from Simon Says Stamp and you can join in up to 5 times, which means you could have 5 chances to winYou have until next Monday at 8am Ohio time. 1pm UK time, 2 pm CET to join in and good luck....


Thank you so much for taking the time to stop by today ~ stay safe and keep well.
Love Emma xxx

Recipe for project:

Distress Ink: Walnut Stain
Distress Spray StainFrayed Burlap, Ground Espresso, Antique Linen, Speckled Egg
Foliage: Peeled Paint, Shabby Shutters and Rustic Wilderness
Blooms and buds: Mustard Seed, Wild Honey, Aged Mahogany, Picked Raspberry and Barn Door 
Distress Oxide Spray: Speckled Egg

Monday, 8 February 2021

Love, In Our Hearts...

Hello friends!

Hope you've all had a wonderful weekend and you're now refreshed and ready for a new week ahead! As always, the start of a new week means a brand new Simon Says Stamp Monday Challenge and this week our theme is called RESIST IT! So whether you use a resist technique, resist products or just can't resist using a certain product that you love, the DT can't wait to see what you create and we're looking forward to you joining us and playing along.

For my project, I couldn't resist using and trying out Tim Holtz's newest colour to join the Distress family, Kitsch Flamingo and yep, I really did use this throughout the whole process of creating this tag booklet all about love and combining Sizzix, idea-ology, Stampers Anonymous and plenty of Ranger products to bring the story to life.

So, let's get started and here's how I felt the love in the air and made this tag book!


To begin with I created my tags...

I used 3 size 8 Mixed Media Heavystock Tags and inked two with the same colours of Distress products, these will be placed on the left and right, and the third one was inked in a lighter shade and this will sit in the centre.

Starting with the two outer tags, I began by using my resist technique ~ I wanted a very subtle effect on the background and for this I used Distress Micro Glaze which I applied with a blending tool through the Bouquet Mini Layering Stencil. For this you need a minimal amount of product on your tool, any excess just dab away on your glass mat and then just gently apply the medium thought the stencil. Once this was done, I lightly misted some water over the tags, then applied the colours using Distress Spray Stains and Oxide Sprays; Walnut Stain, Frayed Burlap and Kitsch Flamingo Distress Spray and Kitsch Flamingo Oxide Spray. The colours will blend, the resist will appear and you should also notice some oxidisation between the sprays which gives such a cool effect.


You can play around with the sprays until you reach the colour you love, it will very rarely be the same twice and once I was happy with my blend, I set these aside to dry and moved onto the third tag.

I applied some of the Distress Micro Glaze through the Floral Stencil directly onto the tag and once again I wanted a very subtle effect ~ just a hint of the resist showing once I applied the inks.

For this tag I used the following sprays; Antique Linen, Frayed Burlap, Speckled Egg, Kitsch Flamingo, together with Speckled Egg (the blue loving side of me just couldn't resist a touch of this colour) and Kitsch Flamingo Oxide Sprays.

After spritzing the inks with a light misting of water, I then allowed the tag to dry before adding some stamped layers using the calligraphy stamp from The Poinsettia set.

Taking all three tags, I placed each one in front of me in a line ~ the two darker tags on the outside of the lighter tag and then flipping them over, I attached each tag to the next using Design Tape to secure them.

I finished by machine stitching a line down the sides of each tag to add strength so that these tags stay in place and also did some fancy zig zag stitching for added decorative purposes.

I haven't got a photo of this but to neaten up the backs of the tags, I cut decorative paper to match the shape of each tag and just adhered these into place ~ it's not necessary but just finishes the book nicely.

Right, I now have my booklet ready to embellish....

...and let's start with the gorgeous pink flowers.

As I mentioned, I couldn't resist trying out Kitsch Flamingo when it arrived on my doorstep on Tuesday and after testing out the sprays on some Heavystock card, I used this to die cut three separate flowers using the Sizzix Bloom Colorize Thinlits Die Set by Tim Holtz.

You do need to build up the layers of each flower but that doesn't take any time at all ~ it's quite quick and once I had my layers adhered, I just added the centres of each flower ~ I cut these from the same colour of card as I used on the leaves.

For the leaves, I coloured some more of the heavystock card using Peeled Paint, Crushed Olive and Bundled Sage Distress Spray Stains and then cut my leaves from the card which I dried thoroughly.

With the tag closed up, I arranged the die cut flowers on the front using foam pads to add dimension and then tucking the leaves in amongst them.

I then took a piece of mica and placed this onto the centre of the flowers, attaching it with Matte Collage Medium.

For my next layer, I used a Vintage Photo Booth image ~ I distressed the edges of the photo before inking it with Walnut Stain and then machine stitched down each side. I then adhered my photo over the top of the mica piece.

Finally, I took one of the Optical Lens idea-ology pieces and accentuated the number on the handle using a little of the (yep, you've guessed it) Kitsch Flamingo Distress Paint before attaching it over my photo with Collage Medium.

To complete this front panel, I added some Clippings Stickers, "Love, in our hearts", in the bottom right hand corner.

Opening up the tag booklet and placing it in front of me I then added all the little details to the rest of the tag booklet.

On the central section I added a stamp ephemera piece from the Field Notes set and attached this on the left hand side. I then stamped the postmark over the stamp, inking up the stamp from the Field Notes stamp set with Black soot Archival Ink.

I also added another detail in the bottom right hand corner.

On the third panel I took one of the Stitched Scraps and machine stitched this into place on the right hand opening side of the tag.

As a finishing touch, I added some Type Chips, the 1 and 4 and I cut each of these in half before attaching them to my tag. Just beneath these I popped a little mirrored heart from my stash, which I altered with some Mushroom Alcohol Ink and then completed the tag with a Tiny Clip, clipped to the numbers.

Finally, I wanted some texture and for this I used Mummy Cloth which I dyed using more of the Kitsch Flamingo Distress Spray Stain and a smidge of Frayed Burlap Stain. Once it was dry, I threaded it through the hole in the top of the first tag, and added a mini pin.

So that see's this week's project completed and I hope you've enjoyed the walk through of how I created this tag booklet and all the embellishments with that added touch of pink! As always, if you've been inspired by anything that you see here on my blog, please just tag me on my social media or leave a message so I can pop by to take a look ~ I always love to see your work!

Don't forget that every week, one lucky random participant has the chance to win a $25 gift voucher from Simon Says Stamp and you can join in up to 5 times, which means you could have 5 chances to winYou have until Monday 8am Ohio time. 1pm UK time, 2 pm CET to join in and good luck....


Thank you so much for taking the time to stop by today ~ stay safe and keep well.
Love Emma xxx

Powered By Blogger

Total Pageviews