
Happy Monday everyone and hope you all had a fabulous weekend! Today, I'm back with my regular Simon Says Stamp Monday Challenge Blog Post and this week the DT are showcasing SSS products and combining it with our theme, HAPPY BIRTHDAY because this month is a very special month ~ SSS are celebrating their 9th birthday and we hope you'll join us to congratulate them!
When it comes to birthdays, I think most of us send a card and that's why I chose to use some of Simon's goodies from some of their latest releases, including the gorgeous Filigree Wreath Die and combined these with some Tim Holtz, Stampers Anonymous and Sizzix products to create this card project, perfect for all those people who love vintage pieces.

So, let's get started and here's how I made this vintage style birthday card...


To begin with I created the background and the first layer of my card...
I cut a panel of Mixed Media Heavystock card, measuring 13 x 17cm and I began by adding some vintage colour and applied Pumice Stone Distress Ink to my glass mat. After spritzing the ink with water, I dragged the card through the ink and then heat dried the card. I usually go back in for a double, or even triple dip to make sure that I get every drop of ink from the glass mat before heat drying the card again and moving on to the next layer, Old Paper Distress Oxide Ink. Once again, I smooshed the ink onto the glass mat, spritzed and then picked up the colour onto my card by dipping, not dragging. Once again, I picked up as much ink as the card would take by keep dipping it into the colour. Finally, I applied another layer of Pumice Stone DI onto the card, using the same technique but this time just dipping the card into the misted inks, not dragging it through.
After heat drying the card, I placed the Filigree Wreath SSS Die onto the card and ran the panel through my die cutting machine to cut the decorative wreath into the card.
I then took the Entomology Script stamp and inked it with Hickory Smoke Archival Ink, stamping the script onto random areas of my card. For the next inky layer, I took the Gradient Dot Layering Stencil and inked through the stencil using Frayed Burlap Distress Oxide Ink. I then spritzed the card with a light misting of water and heat dried the panel.

Using one of the leaf stamps from the Nature's Wonder Stamp Set, I stamped the leaf design over the background panel using Vintage Photo Archival Ink before inking the edges of the card panel with Walnut Stain Distress Ink. To complete the card panel, I added some machine stitching around the edge to create a border.
For the final stamped layers I used the Paris Postmark stamp that I stamped in the top right hand corner and then added No. 1411 from the Correspondence Stamp Set and popped that in the bottom left hand corner.

I had a piece of card that I found in my stash that was inked with some Distress Oxide Inks, (sorry I can't remember the colours but the overall card colour was definitely Picked Raspberry, lol) and placed this piece of card behind the die cut section of the background panel ~ you can see the colour just peeking through.

I then matted the background onto pink Classic Kraft card, followed by a panel of card that I applied some Design Tape around the edge to create patterned paper, followed by a layer of card inked with Old Paper Oxide Ink. I then matted the layers onto kraft card before attaching it to my black card blank.

For the Wildflower Bouquet, I cut my flowers from Distress Watercolour Card and then coloured them with Distress Marker Pens ~ a combination of Picked Raspberry, Wilted Violet, Shaded Lilac, Peeled Paint, Bundled Sage and Squeezed Lemonade.
I then arranged the flowers into a bouquet and tied them together with a piece of twine, which has an addition of a small key adornment, altered with a little Distress Paint and a SSS Sentiment Strip, Happy Birthday!


I attached the bouquet to my card front, adding some carefully hidden foam pads at the back of the flowers so that it would create a small amount of dimension.

For the final touch, I added some bees, stamped onto watercolour card using the Entomology Stamp Set and then die cut with the corresponding die set.
 I then coloured each bee with Distress Marker Pens before adding a Wink Of Stella shimmer to the wings.


I attached the bees to my card with foam pads, placing them all around the bouquet of flowers.

Finally, I added some Strawberry Shortcake Sequins around the arrangement...
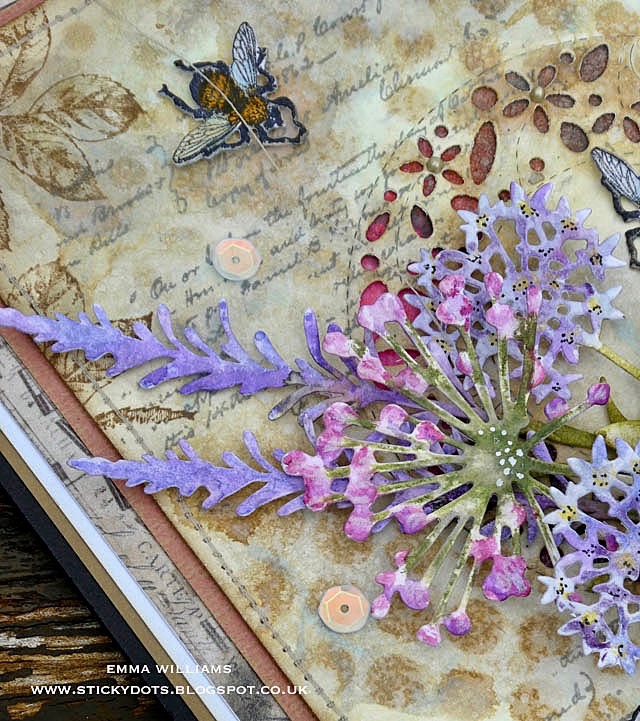
...before adding some Nuvo Crystal Drops onto the Filigree Wreath Circle.

So, that's it from me for today and I hope you've loved the card I've made because I really enjoyed creating it!
Have fun creating your projects and don't forget, you can find more inspiration from my talented teamies over on the challenge blog and every week, one lucky random participant has the chance to win a $50 gift voucher from Simon Says Stamp. You have until Monday 8am Ohio time. 1pm UK time, 2 pm CET to join in and good luck....


Thank you so much for taking the time to stop by today and hope to see you again soon, love Emma xxx
Recipe for project:
SSS Products: Filigree Wreath, Simon Says Stamp Sentiment Strips, Strawberry Shortcake Sequins
Tim Holtz/Stampers Anonymous: Correspondence, Entomology, Paris Postmark, Gradient Dot Layering Stencil
Tim Holtz/Sizzix: Wildflower Stems, Wildflower Stems 2, Entomology, Nature's Wonder
Distress Oxide Inks: Old Paper, Frayed Burlap
Tim Holtz Archival Inks Kit 3
Distress Inks: Old Paper, Pumice Stone
Tim Holtz/Sizzix: Wildflower Stems, Wildflower Stems 2, Entomology, Nature's Wonder
Distress Oxide Inks: Old Paper, Frayed Burlap
Tim Holtz Archival Inks Kit 3
Distress Inks: Old Paper, Pumice Stone


That is one beautiful vintage card, Emma! Love how you use the wreath die in the background, and the detail you added in to some of those flowers! hugs, Maura
ReplyDeleteBeautiful!
ReplyDeleteHow gorgeous! I love the colouring on your flower heads and those bees zooming in to taste the nectar... I guess that's what you call "making a beeline for it"! Happy birthday!
ReplyDeleteAlison x
Your card is just gorgeous Emma. So many great layers of paper, the awesome bouquet of flowers and the adorable bees around the flowers. Pretty enough to frame. Thanks for sharing this with us. 😍😍😍😍
ReplyDeleteYour birthday is really pretty! I love that hint of pink peeking out and those flowers have never been more beautiful! Quite inspiring!
ReplyDeleteYour cards are always of a bespoke quality ,Emma and this one most certainly has it . The vintage feel of your gorgeous backgrounds, the delicate colours of your beautiful floral spray and your lovely buzzing bees make for such a wonderful card .
ReplyDeleteHugs x
So very gorgeous...that bouquet!!! Wow1
ReplyDeleteHi there~ first I wanna say, beautiful work! I'm new to mixed media, so I have what may be a stupid question... when you say ‘dipping’ vs. ‘dragging through’, did you ‘dip’ the entire piece or just a few select areas?
ReplyDeleteHi Shelly... Thank you so much for your sweet words about my work and welcome to the world of mixed media, hope you enjoy it! It's not a stupid question at all and the difference between dragging the card through the inks and dipping just makes subtle differences. By dragging the card through the inks, you will get more coverage to the card surface, you can probably colour the entire piece of card in just a couple of passes which is how I apply the ink to the card surface to begin with. I'll then add some more ink to my glass mat, spritz it with water which will create little inky pools and just dip the card quickly and very lightly into the inky pools, it will just pick up the ink in the select areas (not the entire piece) you want, giving you more control over where you place it and how the finished piece will look! Hope that helps and if you need to ask anything else, don't hesitate. Happy crafting
DeleteSimply stunning! I really love the bees. Your vintage style just beautiful
ReplyDeleteWow this is such a gorgeous card! So much work in there!
ReplyDelete